User Manual
4ms Pingable Envelope Generator (PEG)
Intro
Description
Getting Started With PEG
Parameters
Inputs
Outputs
Parameters, Indicators, Inputs and Outputs
The PEG Module In Use
Credits
The 4ms Pingable Envelope Generator (PEG) is a dual envelope generator whose envelope lengths are set by the time between external clock pulses or “pings”. The dual envelopes are of simple two-stage, rise-and-fall design, and can be used in cycle mode as LFOs. When gated it can also serve as a simple rise-sustain-fall (or ASR) envelope, commonly used in monophonic synths of the 70s.
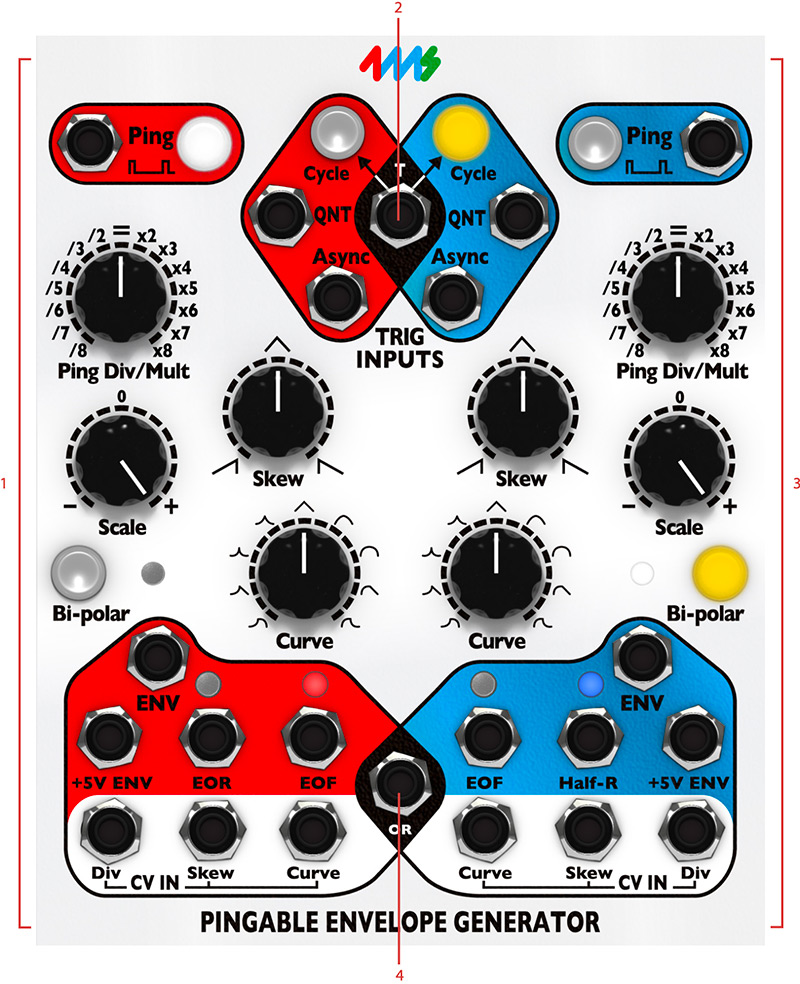
Click here to view the full-sized image in a new tab
- Red channel
- Toggle for both channels
- Blue channel
- Combined output
PEG consists of two identical envelope channels, Red and Blue. They can be used independently or via the mixed (OR) output.
In PEG, CV control over envelope shape, skew and ping (clock) division/multiplication per envelope channel (Red/Blue) is possible. PEG features a multitude of different triggering and cycling options (AD, AR, quantization, cycle, cycle toggle) as well as different level stage trigger outputs (EOR, EOF and Half-R).
Each of the envelope channels also features a Tap tempo button for manual pinging.
The firmware features used in the PEG firmware version 4.3 are all emulated by Softube except the 2 second tap clear feature and System Mode (factory presets are being used).
1. Set the tempo of an envelope channel by repeatedly clicking on one of the ping buttons at the top of the PEG module. “Pinging” an envelope channel will set the internal tempo for that envelope and determine its overall length. An envelope channel can also be “pinged” by patching an external clock into its Ping input jack.
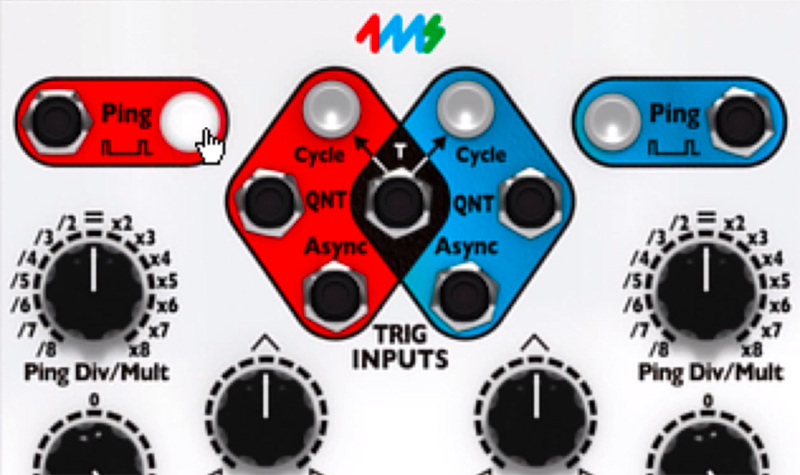
2. Use the pinged envelope channel as a rise-sustain-fall (same as an ordinary ASR) envelope by patching a gate into the Async jack. Now, when a gate appears on the Async jack, the rise-portion of the envelope will play through and the envelope will then stay at its maximum level (i e sustain level) until the gate is released. When the gate is released, the fall-portion of the envelope will be initiated and played through.
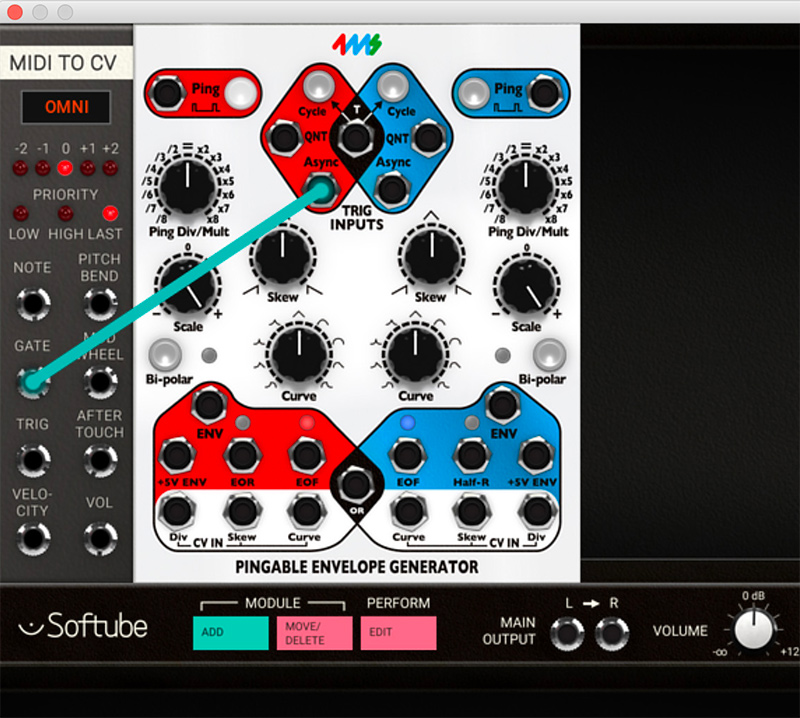
3. PEG does not normally produce sound on its own, so patch the PEG Envelope CV output to the whatever module you want to modulate. This could be the pitch of a oscillator, the cutoff frequency of a filter or a voltage controlled amplifier (VCA), just to mention the most common use-cases.
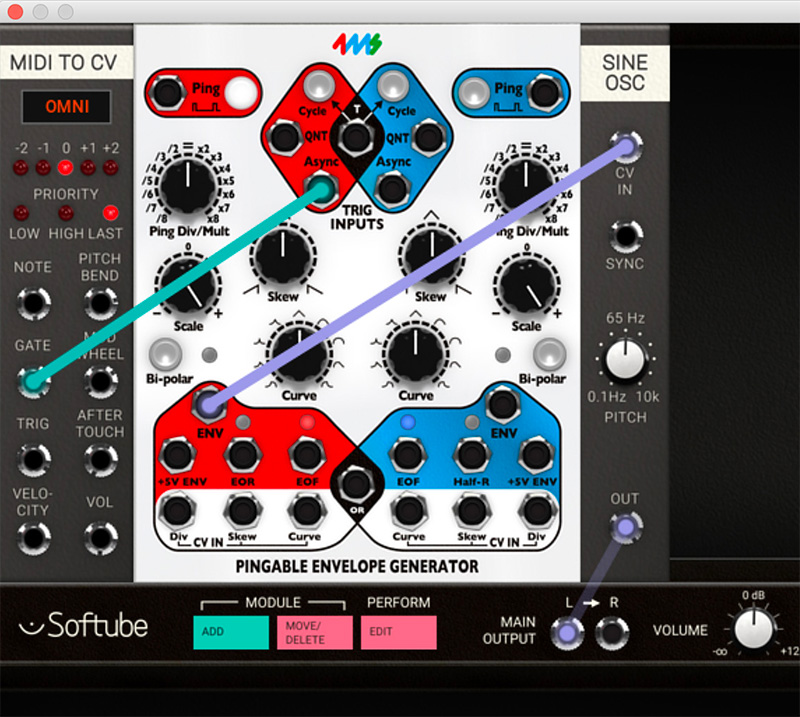
4. The output envelope amount can be adjusted by using the Scale knob. It can also be used to invert the output envelope CV.
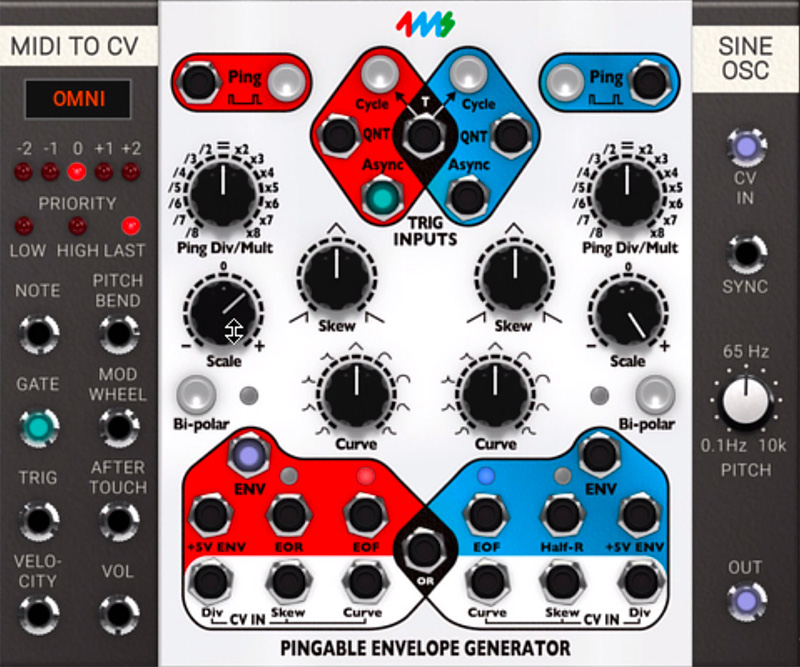
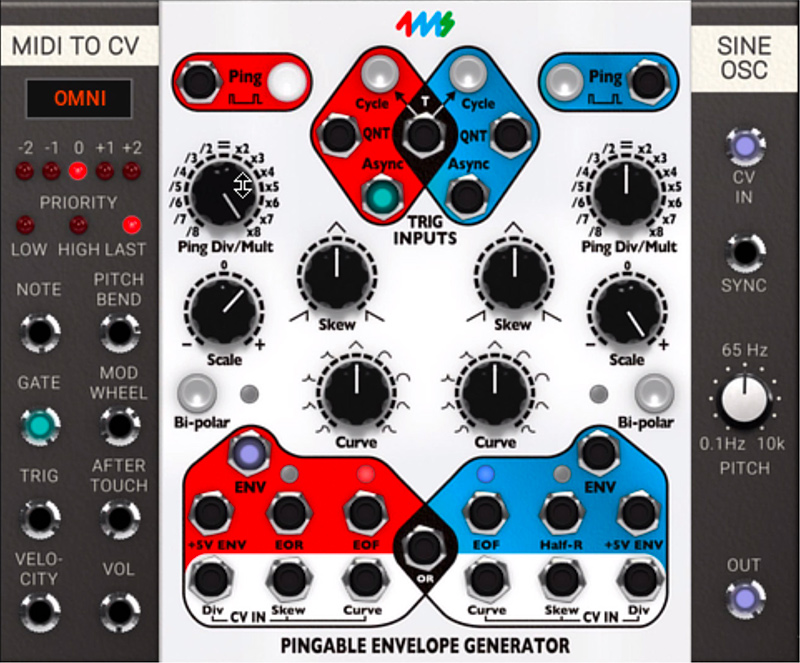
5. Experiment with different envelope lengths by “pinging” the envelope at different tempos. You can also change the speed by turning the Ping Div/Mult knob to set the envelope to be up to 8 times faster or slower then pinged tempo. Changing the Curve or Skew of the envelope will not affect the overall rise and fall time, only the balance between the two.
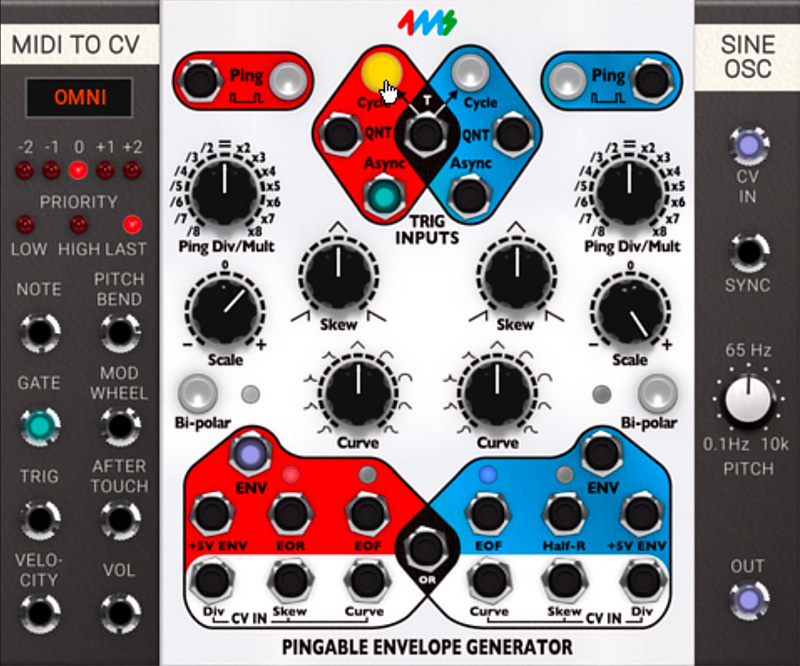
6. Use the cycle function by clicking on the Cycle button at the top if you want the envelope to keep on repeating independently. This is great when you want to use PEG as an LFO.
Red Tap Button
This is the manual tap tempo button for the Red envelope channel. Manually “ping” the red envelope channel to a certain tempo by repeatedly clicking on this button. The button will flash in sync with tapped tempo.
Note: Pinged PEG tempos are saved in a Modular patch, but the phase difference between the two envelope channels (or other PEG modules) will not be saved. This is to avoid other (in our opinion worse) side effects of saving the phase and this can make patches using cycle sound different when loaded than compared to when they were saved.
Red Cycle Button
This turns Red envelope cycle on and off. When cycle is enabled the envelope will keep on triggering on every ping.
Blue Cycle Button
This turns Blue envelope cycle on and off. When cycle is enabled the envelope will keep on triggering on every ping.
Blue Tap Button
The manual tap tempo button for the Blue envelope channel. “Ping” the red envelope channel manually in a certain tempo by clicking on this button. The button will flash in sync with tapped tempo. If more than two clicks are received, the average time between the three latest clicks will set the pace of the envelope (unless the third click occurs more than 50% different than the timing period of the first two clicks).
Red Ping Div/Mult Knob
The Div/Mult knob sets the offset division or multiplication of the pinged tempo of the Envelope. If this knob is set to “=” (preset value), no division or multiplication takes place. Division makes the output envelope times longer (up to 8 times longer) and Multiplication makes the output envelope times shorter (down to a 1/8 of pinged timed).
Blue Ping Div/Mult Knob
The Division / Multiplication offset for the Blue envelope generator (see description above).
Red Skew Knob
The Red Skew knob sets the proportion between the rise and fall times of the Red envelope generator. All the way counter-clockwise the rise portion is the dominant (longer) part. With the Skew knob set at 12 o'clock both portions are equal and with the Skew knob set all the way clockwise the fall portion becomes the dominant (longer) part.
Red Skew Knob
The Blue Skew knob sets the proportion between the rise and fall times of the Blue envelope generator in a similar manner as the Red Skew knob (see description above).
Red Scale Knob
This knob sets the envelope amount and polarity output at the ENV (red) output jack. With the Red Scale knob set all the way counter-clockwise, the ENV (red) output will output a fully inverted (negative) envelope shape (-10V), while the knob set at 12 o'clock (0), will produce no envelope output at the ENV (red) output jack. Fully clockwise (preset position) will produce a full positive envelope output (+10V) at the ENV (red) output. The +5V ENV (red) output jack is not affected by the Red Scale knob and will always output a fully positive envelope shape.
Blue Scale Knob
The Blue Scale knob has a similar behavior as the Red Scale knob but will of course affect the ENV (blue) output jack instead (see description of the Red Scale knob above). The +5V ENV (blue) output jack is not affected by the Blue Scale knob and will always output a fully positive envelope shape.
Red Bi-Polar Button
When engaged, this button centers the Red envelope around 0V with a approximate span of -5V to +5V.
Red Curve Selection
This knob selects the desired envelope-curve for the red envelope from a plethora of 17 different exponential, linear and logarithmic waveforms. As you turn the knob clockwise the first 4 curves are asymmetrical with exponential attacks and different decays, while the next 4 curves are symmetrical, ranging from exponential to logarithmic in 4 interpolated steps. Middle curve is linear (triangle wave). Curves 10 to 13 are symmetrical, ranging from linear to logarithmic, and the last 4 curves are asymmetrical with logarithmic attacks and varying decays (logarithmic to exponential).
Blue Curve Selection
This knob selects the desired envelope curve for the blue envelope with a similar function (see description above).
Blue Bi-Polar Button
This button centers the Blue envelope around 0V with an approximate span of -5V to +5V.
Tip: Use envelope Cycle mode if you want a PEG channel to work as an LFO.
Red Ping LED
This LED button indicates the pinged tempo of the Red Envelope with tempo alterations set by the Red Div/ Mult knob.
Red Cycle button LED
This LED button indicates whether or not the Red Envelope is in cycle mode or not (see further description above).
Blue Cycle button LED
Indicates whether or not the Blue Envelope is in cycle mode or not (see further description above).
Blue Ping LED
Indicates the pinged tempo of the Blue Envelope with tempo alterations set by the Blue Div/Mult knob.
Red Bi-Polar button LED
This LED button indicates if Bi-Polar mode engaged for the Red Envelope or not.
Red Envelope LED
This LED lamp reflects the output of the +5V ENV (red) jack and thus does not reflect amount or polarity of the ENV (red) output.
Blue Envelope LED
This LED lamp reflects the output of the +5V ENV (blue) jack and thus does not reflect amount or polarity of the ENV (blue) output.
Blue Bi-Polar button LED
Indicates if Bi-Polar mode is engaged for the Blue Envelope or not.
Red EOR LED
When the red envelope finishes the rise portion of its cycle, the EOR (red) output goes high (+5V) and this LED is lit.
Red EOF LED
When the red envelope finishes the fall portion of its cycle, the EOF (red) output goes high (+5V) and this LED is lit.
Blue EOF LED
When the blue envelope finishes the fall portion of its cycle, the EOF (blue) output goes high (+5V) and this LED is lit.
When the blue envelope finishes the fall portion of its cycle, the EOF (blue) output goes high (+5V) and this LED is lit.
The Blue Half-R LED is lit when the blue envelope has gone through half (50%) of its rise portion.
Ping (Red) Input
Short pulses sent into this input “ping” the red envelope channel and set the internal tempo for it. Faster pulses sent here means shorter envelope, and pulses further apart will effectively result in a slower envelope. Tempo is derived from the time between the two latest pulses.
Ping (Blue) Input
Works similar to the ping (red) input, but obviously affects only the blue envelope.
QNT (Red) Input
This is the quantized input for the red envelope. Quantized means that any pulse that appears here will not trigger the envelope until the next “ping” is indicated on the red envelope channel LED. If gated (this input held high, at +5V) for a period longer than two pings in succession, the envelope will repeat (similar effect to cycle mode).
T (Toggle) Input
When a gate is applied (this input held high, at +5V) to this input, both envelope channels’ Cycle buttons will toggle state, on to off and vice versa. When the gate is released they will revert to their previous state. The "T" jack is useful for toggling between the two channels: set one channel in Cycle mode and the other channel to non-cycling while using the output from the OR jack (see the outputs section below). The "T" jack is also useful for turning both channels on/off at the same time.
QNT (Blue) Input
Blue envelope channel quantized input. Works similar to the QNT (red) input described above but for the blue envelope channel.
Async (Red) Input
When a trigger is received at this jack, the red envelope will trigger or re-trigger immediately. Holding a high gate (+5V) on this jack causes a sustain period followed by a fall period when the gate goes low (ASR envelope).
Async (Blue) Input
Work similar to the Async (red) input jack.
Div (Red) CV Input
A CV signal patched to this input will add to the value set by the Red Ping Div/Mult knob. Range is -5V to +5V.
Skew (Red) CV Input
CV control over the Red envelope Skew. This will add to the value set by the Red Skew knob. Range is -5V to +5V.
Curve (Red) CV Input
CV control over the Red envelope Curve. This will add to the value set by the Red Curve knob. Range is -5V to +5V.
Div (Blue) CV Input
A CV signal patched to this input will add to the value set by the Blue Ping Div/Mult knob. Range is -5V to +5V.
Skew (Blue) CV Input
CV control over the Blue envelope Skew. This will add to the value set by the Blue Skew knob. Range is -5V to +5V.
Curve (Blue) CV Input
CV control over the Blue envelope Curve. This will add to the value set by the Red Curve knob. Range is -5V to +5V.
ENV (Red) Output
This is the main envelope CV output of the red envelope channel. The CV amount output here is controlled by the Red Scale knob and Red Bi-Polar button. Range is -10V to +10V.
ENV (Blue) Output
This is the main envelope CV output of the blue envelope channel. The CV amount output here is controlled by the Blue Scale knob and Blue Bi-Polar button. Range is -10V to +10V.
+5V ENV (Red) Output
This is the unregulated envelope CV output of the red envelope channel. Range is always 0V to +5V.
EOR (Red) Output
This jack output +5V at the end of the rise portion of the envelope when the fall portion is initiated. Note that this jack does not output +5V during sustain when gating the Async input jack.
EOF (Red) Output
This jack outputs +5V at the end of the fall portion of the red envelope or when the rise-portion is in progress.
EOF (Blue) Output
This jack outputs +5V at the end of the fall portion of the blue envelope or when the rise-portion is in progress.
Half-R (Blue) Output
This jack outputs +5V when half of the rise portion of the blue envelope has been played through. Note that this jack also output +5V during sustain when gating the Async input jack.
+5V Env (Blue) Output
This is the unregulated envelope CV output of the blue envelope channel. Range is always 0V to +5V.
OR (Black) Output
The OR jack will output the highest voltage value from either the red or blue ENV jack at any given moment. One way to use this is to think of the OR jack as a mix out, and use the Scale knobs as level knobs and the Bi-Polar buttons to bring down the relative level of a channel (kind of like a mute button).
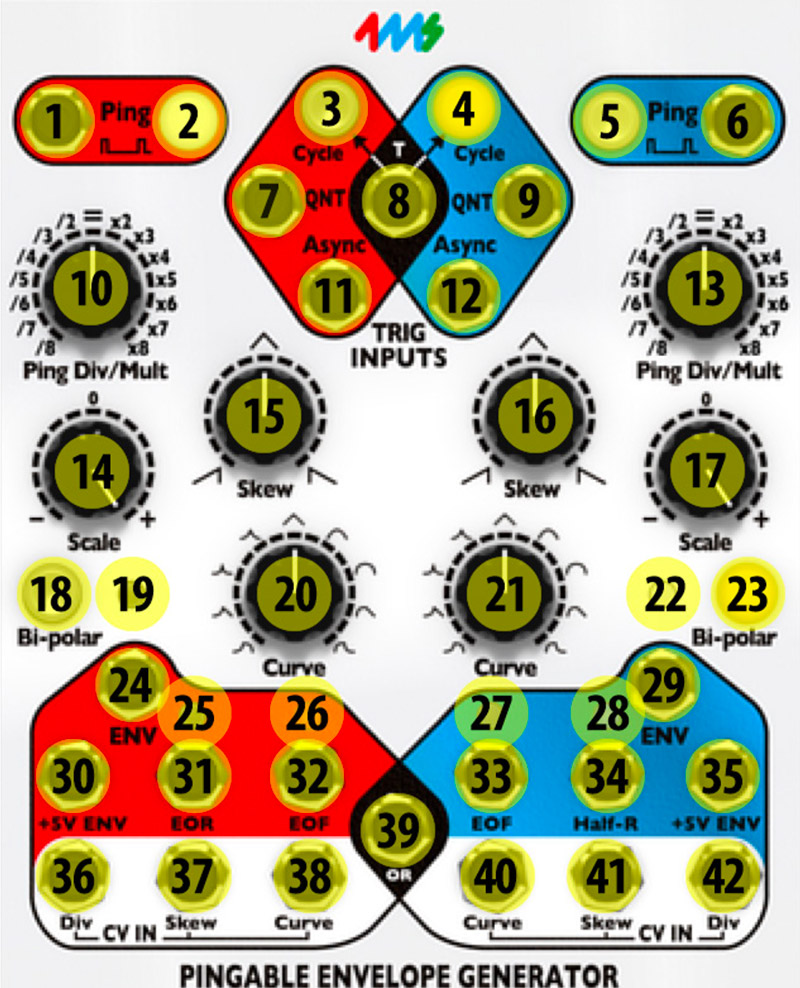
Parameters, Indicators, Inputs and Outputs
Click here to view the full-sized image in a new tab
- Ping (Red) Input
- Red Tap Button
- Red Cycle button LED
- Blue Cycle button LED
- Blue Tap Button
- Ping (Blue) Input
- QNT (Red) Input
- T (Toggle) Input
- QNT (Blue) Input
- Red Ping Div/Mult Knob
- Async (Red) Input
- Async (Blue) input
- Blue Ping Div/Mult Knob
- Red Scale Knob
- Red Skew Knob
- Blue Skew Knob
- Blue Scale Knob
- Red Bi-Polar Button
- Red Bi-Polar Button LED
- Red Curve Selection
- Blue Curve Selection
- Blue Bi-Polar Button LED
- Blue Bi-Polar Button
- ENV (Red) Output
- Red EOR LED
- Red EOF LED
- Blue EOF LED
- Blue Half-R LED
- ENV (Blue) Output
- +5V ENV (Red) Output
- EOR (Red) Output
- EOF (Red) Output
- EOF (Blue) Output
- Half-R (Blue) Output
- +5V ENV (Blue) Output
- Div (Red) CV Input
- Skew (Red) CV Input
- Curve (Red) CV Input
- OR (Black) Output
- Curve (Blue) CV Input
- Skew (Blue) CV Input
- Div (Blue) CV Input
The 4ms Pingable Envelope Generator is a very versatile module with many fun uses. Here are some suggestions:
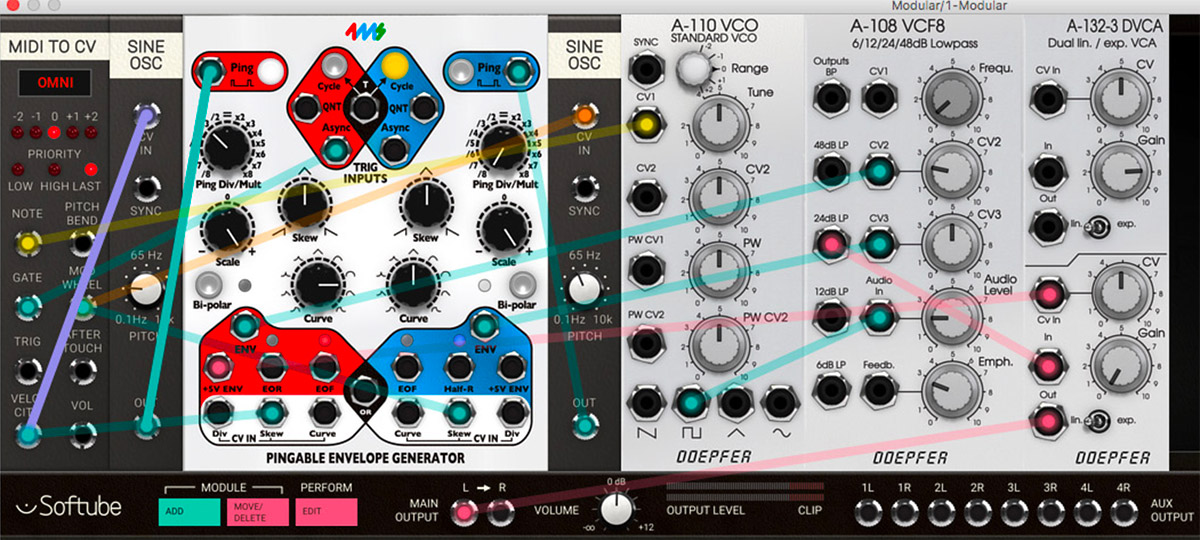
1. CV controllable length of the PEG cycle - Use a CVcontrollable LFO or VCO to ping the tempo of PEG. By varying the pitch of the driver the length of the PEG envelope can then be easily be altered, for example via an additional LFO or sequencer.
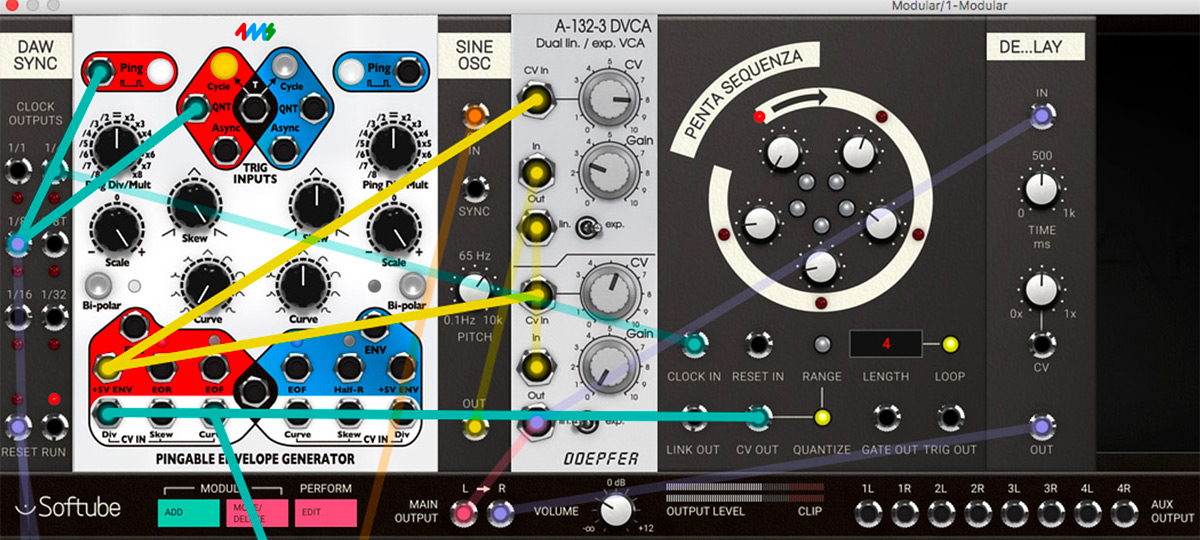
2. Ratcheting envelopes - Clock one envelope module from the DAW sync clock module with a steady pace, for example quarter notes. Use another faster input to clock the QNT input while an LFO is sweeping the Div input. The pace of the faster input, for example 32nd notes, will set the upper limit to the ratcheting speed. If you desire a more controlled approach to ratcheting, using a CV to turn on and off the cycle function is the way to go.
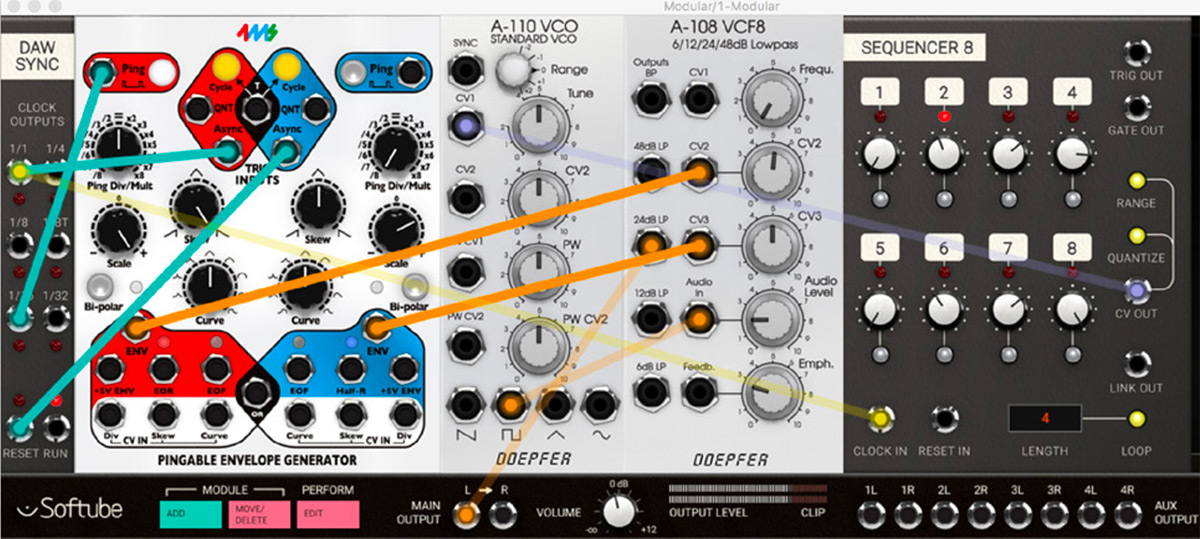
3. DAW synced LFOs - Use the DAW sync module to ping a cycling PEG at a regular pace, for example by using the 16th notes output. The reset jack or whole note jack should also be connected to the Async input to ensure PEG to start at the same phase each time (or each bar when using the whole note output). Using the Tri (preset) shape will be the most common use case when using PEG as an LFO, but of course you can use any shape to create your own customized LFO.
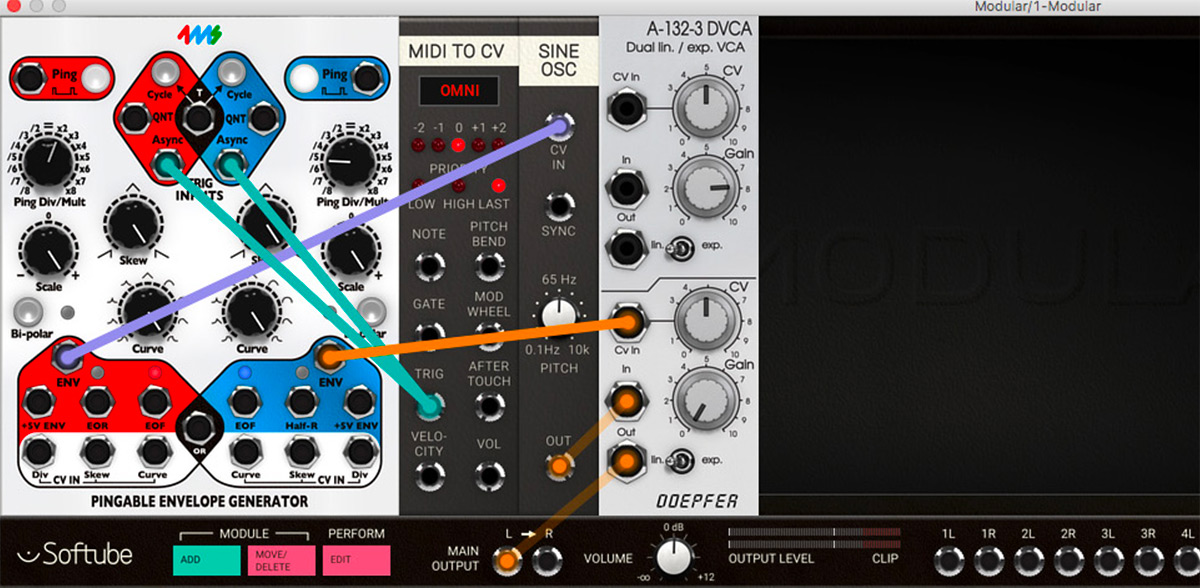
4. PEG Percussion - PEG is a great module to use for percussive sounds. Use the Skew and Curve knobs to shape the pitch bend of the tuned percussion and the Scale knob to set pitch bend amount. Experiment with different curve types for different sounds.
Oscar Öberg – Modeling, project management, validation
Kristofer Ulfves – Presets, validation, user manual
Igor Miná – User manual layout, hardware photos
Niklas Odelholm – GUI graphics