User Manual
Amp Room
What is Amp Room?
Difference between Suite and Studio mode
Amp Room presets
Suite sections
Pedal and Effects section
The Amplifier section
The Cabinet section
The parametric EQ section
Switching between Suites
Main Suite mode controls
Multistates
Studio mode specifics
The IR loader LoadIR
Main Studio mode controls
Gear modules in Studio mode
Focus mode
Studio mode Gear menu
Utility tools
Credits
Related manuals
Amp Room is a pro audio guitar/bass plugin platform where Amp Room Suites (e.g. Vintage Suite) can be run, Amp Room Exclusive products (e.g. Marshall Cabinet Collection) can be added and where any Amp Room Ready Softube products (e.g. Drawmer S73) that the user owns are included automatically.
Amp Room has two modes: Suite and Studio. In Suite mode gear is true life-rendered. For better overview and arrangement purposes, Studio mode has a modular representation of the gear. The two images below show the exact same signal chain in both modes.
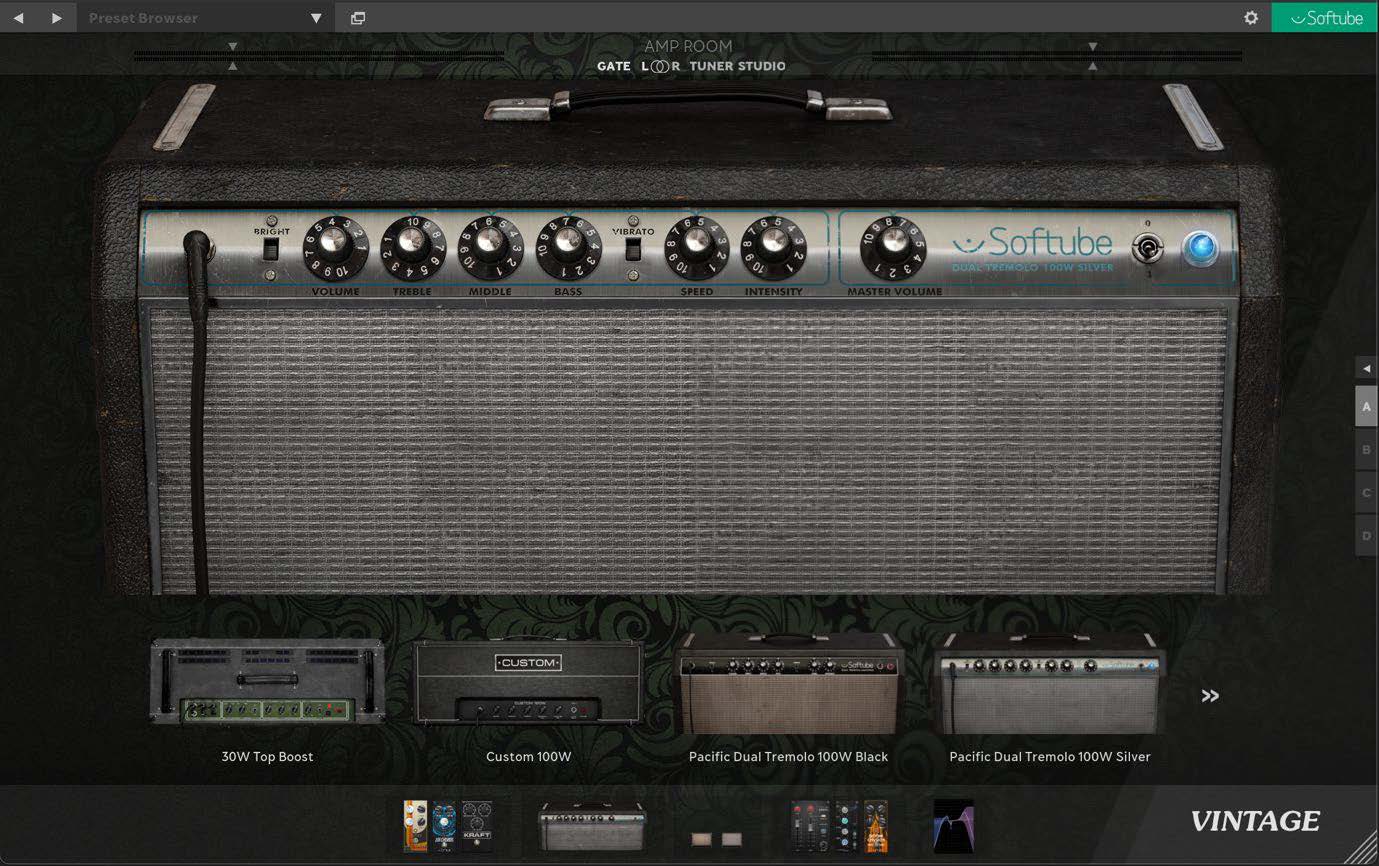
Suite mode image
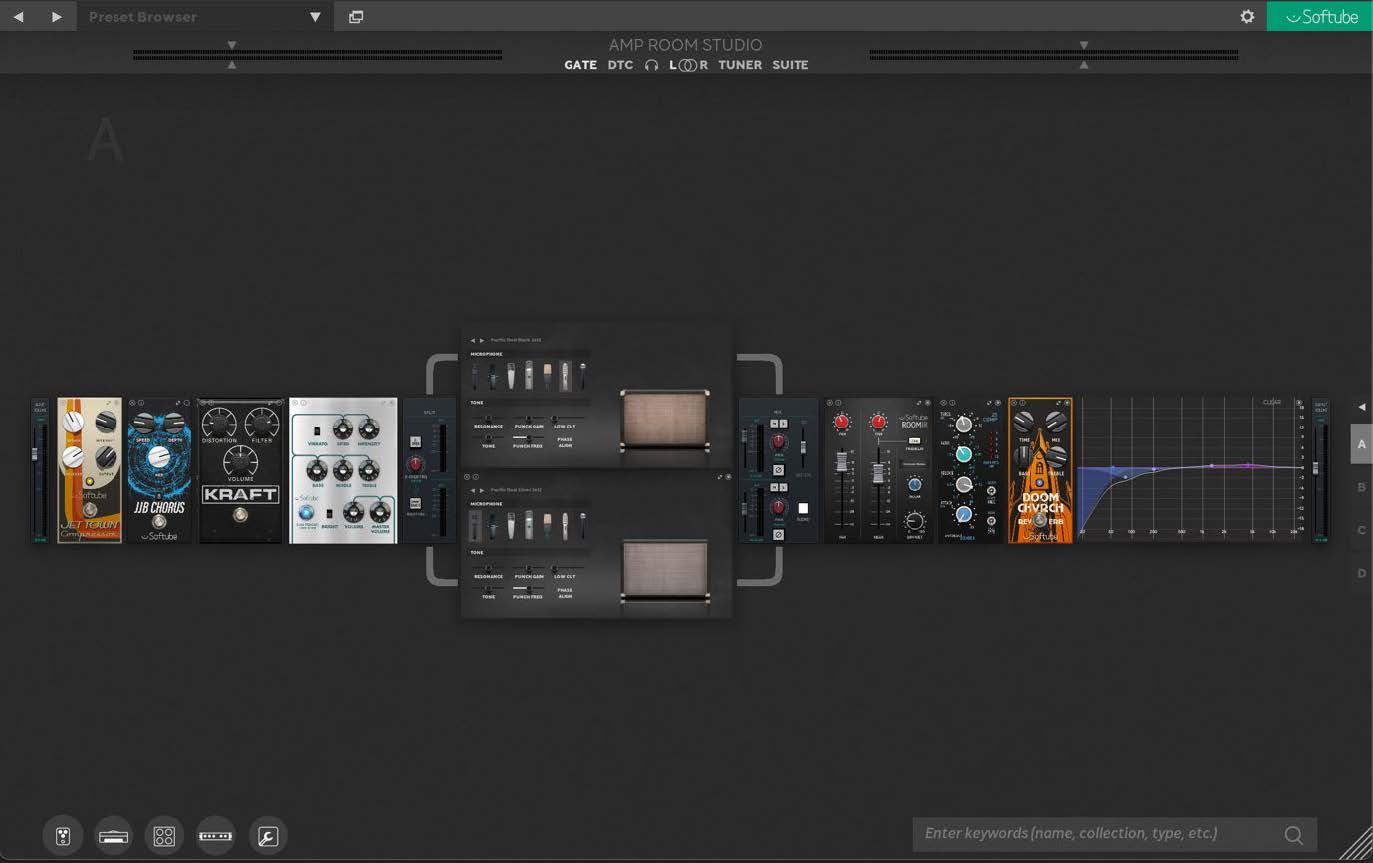
Studio mode image
Switch between the two modes by clicking the Suite/Studio button.
In Suite mode, click “Studio” to change mode.

In Studio mode, click “Suite” to change mode.

Difference between Suite and Studio mode
Suite mode is for quick and great results with a predetermined workflow.
Up to 3 pre-pedals/effects serial – 1 amp – 2 cabs parallel – up 3to post-pedals/effects serial– 1 parametric EQ
Studio mode is for a creative, tweak-intensive and/or a “try whatever you want” workflow.
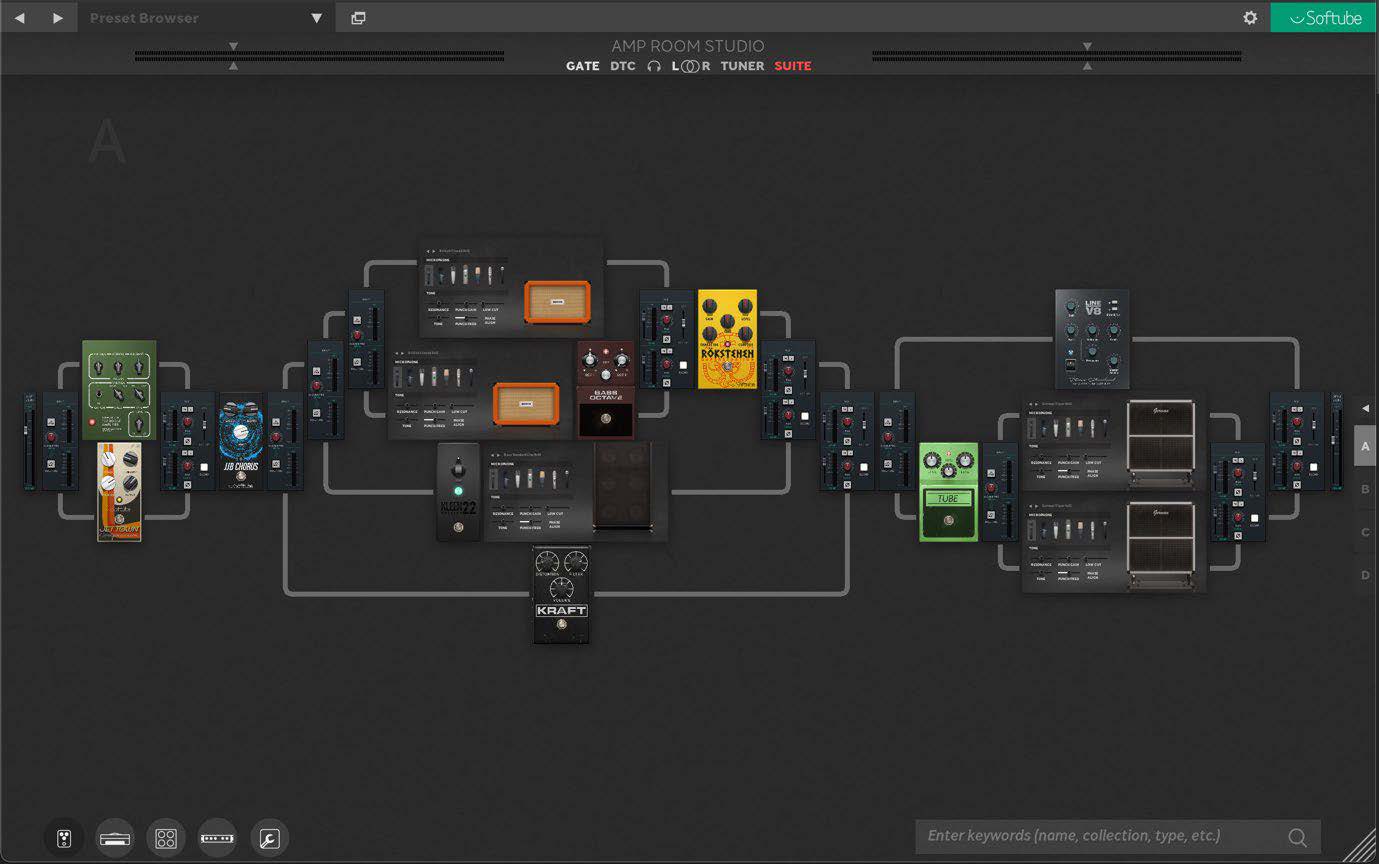
All signal chains in Suite mode can be moved to Studio mode, but because of Suite mode’s predetermined workflow, not all signal chains can be moved from Studio to Suite mode.
If you're in Studio mode, and the Suite button is highlighted in red, then the current signal chain cannot be moved from Studio to Suite mode. Hovering over the Suite button will show the Suite mode signal chain requirements.
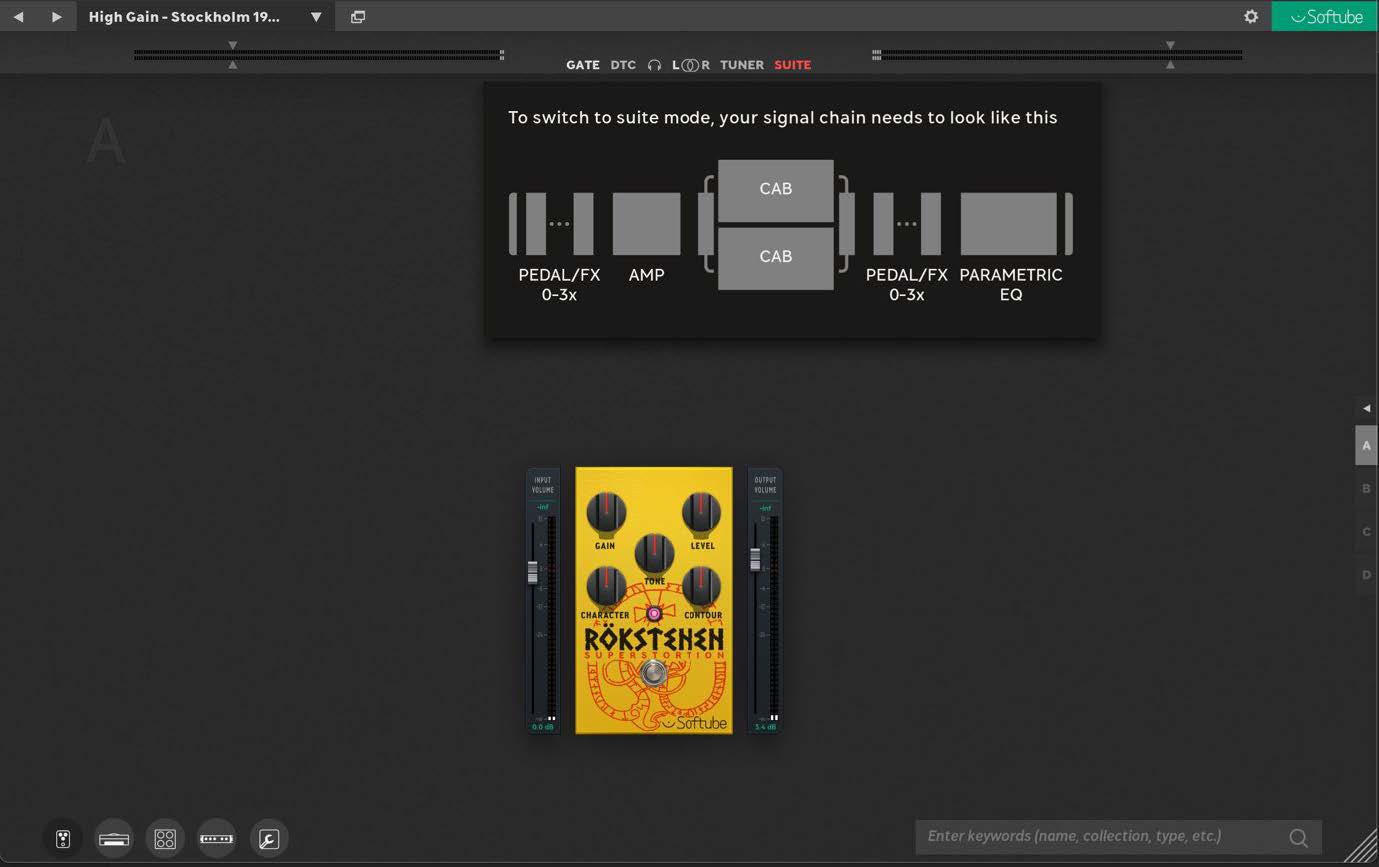
Image shows a non-Suite compatible “signal chain” in Studio mode, hence the Suite-button high-lighted in red.
Amp Room factory presets are your friend for both learning how Amp Room works and for finding great sounds quickly. You can find factory and User presets both here:
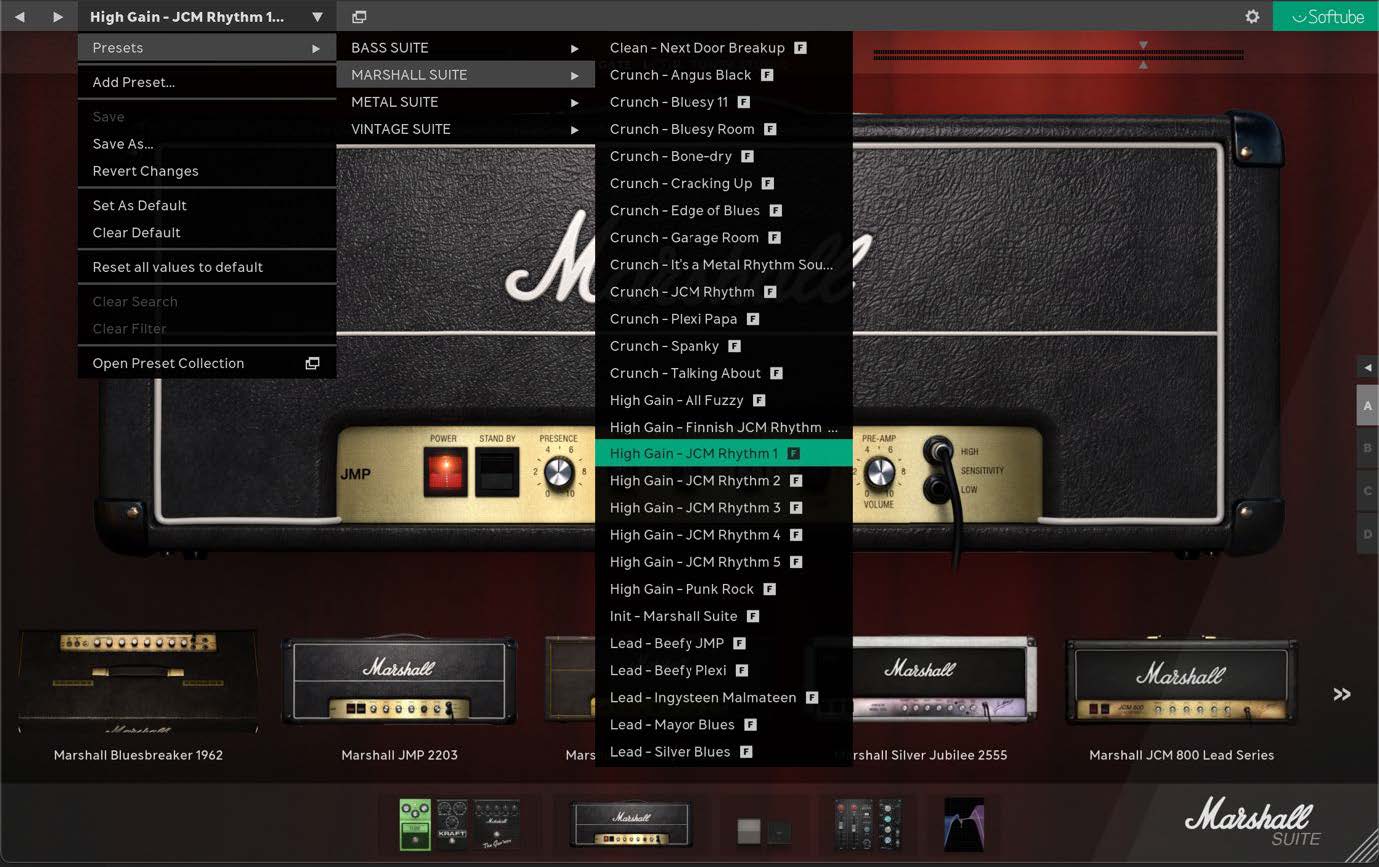
and here, in Preset Collection (opens new window):
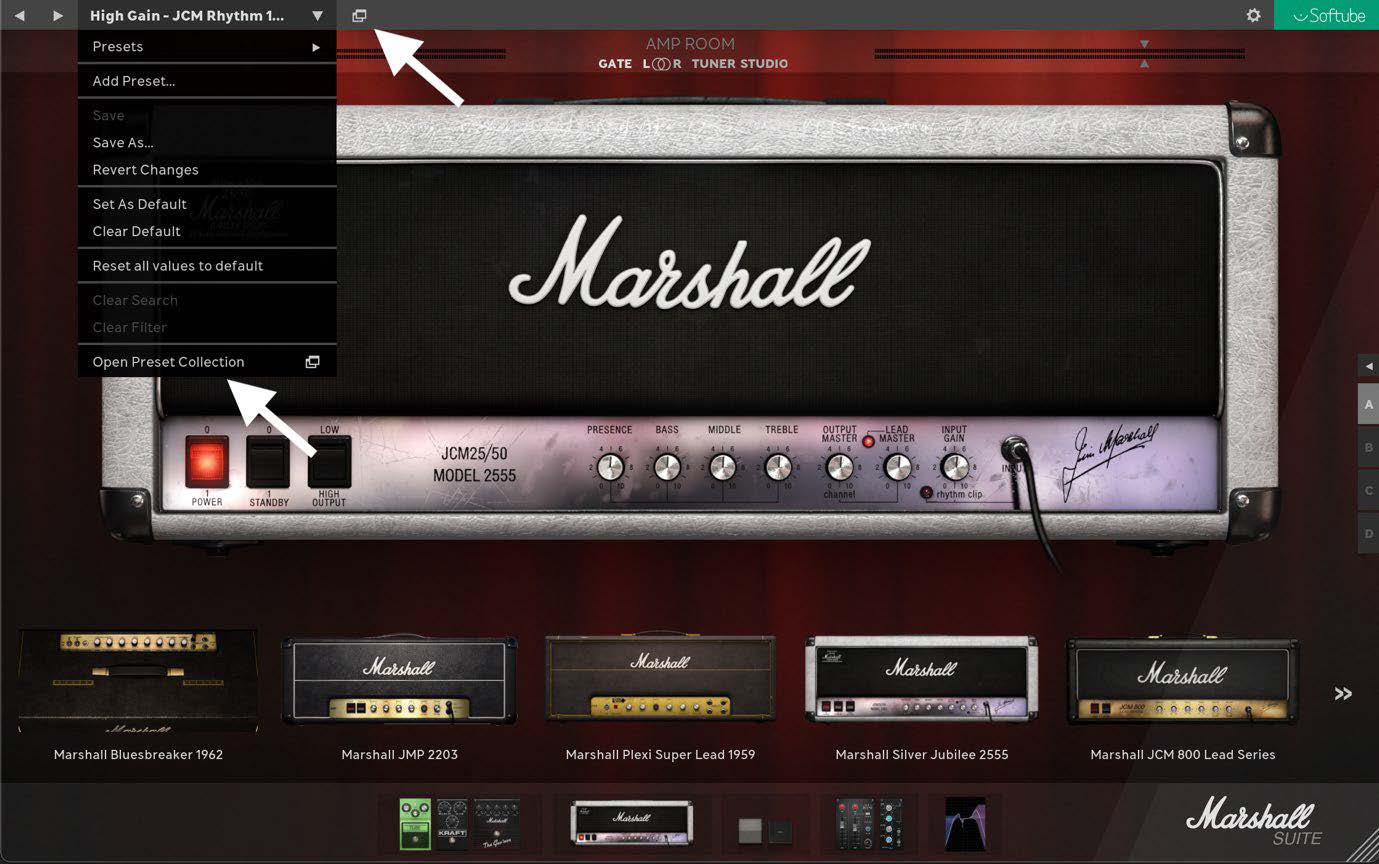
This is Preset Collection. Sort presets by collection (Suites), Factory presets, User presets or by module and/or description tags.
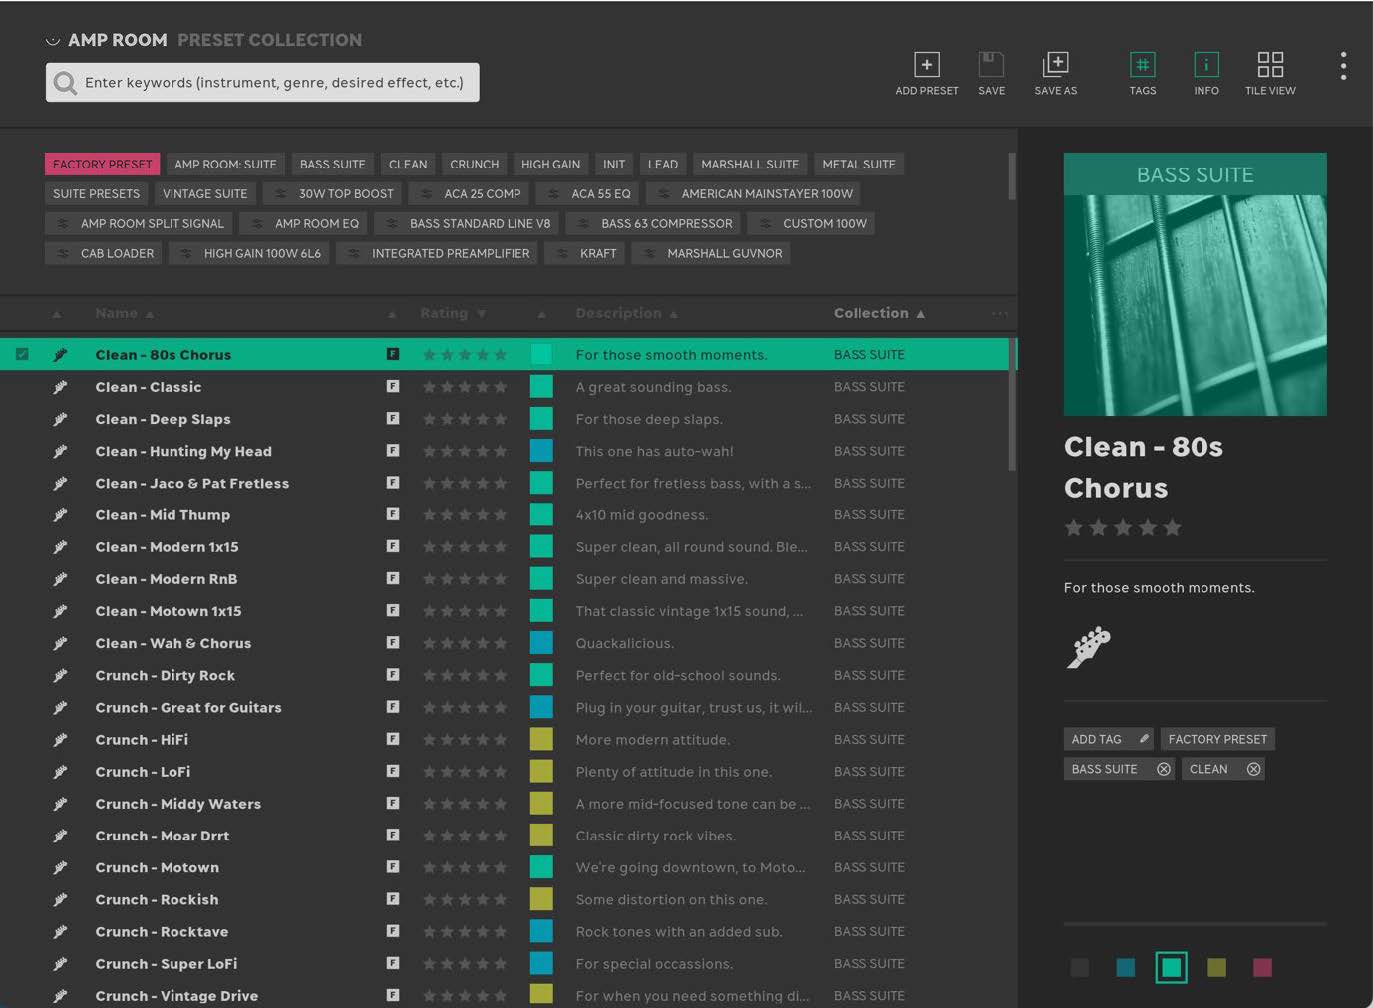
For more information on Preset Collection, see dedicated chapter.
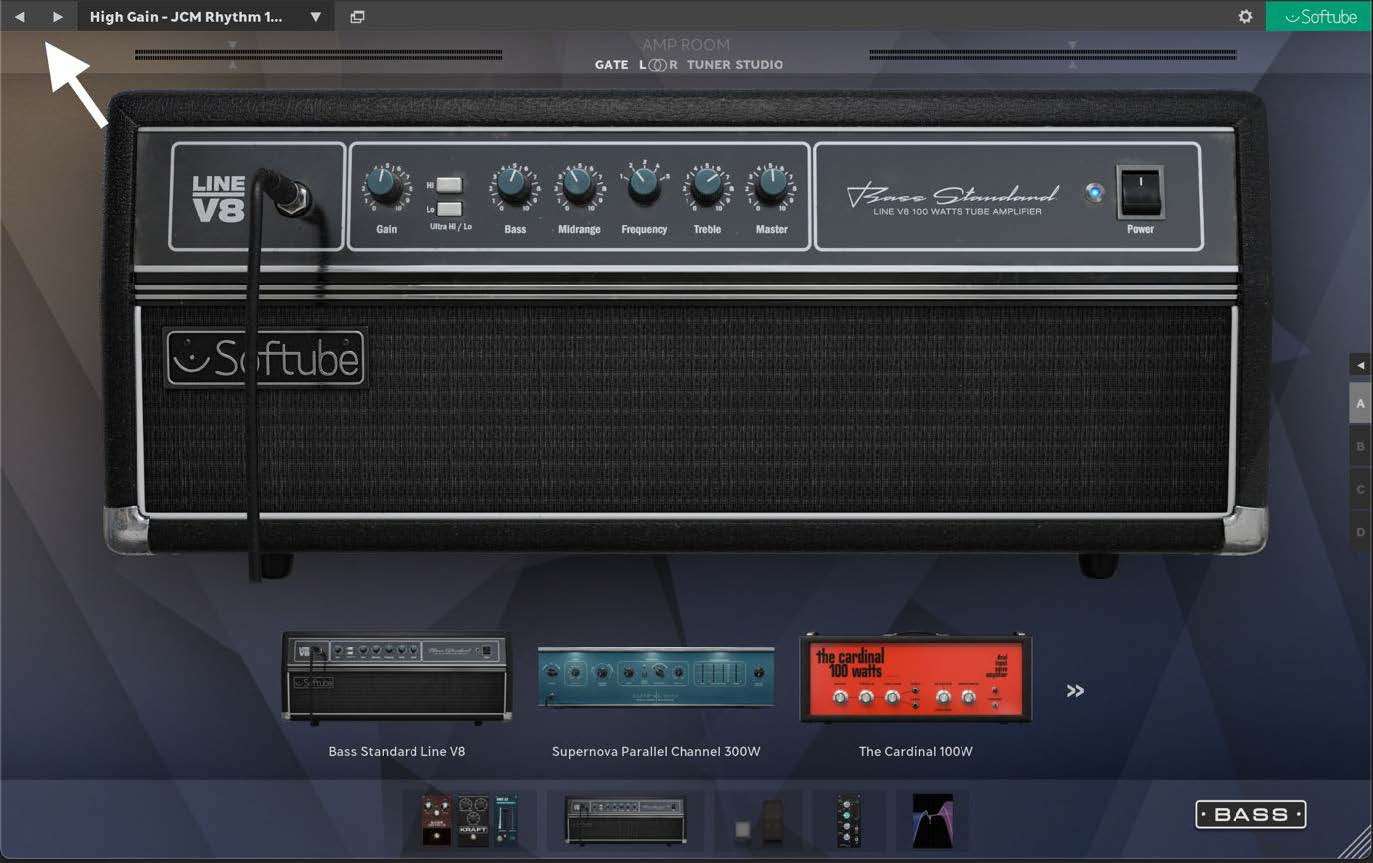
Step through the presets by clicking these arrows. If the presets step in an unwanted order, open Preset Collection and set the sorting there.
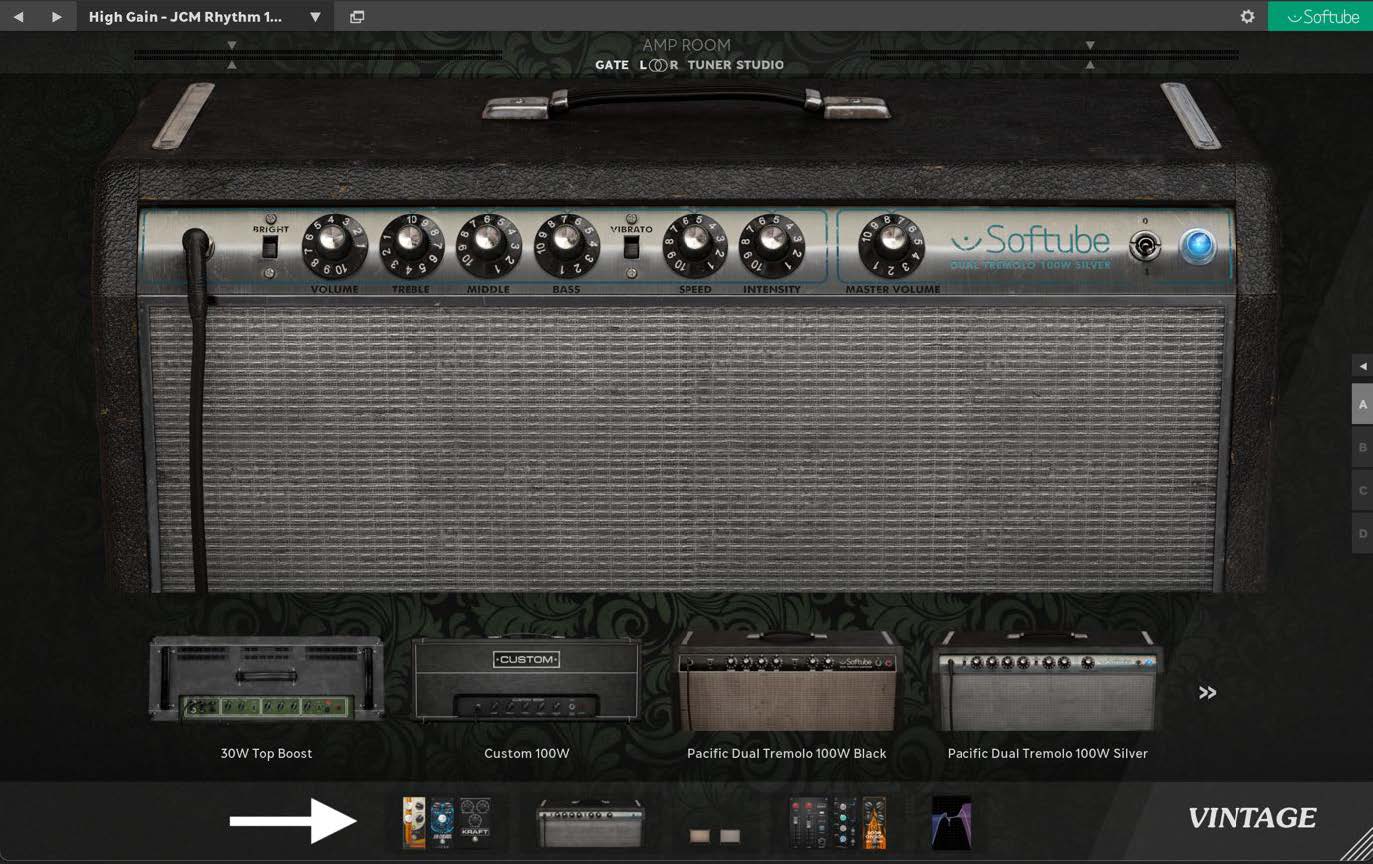
Navigate through the different sections of a Suite by clicking on a section here.
Bypass entire sections by clicking the section’s bypass button here.

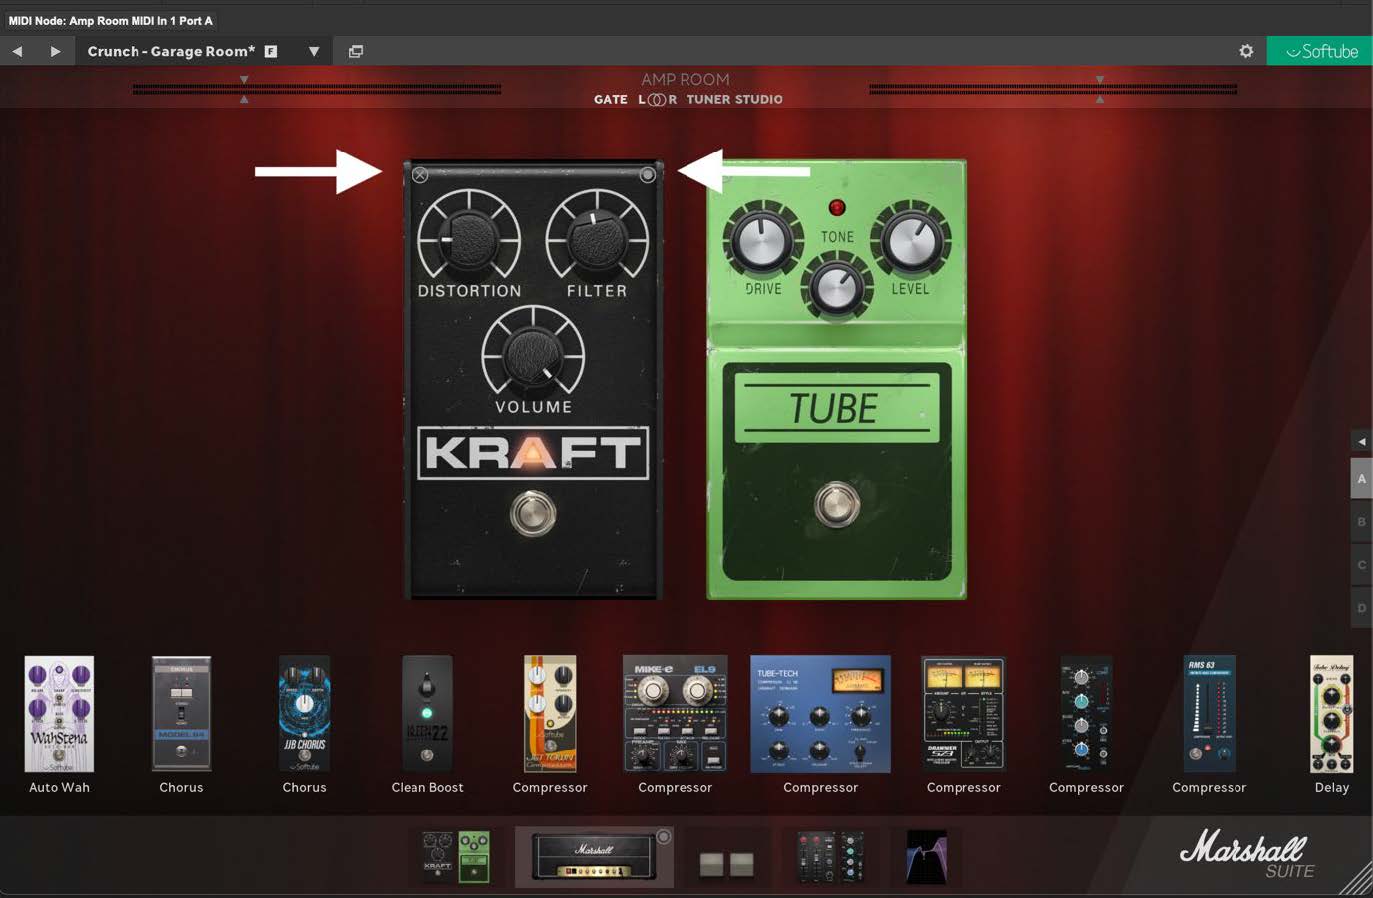
Delete (left) and bypass (right) individual pre/post pedal/effects in the module top bar.
- Add a pedal or effects by dragging it from the Gear menu and dropping it into the section’s workspace.
- Replace a module in any section by dragging a new module from the Gear menu and dropping it on top of the on top of the module you want to switch out.
- Change order of pedal and effects modules by grabbing a module anywhere (though not a control surface, e.g. a knob or a button) and dropping it where you want it.
The Amplifier section can only have on amplifier at a time. Change amplifiers by dragging and dropping a new amplifier on top of the current one. Note: all settings on the current amplifier will be lost when changing to a new one.
Bypass the amplifier similarly to bypassing other sections: clicking the circle in the section selector.

The cabinet features two cabinets simultaneously. Select a cabinet by either dragging and dropping from the Gear menu, clicking the stepping arrows next to the cabinet name or by clicking on the cabinet name and selecting from the drop-down list.
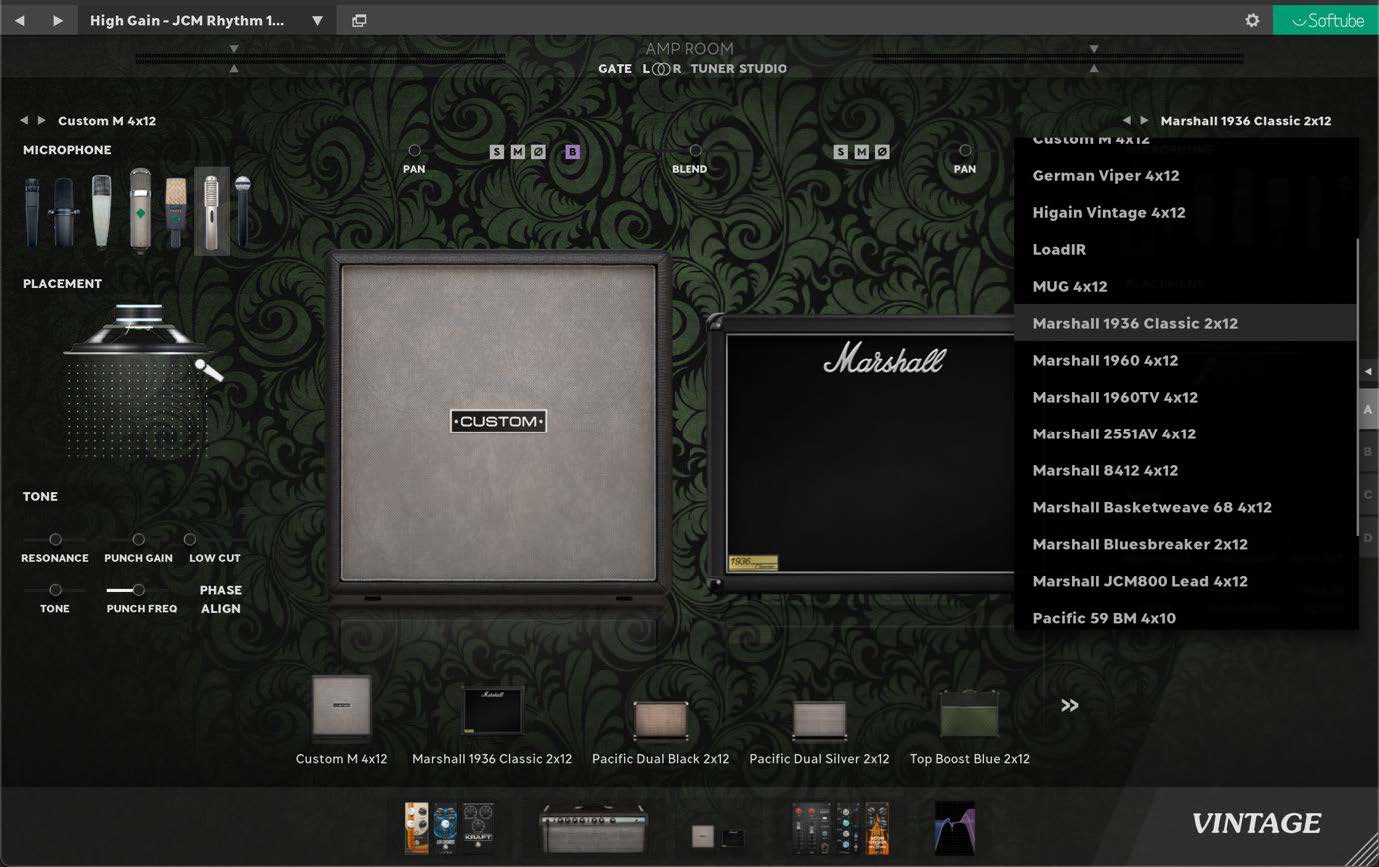
There are seven different moveable microphones for each cabinet. Click on a microphone to select it. Grab the microphone icon to move it around the speaker field. Pushing the microphone icon up against the speaker will increasingly angle the microphone up to a maximum of 55 degrees.
The tone section is a powerful tool to tone shape a cabinet.
- Resonance – Move the knob to the right to add more “thump”/low end and brightness to the sound. Moving it to the left does the opposite.
- Punch Gain/Freq – Pinpoint the frequency that you wish to address with Punch Freq. In-/decrease the affected frequency amount with Punch Gain.
- Low Cut – A low cut filter ranging from (left to right) 20Hz (off) to 250Hz.
- Tone – Basically a tilt EQ. Move the knob to the right to tilt the frequency curve towards less low-end and more-high end. Moving the knob to the right does the opposite.
- Phase Align – Automatically aligns the phase of the cabinet regardless of microphone position. If both cabinets have Phase Align active no phasing will occur between them. If you prefer the positioning of a microphone to behave realistically, click Phase Align to set to off (button not high-lighted).
Note: Changing a cabinet will not affect selected microphone, microphone position or any tone settings. Example: you can select your favorite microphone, place it in your favorite position, tone-tweak it and change cabinets without losing these settings.
The two cabinets can be blended by using the Blend function or by clicking the B button and setting individual volume levels per cabinet. Here you also control L-R pan, Solo, Mute and Phase Invert for the individual cabinets.

For IR loader module LoadIR information, see further down.
The last section of the Suite signal chain is the five banded Parametric EQ. Click on a band point to access its individual frequency, gain and Q-value settings. Each band can be set to five different modes, left to right (see image): low cut, low shelf, bell, high shelf and high cut. The bottom and top frequency bands are set to low respectively high cut by default.
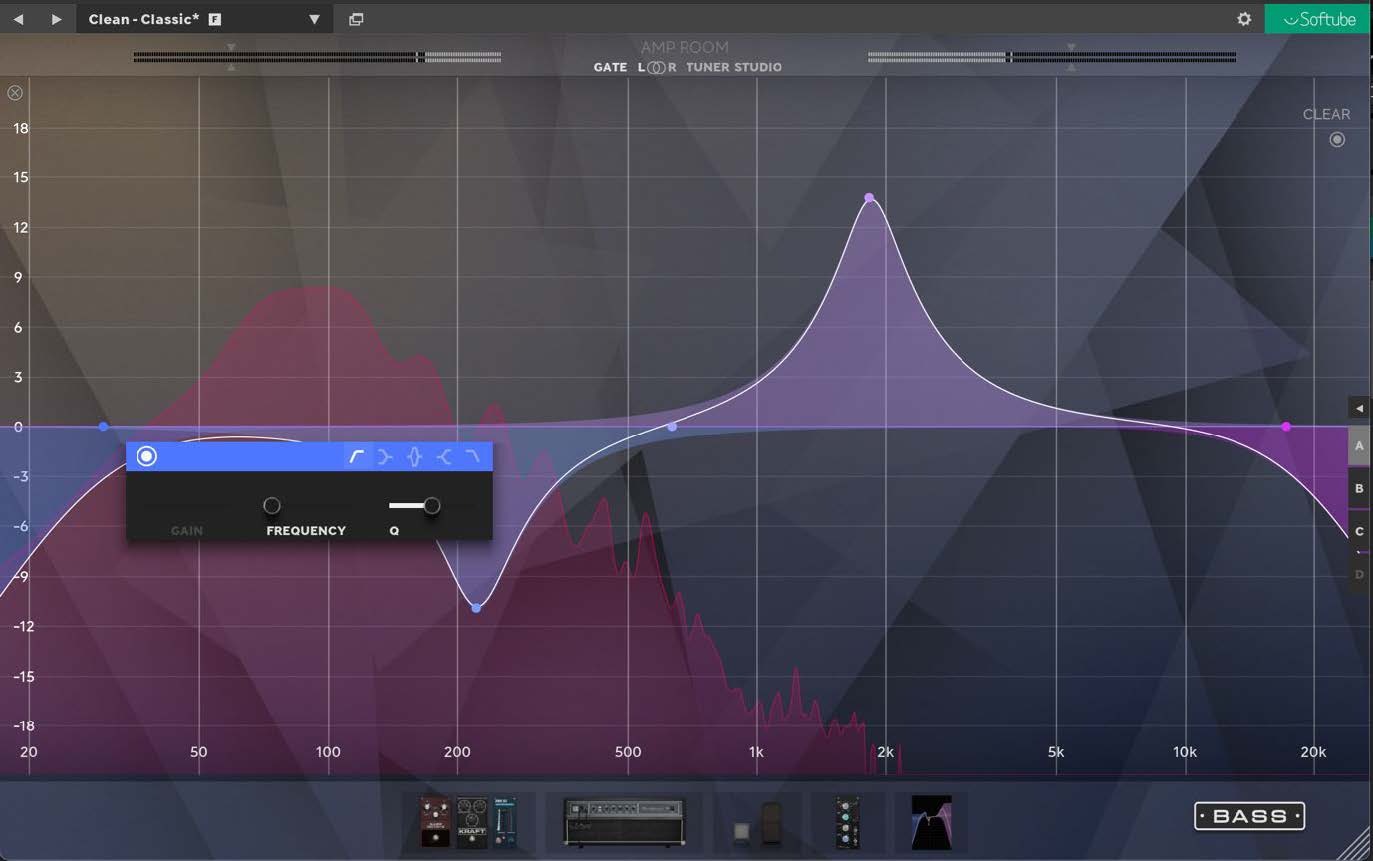
All five bands can be positioned anywhere and set to any mode. Hovering a band point and scrolling will change the Q-value. The white EQ curve indicates the combined EQ setting. The frequency analyzer in the background shows the output affected by the combined EQ settings.
The “Clear” button in the upper right corner resets all bands to default value and position. Bypass the Parametric EQ by clicking the circled dot below it.
Ctrl/alt+left-clicking while hovering over an EQ nod will bypass and also reactivate it.
The Parametric EQ is also available as a module and can be inserted in the pre/post pedals and effects section in Suite mode and anywhere in Studio mode.
If you own more than one Amp Room Suite, you can switch between Suites by clicking on the Suite selector and selecting another Suite in the list. Choosing a preset from another Suite will automatically change Suites to where the preset belongs.
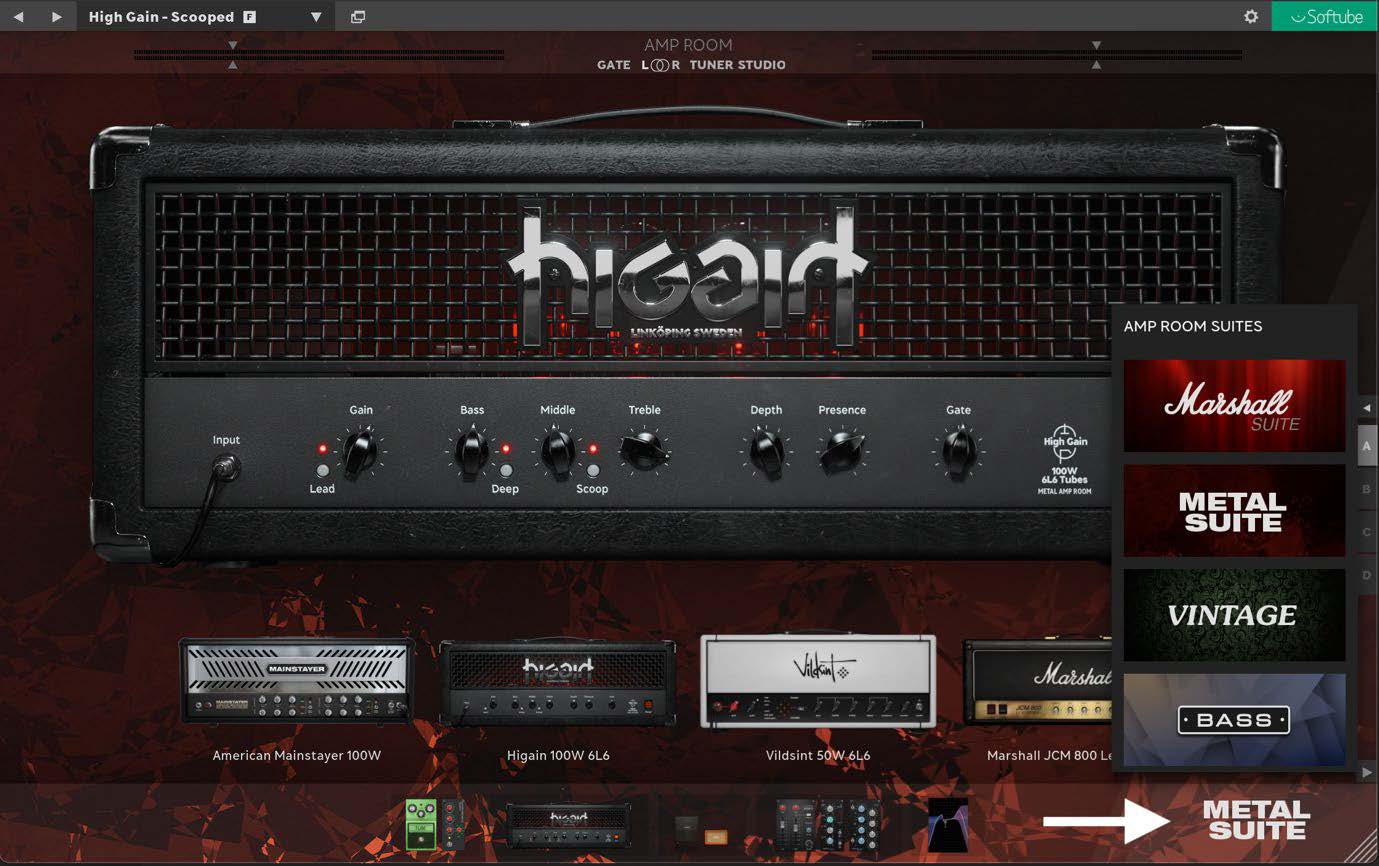
Note: all current signal chain progress will be lost when switching to another Suite.
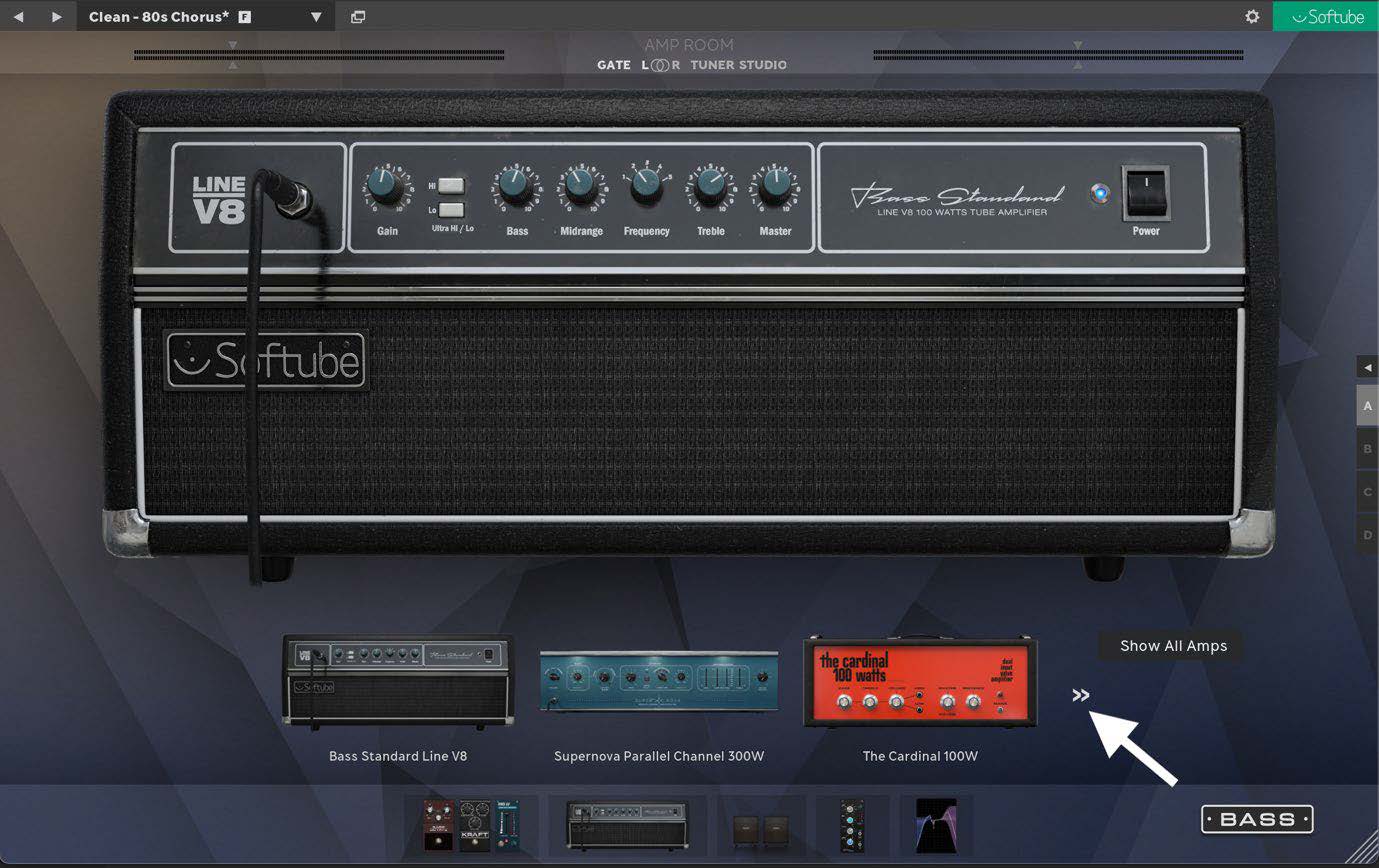
When loading a Suite, only the content that comes with the particular Suite will show in the amp and cab section. If you own multiple suites, you can always access content from other suites by clicking the double-arrow "Show all" button in the amp and cab section. Click again to hide non-suite specific content. The pedal and effects sections always show everything.
In the pedal and effects section you will also see all/any Amp Room Ready products that you own. Amp Room Ready means other native Softube products that automatically can be accessed inside Amp Room.
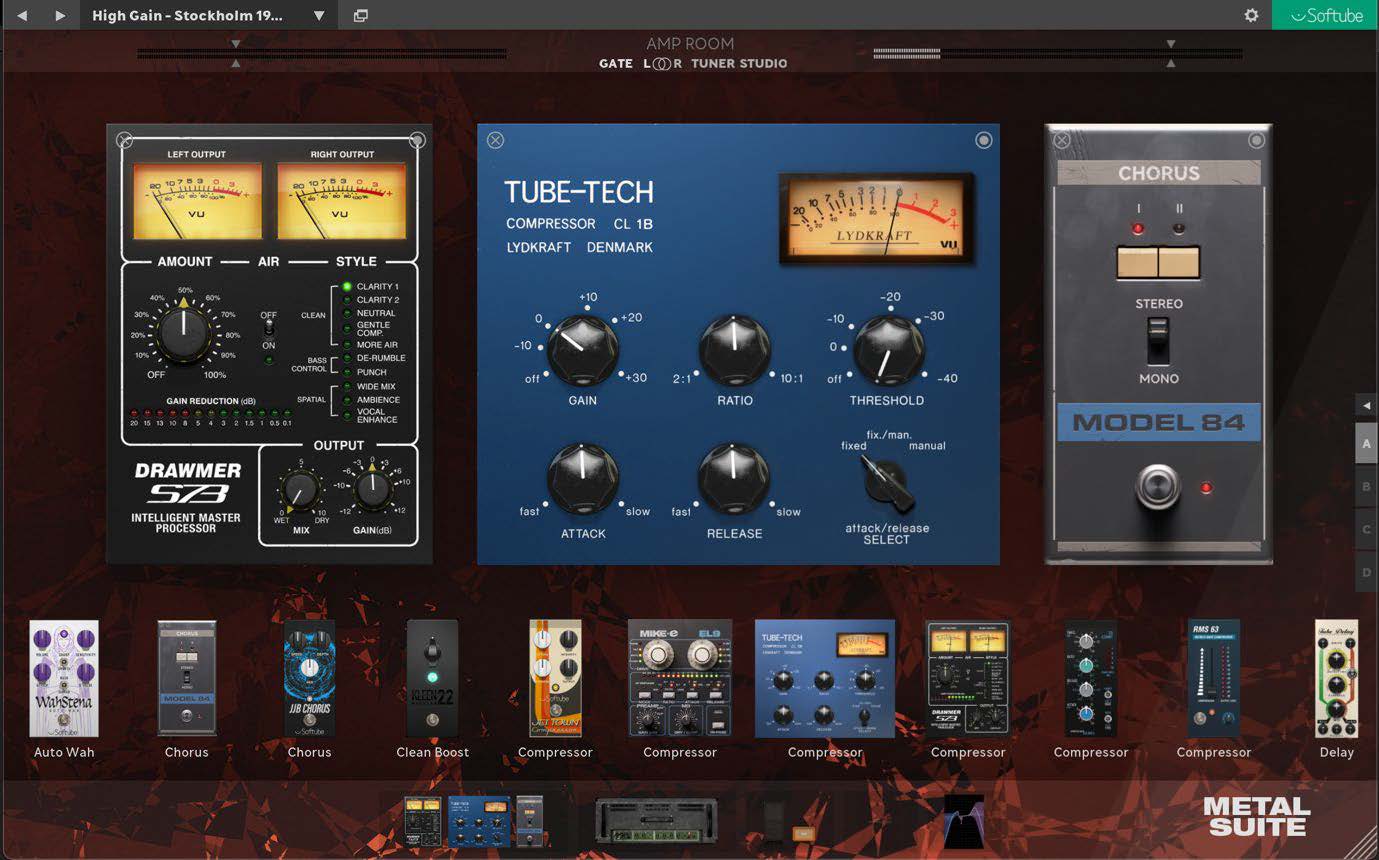
Image shows Amp Room Ready examples: Drawmer S73, Tube Tech CL1B and a chorus effect from the Model 84 synthesizer.
Complete list of Amp Room Ready products can be found here
Included in the cabinet section is the IR loader module LoadIR. Locate it by double-clicking “Show All Cabs” in the cabinet section and looking last (far right) in the cabinet Gear menu.
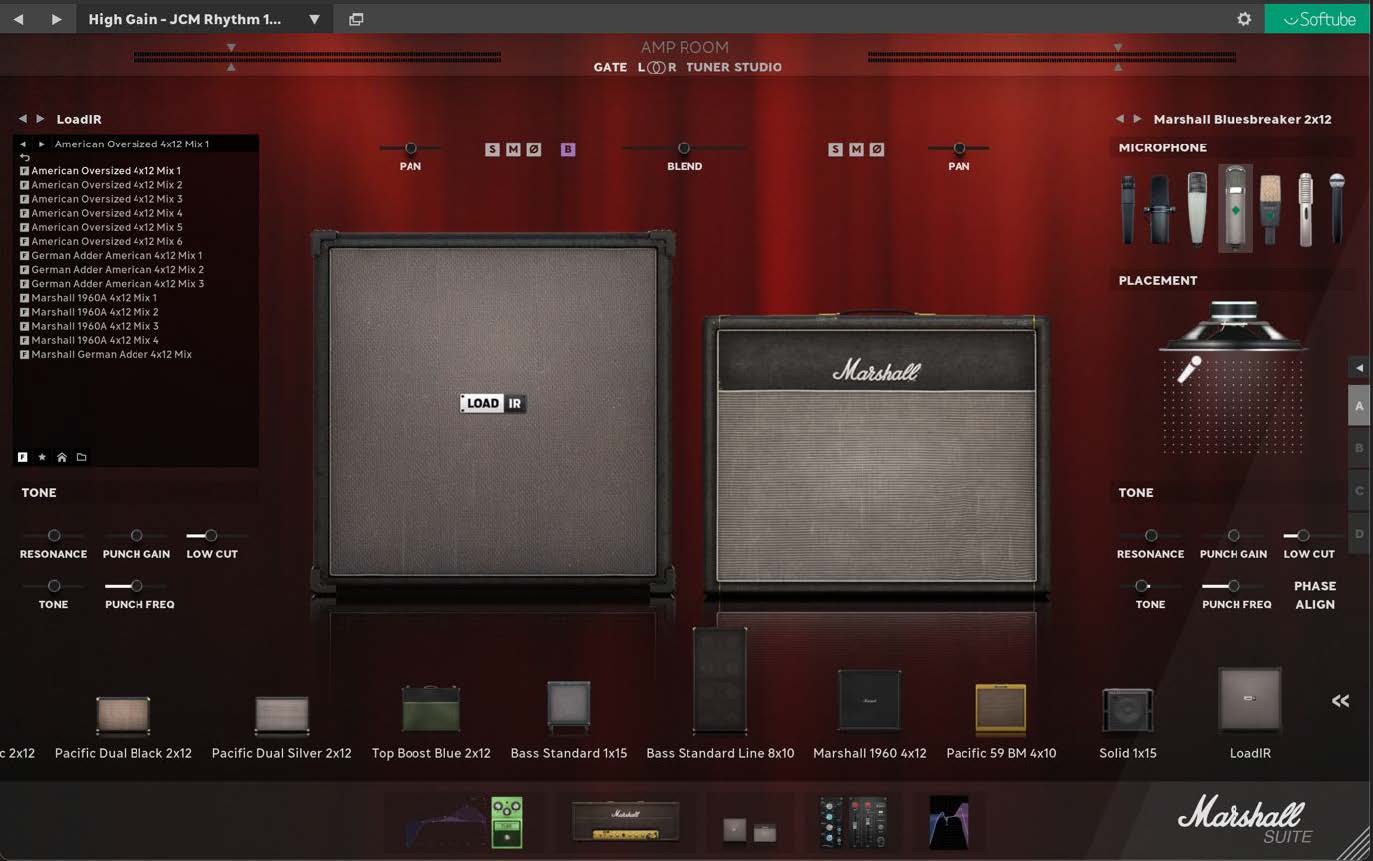
Microphone selection and positioning is not available for IRs, but the Tone controls are.
Step through the IRs by either the arrows next to the IR file name or by clicking directly in the drop-down list.
Clicking on the F icon at the bottom of the IR selection window will take you to the factory included IR folders. Click on a folder to access it. Click on the curved arrow at the top of the list to take you one step higher in folder hierarchy.
![]()
Every IR has two options to it.
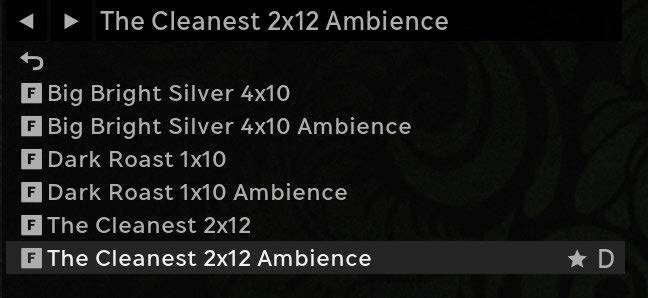
Clicking the star will add the IR to your favorites folder. Clicking the D will set the IR as the default IR when using the LoadIR module.
Access your favorites folder by clicking the star icon at the bottom of the IR selector window. Remove an IR from your favorites folder by clicking the IR’s star when in the favorites folder.
![]()
If you have your own IR library, access the OS browser by clicking the folder icon at the bottom of the IR selector window. Navigate through your HD and select an IR. The selected IR, along with all/any other IRs in the folder, will appear in the IR selector window. Step through them as you would with the factory IRs.
![]()
When a User IR is loaded and the OS folder is shown in the LoadIR display, alt/option + click the home icon to set the current OS folder as your home folder.
In the Settings menu (cog wheel icon, top right corner of the main plugin window) there are two options that concern LoadIR. Normalizing non-factory IRs is to safeguard against third party IRs that might be harmfully loud. Automatically phase aligning third party IRs with Amp Room cabinets and IRs is for safeguarding against getting unwanted artifacts, such as phasing. Both can be unchecked but should be done so with care and at own risk.

An inserted IR will be saved along with the DAW project. Meaning, if the project is moved to another computer that does not have the selected IR locally LoadIR will still contain this IR and the signal chain will play as intended.
Saving a preset where LoadIR is used to Preset Collection will also save the IR to the preset.
The IR loader LoadIR supports .wav files in 16/24/32 bit (so basically any bit depth and in all sample rates (44.1, 48, 96, 176.4 and 192 kHz) up to 1 second for both mono and stereo IRs. If you choose to load a longer .wav file just for the heck of it, LoadIR will automatically introduce a fade after 0.8 seconds to comply with the 1 second length limitation.
Set in (left) and out (right) signal levels here by hovering and mouse scrolling or clicking and grabbing the levers.
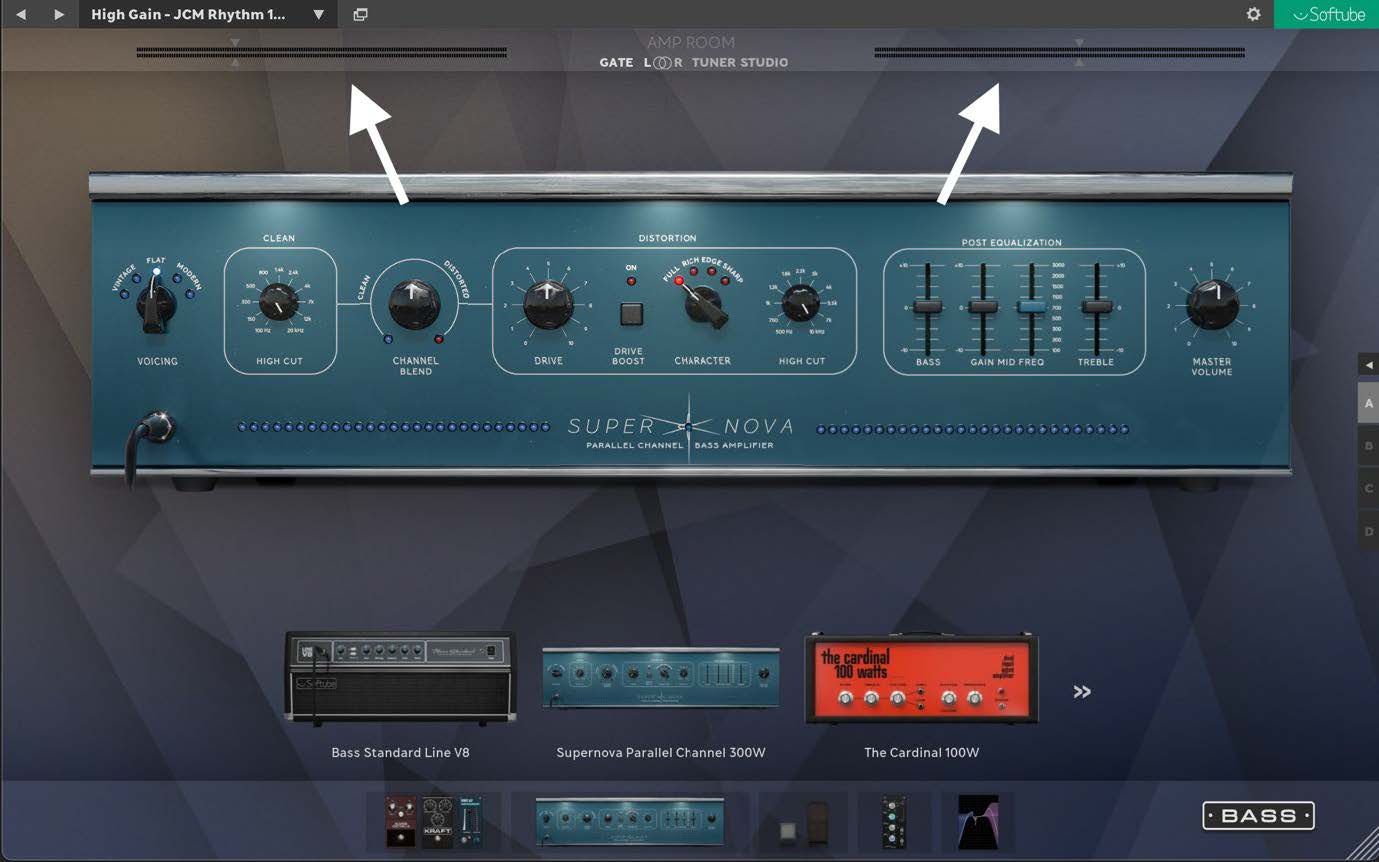
When “Gate” is highlighted, the noise gate is active. Switch off/on the gate by clicking on “Gate”. Hovering over Gate will show the amount of noise gate applied. To set the noise gate threshold level, either hover over the noise gate bar and mouse scroll or click to adjust the threshold level.

Click L, “stereo” or R to adjust Amp Room to the source of the incoming signal. If you have stereo information on a stereo track going into Amp Room, choose “stereo”.
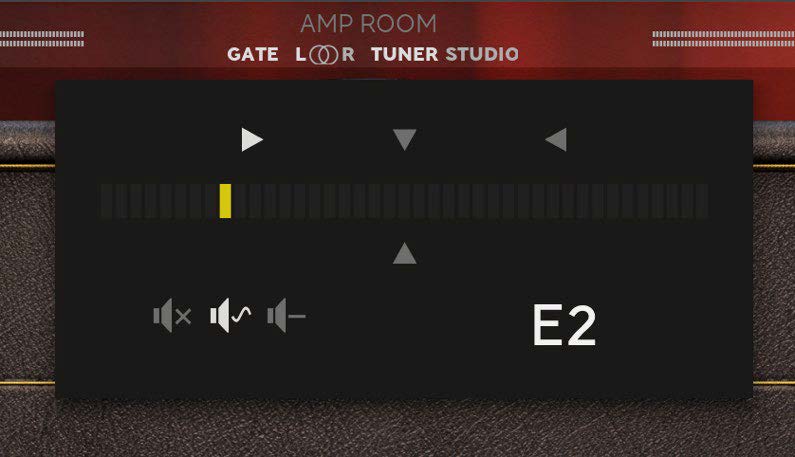
Quick-access the tuner by hovering over “Tuner”.

Click “Tuner” for larger tuner display plus options for (left to right) mute, processed or direct input signal while tuning.
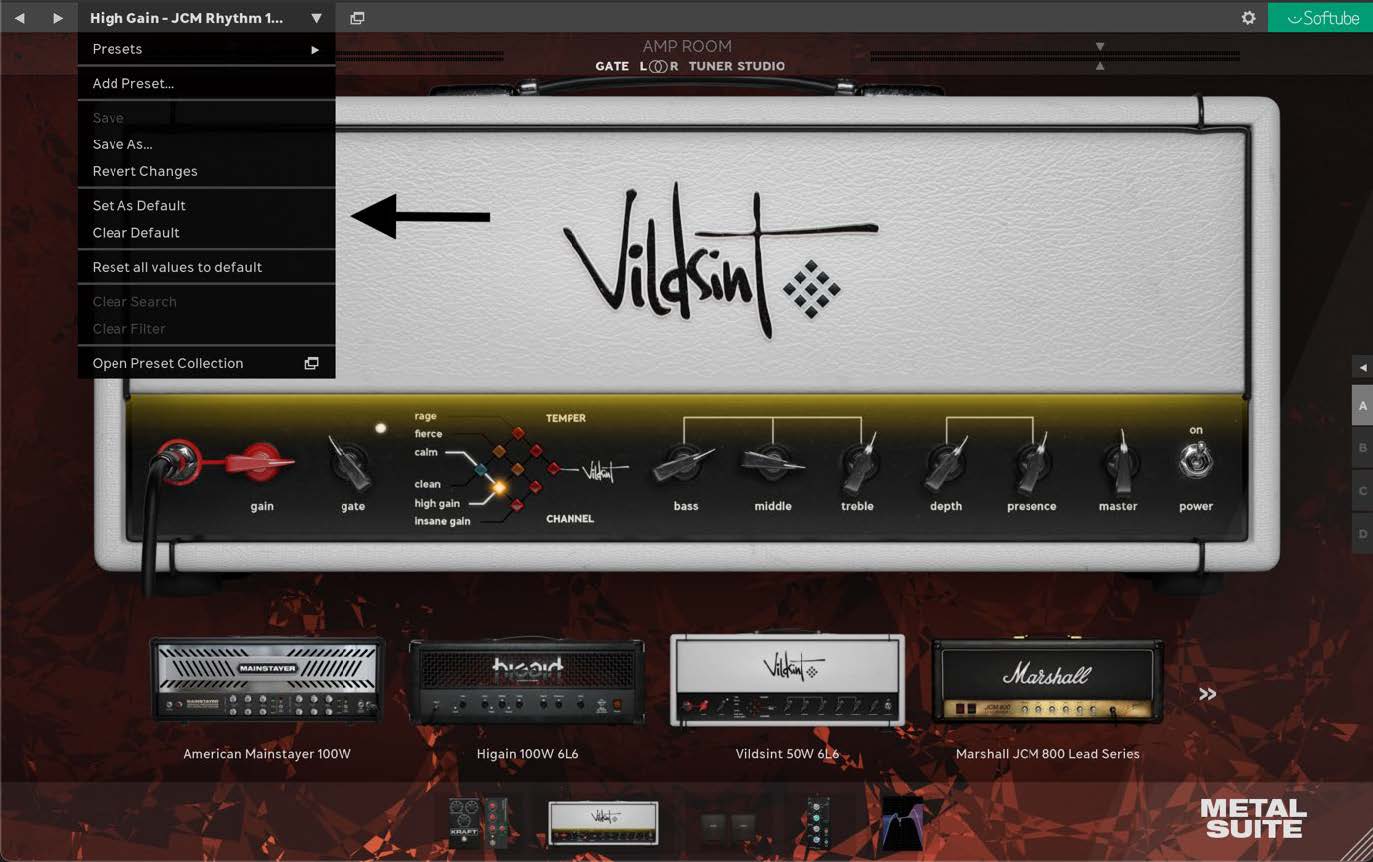
If you have a favorite signal chain that you want Amp Room to always open up with, click “Set As Default”. “Clear Default” will revert Amp Room back to opening up with the factory default preset.
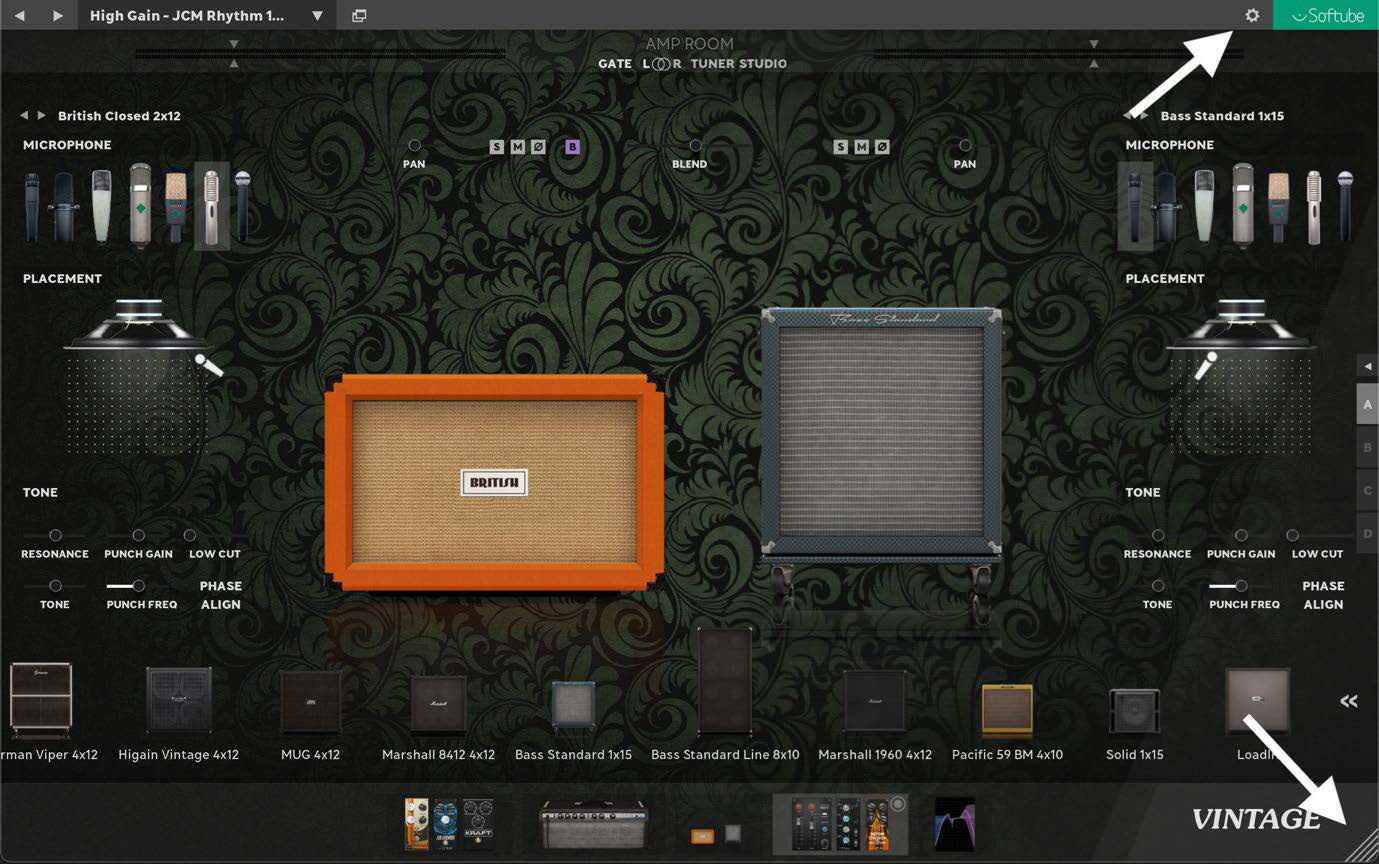
If you want to change the size of the plugin window, grab the bottom right corner and drag/push to resize. If you wish to set the new size as the default plugin window size, click the cog wheel at the upper right corner to access Settings.
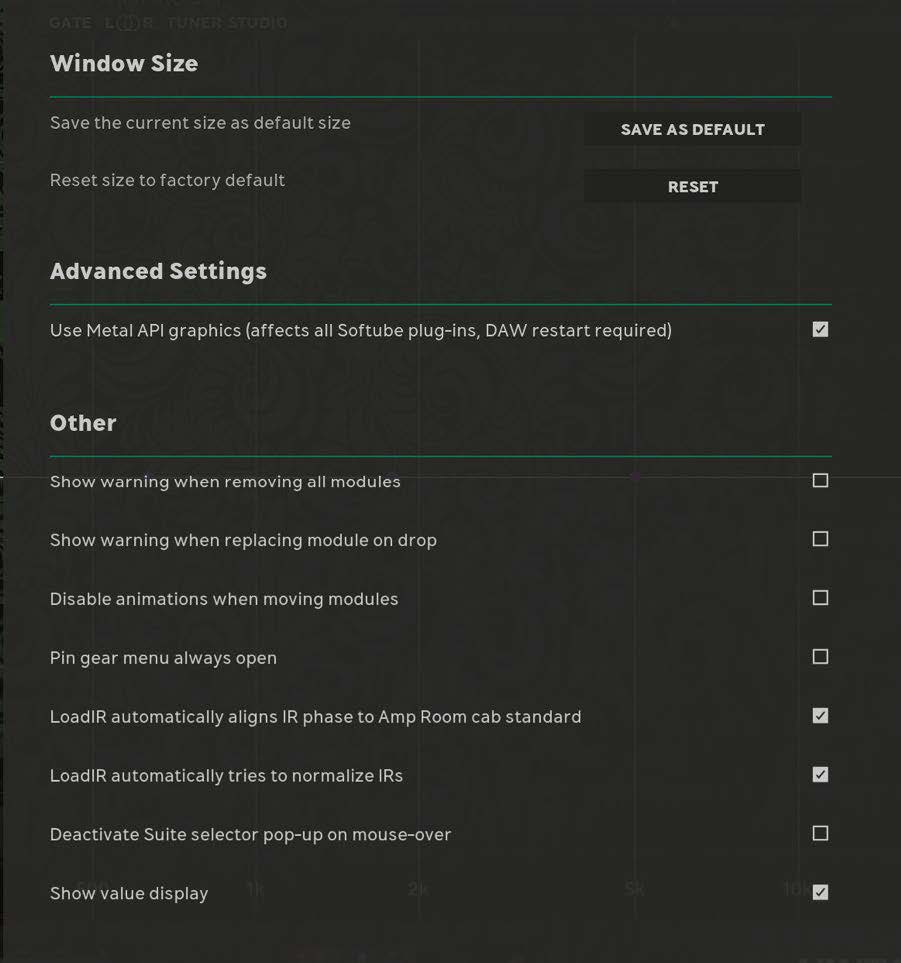
The Settings menu allows you to set many general features of Amp Room.
If severe graphical issues occur, try deactivating Metal API graphics. This is not recommended as this will in turn affect overall performance.
Lastly, we have something called “multistates”. This is up to four (A, B, C and D) fully individual Suite/Studio signal chains inside every instance of Amp Room. By default, Amp Room always starts in multistate A. If you wish to continue tweaking but not lose your current progress, click on the arrow and copy your signal chain to a multistate of your choice. Go to another multistate by clicking on the desired letter.
Note 1: Copying to another multistate will overwrite whatever, if anything, is currently there.
Note 2: All multistates will be saved along with your project.
Note 3: Saving a signal chain to a preset will only save the multistate that is visible.
Note 4: Having signal chains on all four multistates will not drain your cpu. Only the visible multistate is active. The others are inactive.
Note 5: If you go to a multistate that is empty the multistate will automatically open in Studio mode. This is due to the previously discussed criteria for a Suite mode signal chain. An empty signal chain does not qualify for the Suite mode workflow. You are therefore taken to Studio mode where any/every kind of signal chain is allowed.
Many of the features of Studio mode are similar to them in Suite mode. The main difference is, as discussed previously, the workflow. Studio mode has no restrictions on what can be done. Modules can be set in any order and signal chains can be however long and intricate as desired.
The general Studio mode controls are very similar to Suite albeit with the addition of two parameters: DTC and Headphone mode.

DTC (Dynamic Transient Control) - Some pedals, effects and amplifiers impact the overall dynamics and transients of a sound. If you want to restore the original dynamics, DTCTM can bring those transients back. The further the setting is to the right the more those transients are enhanced. Set to off by default.
Headphone mode – This brings some life to your headphone sessions by adding some slight room ambience in stereo. It also removes some harsh high end of the sound. The further the setting is to the right the more room it adds to the overall sound.
Note: If you render or mix with Headphones mode active, that little extra ambience will also be added to the overall Amp Room sound.
For the other features (Gate etc.), see chapter Main Suite mode controls.
Gear modules may look different between the two modes, but they have the exact same functionality.
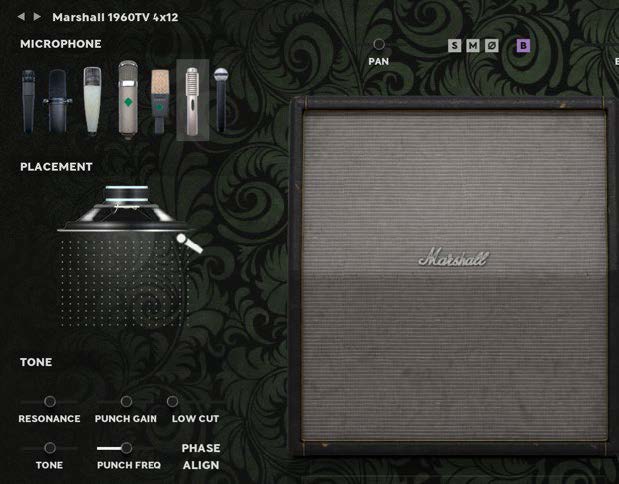
A cabinet module in Suite mode.
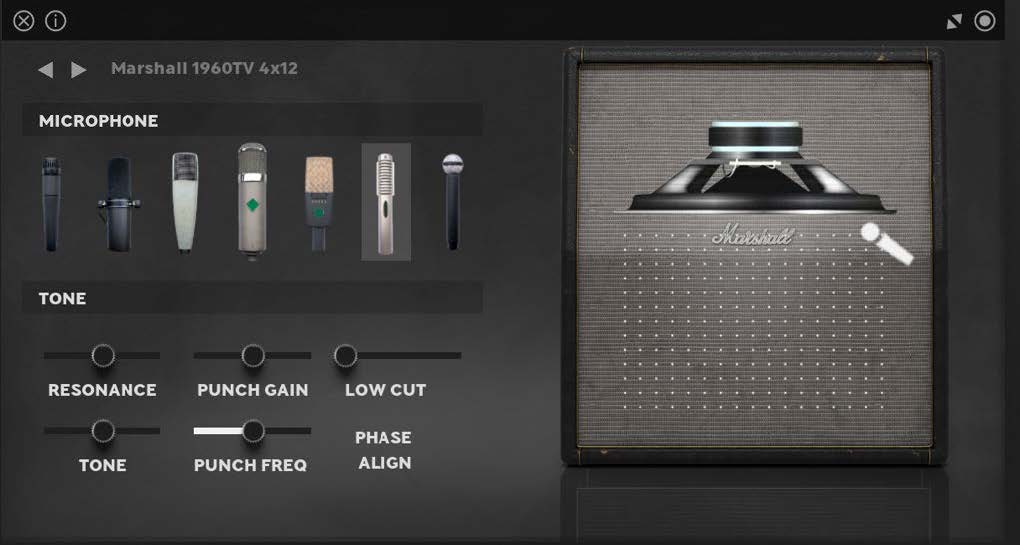
The same cabinet in Studio mode.
Note: Speaker field and microphone positioning will appear upon mouse-over.
One thing that does differ Suite from Studio mode is the functionality when modules are in parallel to each other. In Studio mode Split/Mix modules are inserted automatically when any two or more modules are in parallel to each other.
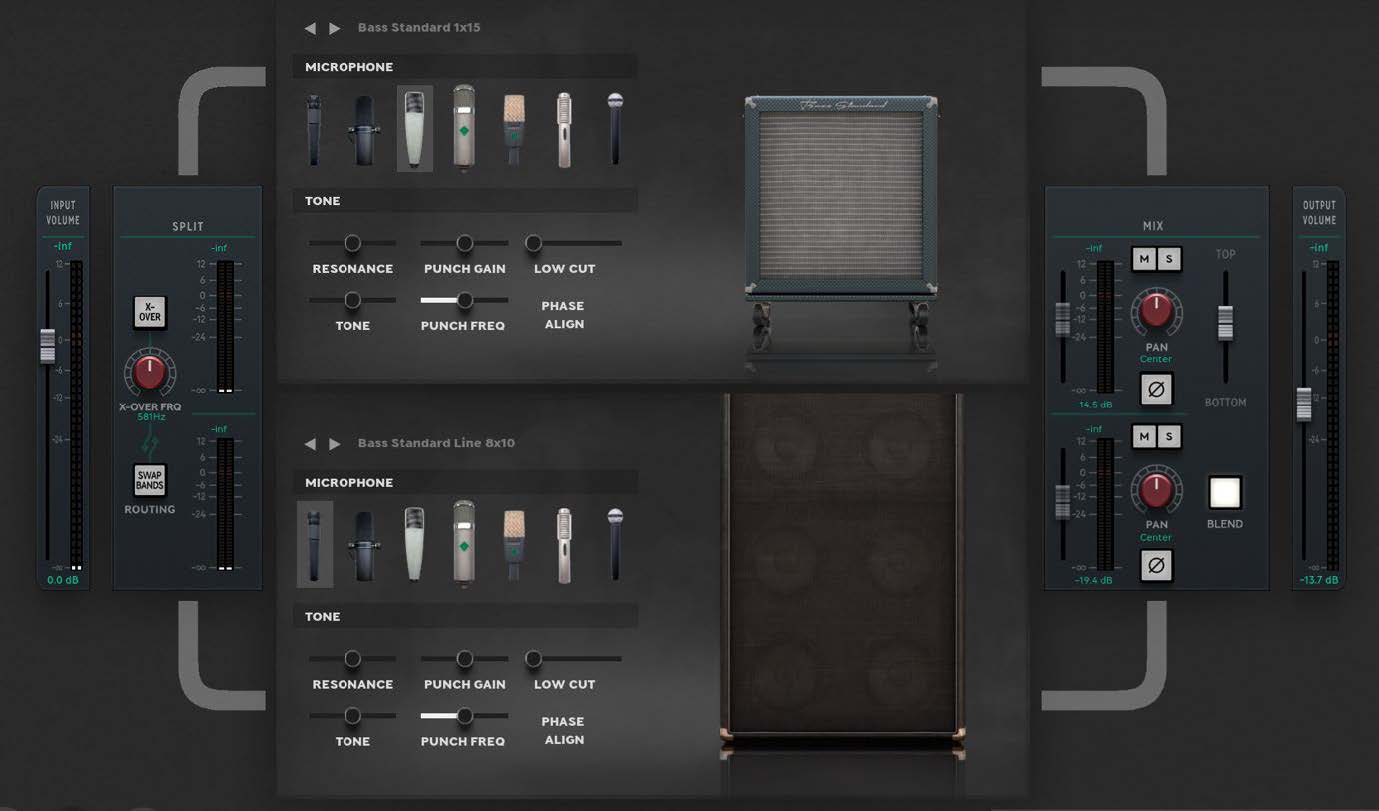
The only thing that can be in parallel in Suite mode are the two cabinets, however only the Mix module controls are accessible in Suite mode. The split module controls are not.
Note: This means the cross-over functionality is not accessible in Suite mode, but the functionality is still there. A cross-over setting can therefore be made in Studio mode and the signal chain moved to Suite mode leaving the cross-over functionality active yet both hidden and inaccessible.
Read more about the Split/Mix modules in the chapter Included Modules.
Another difference between the two modes is that Suite mode features true to life- renditions of the gear, whereas Studio mode, for better overview and arrangement purposes, features a modular render of the same gear.
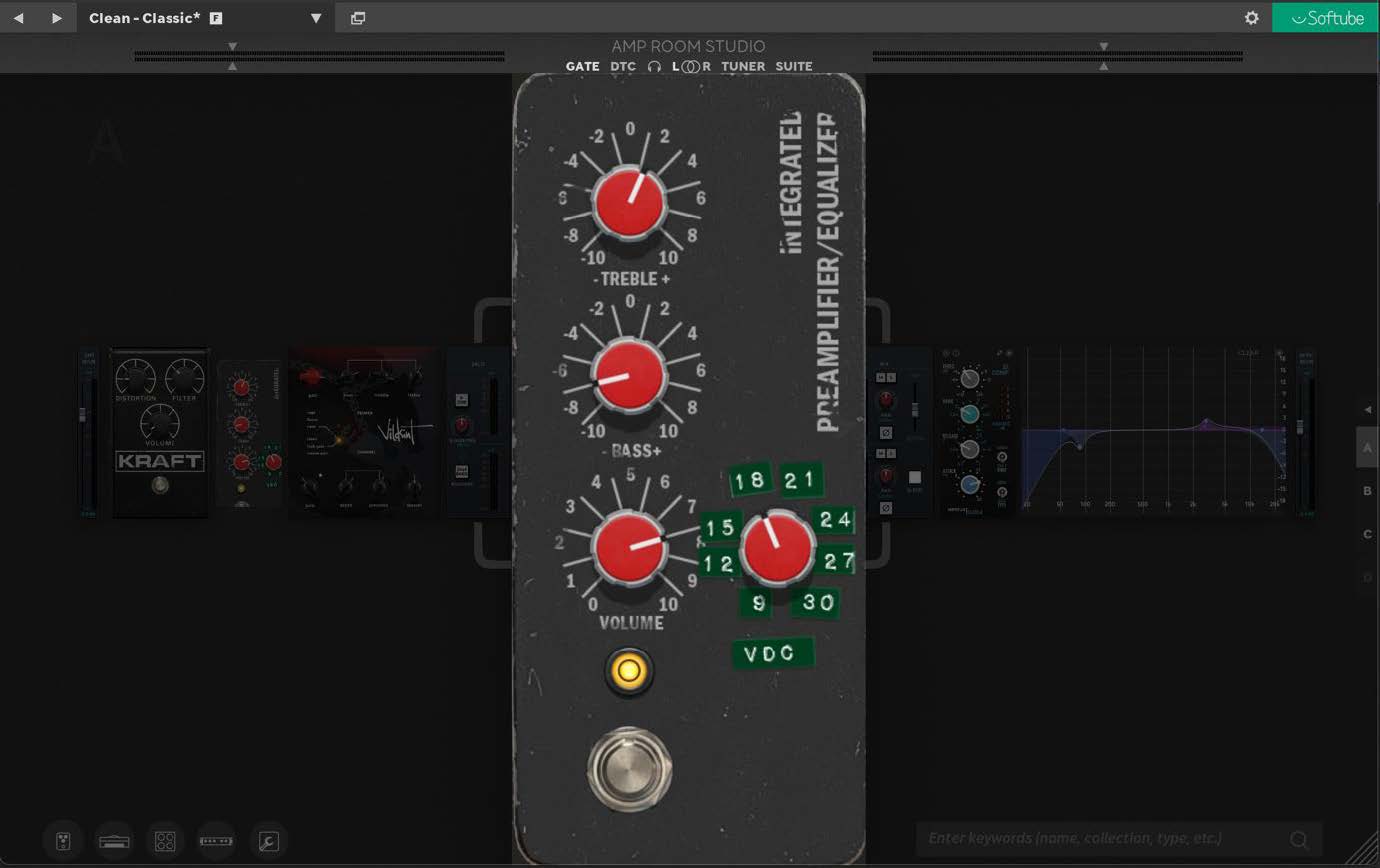
To access a larger view of the modular gear in Studio mode, double-click on it. In most cases the module will be displayed larger, but amplifiers will display the true to life render. To exit focus mode, click somewhere outside of the gear in focus.
Add modules by dragging and dropping them from the Gear menu. You can also double-click on a module to add it. Double-clicked modules will be added last in the signal chain.
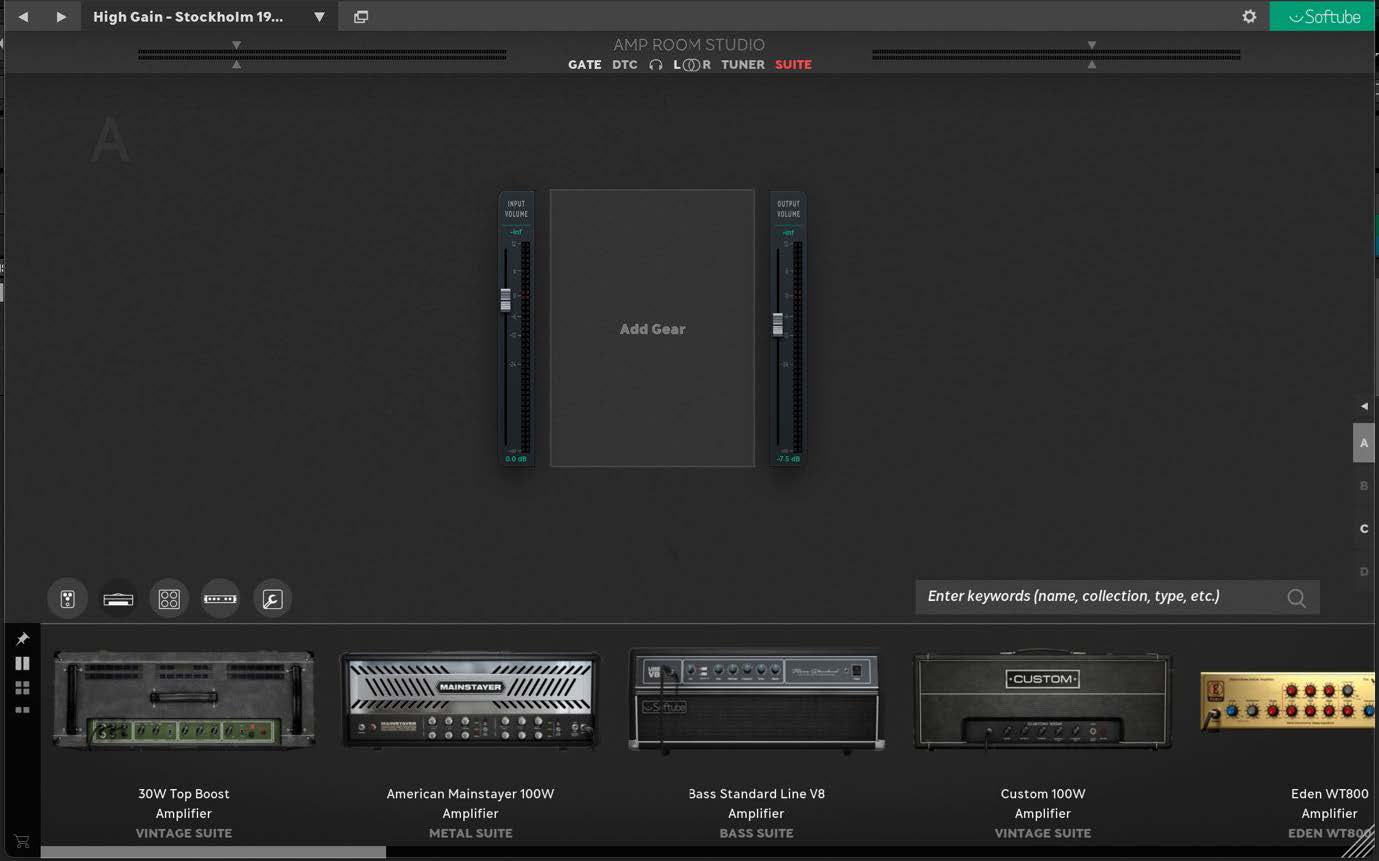
Search for gear by name, collection or type in the search field or by clicking the different gear icons above the Gear menu.

Left to Right: Pedals – Amplifiers – Cabinets – Effects – Utility tools
The Gear menu difference between Studio and Suite mode is that in Suite mode the two categories Pedals and Effects have been consolidated and, as Studio mode is the main workspace for a higher degree of tweaking, there is also a Utility tool category. See Utility Tools chapter for more information on these.

Utility tools icons. See chapter Included Gear for more information on these.
The icons to the left in the Gear menu determines the Gear menu’s behavior.

Top to bottom:
Pin – Pins the Gear menu open at all times. If this is unchecked the Gear menu will instead open upon mouse-over.
Max viewing mode: Shows the gear thumbnails at their largest in single row.

Mid viewing mode: Shows smaller gear thumbnails in double row.

Min viewing mode: Shows smaller gear thumbnails in single row.

Move modules by grabbing them by the top bar and dropping them where is desired (serial and/or parallel to something else). You can also drop it on top of another module to replace it.
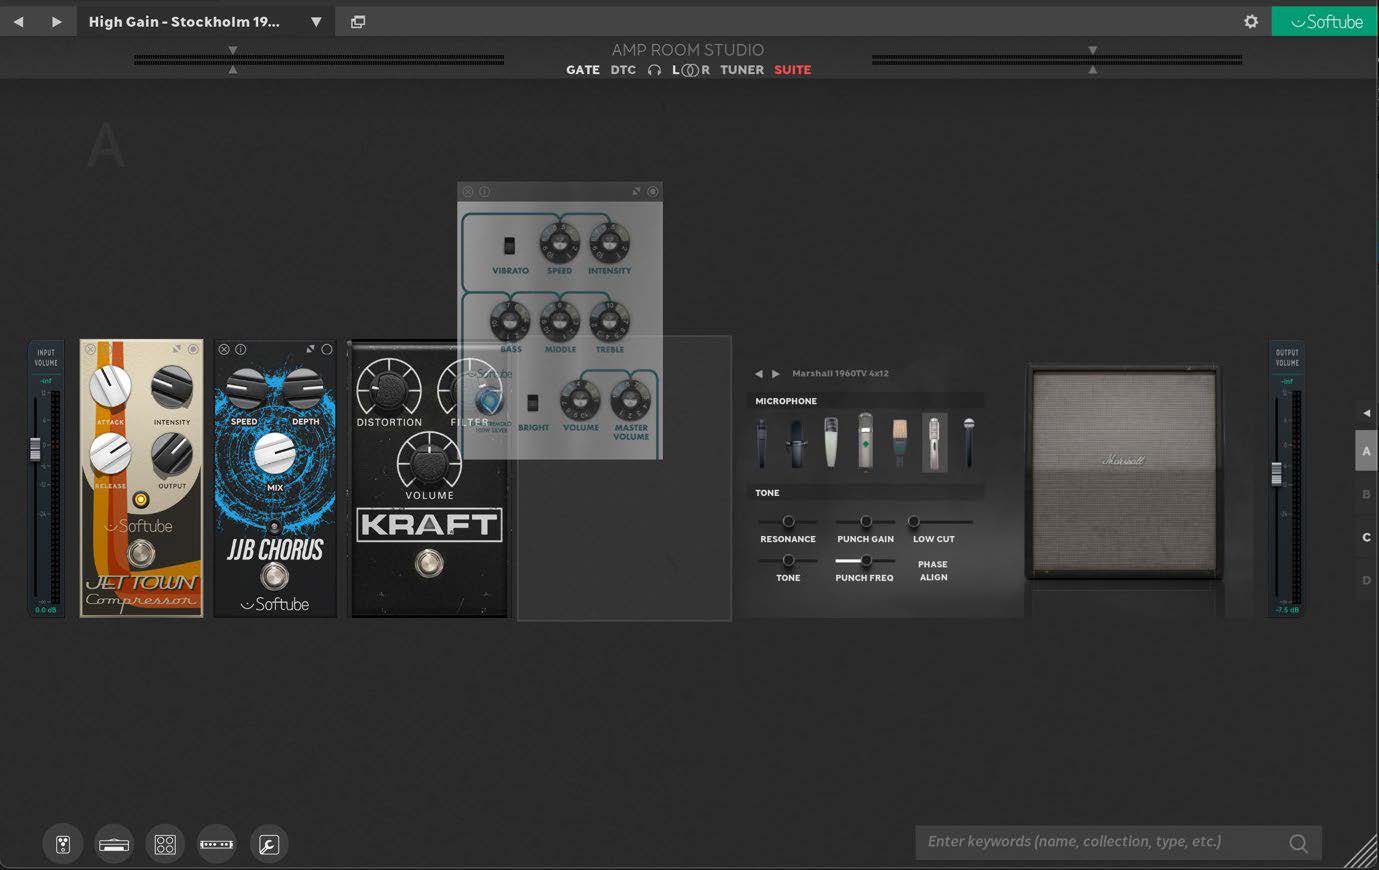
Right-clicking on a module is another way of arranging modules.

Remove module: Will remove that particular module instantly without a confirmation warning.
Replace module: Will lead you to a list version of all available modules.
Remove all modules: Will, perhaps not surprisingly, remove all the modules you currently have in the workspace area if you wish to start over fresh with a clean slate. Choosing this will however prompt a confirmation warning of what is about to happen.
Add duplicate after module: This will duplicate the module along with all its current settings and paste it directly after the module being duplicated.
Please note! These right-click options do not appear on the Split and Mix panels, nor the Input and Output meters.
Also, hold ctrl while holding&dragging left-click to draw a rectangular area and high-light several modules at once. This can also be achieved by holding ctrl and clicking on the desired modules. Right-click on high-lighted modules for options.
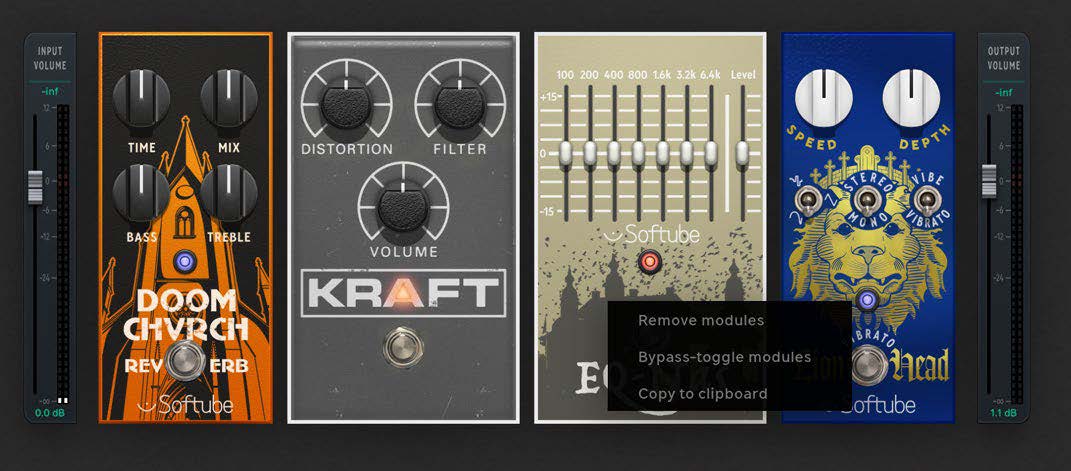
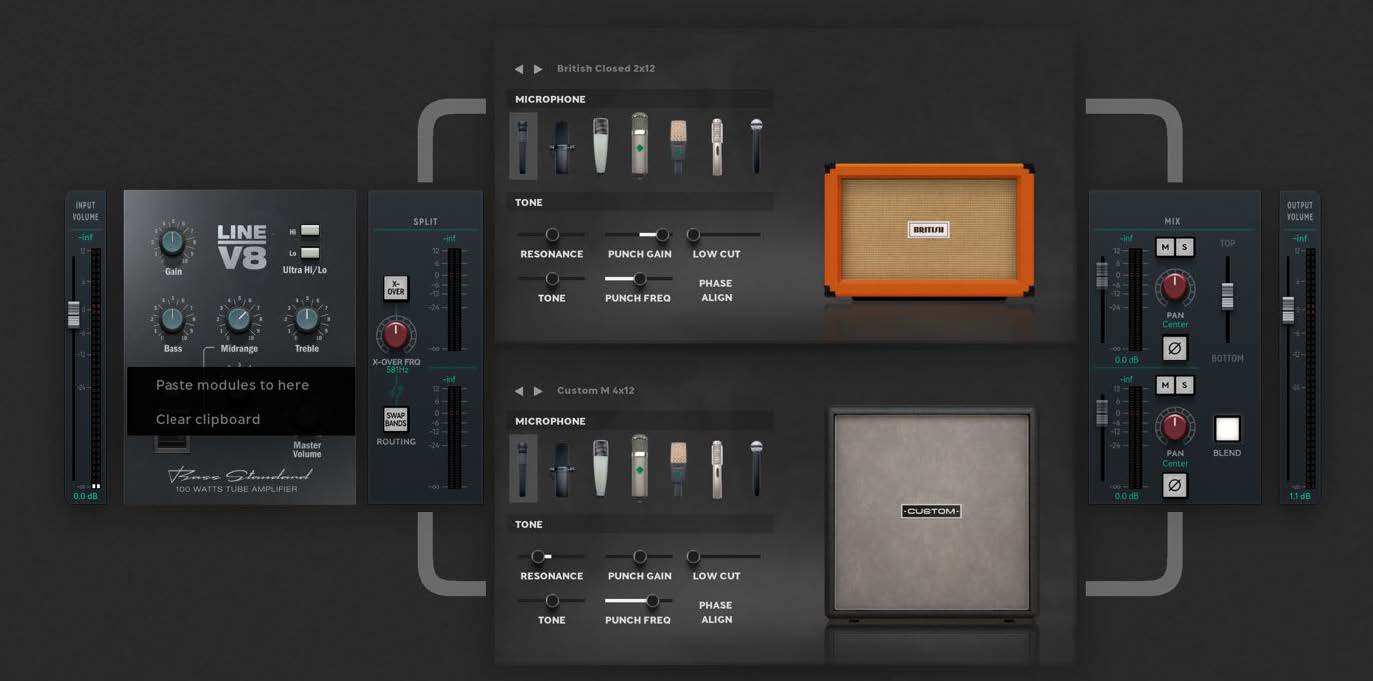
Apart from deleting and bypassing many modules at once, “copy to clipboard” also allows you to copy/paste the high-lighted modules. This, used together with multistates, can speed up the signal chain creation process a lot.
Example: There is a preset with a great pedal signal chain that you want to have in front of your current amp + cab signal chain.
- Go to an empty multistate.
- Load the pedal chain preset to the new multistate.
- Ctrl + drag high-light the pedals you want use.
- Right-click on a high-lighted module and choose “copy to clipboard”.
- Go back to the first multistate.
- Hover with the mouse next to the module where you want to paste the pedals.
- Right-click on the insertion line that appears and click “paste modules here”.
These modules are only available in Suite Mode. When your sound setting is almost perfect and you only need to make one final tweak, these Utility devices can save your day. These are the not-so-glamorous tools that take care of general audio housekeeping like basic filtering, pan, mute, and phase.
High Shelf Filter

All audio above the frequency set by the Freq knob will be amplified or attenuated. The Gain knob sets the amount of boost or cut.
Low Shelf Filter

All audio below the frequency set by the Freq knob will be amplified or attenuated. The Gain knob sets the amount of boost or cut.
High Cut Filter

Noise or unwanted brightness can usually be removed by this high cut filter. This type is also known as low pass filter, or LPF.
This filter removes audio above the frequency set by the Freq knob.
Low Cut Filter

The low cut filter (also known as high pass filter, or HPF) is by far the most widely used tool in any studio. There is often a lot of unwanted, low frequency rumble going on that doesn’t help the mix at all. Removing all audio below, say, 100 Hertz is standard procedure, except for bass instruments and kick drums, of course.
This utility module removes audio below the frequency set by the Freq knob.
Gain/Mute
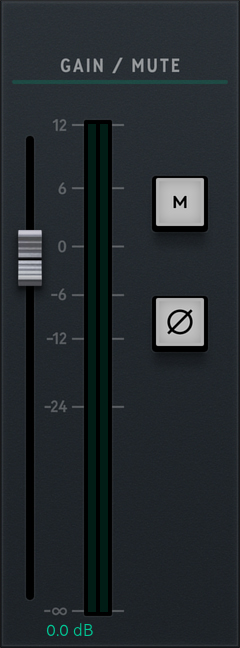
In complex setups, with several parallel lanes in the signal chain, you may want to quickly mute or change the volume of a lane. By placing this utility module last in the chain, you’ll be able to do exactly that.
The Mute button mutes the chain where it’s inserted. Phase inverts the phase by 180 degrees. Volume adjusts the volume of a chain.
Note: That inverting the phase can create unwanted side effects such as mono incompatibility.
Pan/Volume
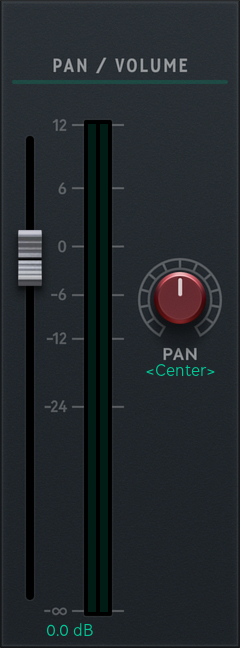
This module comes in handy, when all you need to do is adjust the Volume or Pan at some stage in the signal chain. Just insert it wherever it is needed.
Short Delay

This utility module can be used for time aligning between parallel signal paths.
Cab impulses, with mics at different distance from the cabinets, can cause unintentional phasing issues between parallel signal paths. This can result in a sound that feels slightly “off”, where certain frequencies are missing.
The Delay knob has a range from 0 to 5 ms. Adjust the delay and hear the phasing problem disappear. When you've hit the right spot, press the – and + buttons to nudge the delay in 0,08 ms sample steps for even finer adjustment.
Short Delay can also be used as a tone shaper.
Variable Phase

Two microphones at different distances from a sound source (say, a speaker cabinet), will inevitably produce two signals that are more or less out of phase. This is not necessarily a problem, but if you want to do something about it, Variable Phase is the tool to use.
The Variable Phase knob will turn the phase above the frequency you choose (20 Hz to 20 kHz). Audio below that frequency passes unaffected.
Variable Phase can be both a problem-solver and a tool for experimentation.
Patrik Jensen – Product Owner
Johan Toverland – Project Management
Stefan Aronsson – Product Marketing
Kim Larsson, Mattias Flygare, Fredrik Jansson, Anton Eriksson and Niklas Odelhom – DSP modeling
Pelle Serander, Patrik Holmström and Arvid Johnsson – Framework programming
Björn Rödseth – DSP backend programming
Niklas Odelholm – General graphic design
Ulf Ekelöf, Thomas Merkle, Nis Wegmann and Manuel Colom – Graphic design
Stefan Aronsson and Patrik Jensen – Presets
Emanuel Enbäre and Niels Nielsen– Quality assurance
Thank you to: Daniel Bergstrand @ SDFX, Kristian Kohle @ Kohlekeller Studio, Thomas Plec Johansson @ The Panic Room, David Castillo @ Studio Gröndal, Tue Madsen @ Antfarm Studio, Vilma Colling @ Riksmixningsverket, Jacek @ Bogren Digital, David Gnozzi @ MixbusTv, Monte Pittman and Mikael Almgren.