
With Apollo Central you can control your UAD channels and plugins in the Apollo Console from the Console 1 hardware. Switch your Console 1 to Apollo Central mode and you will be able to load plug-ins and presets directly in your Apollo Control and you can control the plug-ins, channels, sends, monitoring. You can set up a recording chain with an UA 610 on the vocals, adjusting gain, sending a bit of that to a send with the Lexicon 224, and outputting it to the vocalist's headphones only by using the Console 1 hardware!
- Channel settings, such as Volume, Pan, Solo, Mute, Sends.
- Preamp settings, such as Low Cut, Input Gain and also control of Unison plug-ins.
- Plug-in inserts. All UAD plug-ins come premapped to the Console 1 hardware. Just insert a plug-in and you can easily access and tweak its parameters.
- Output monitor track.
- Presets and channel presets.
How to Switch to Apollo Central Mode
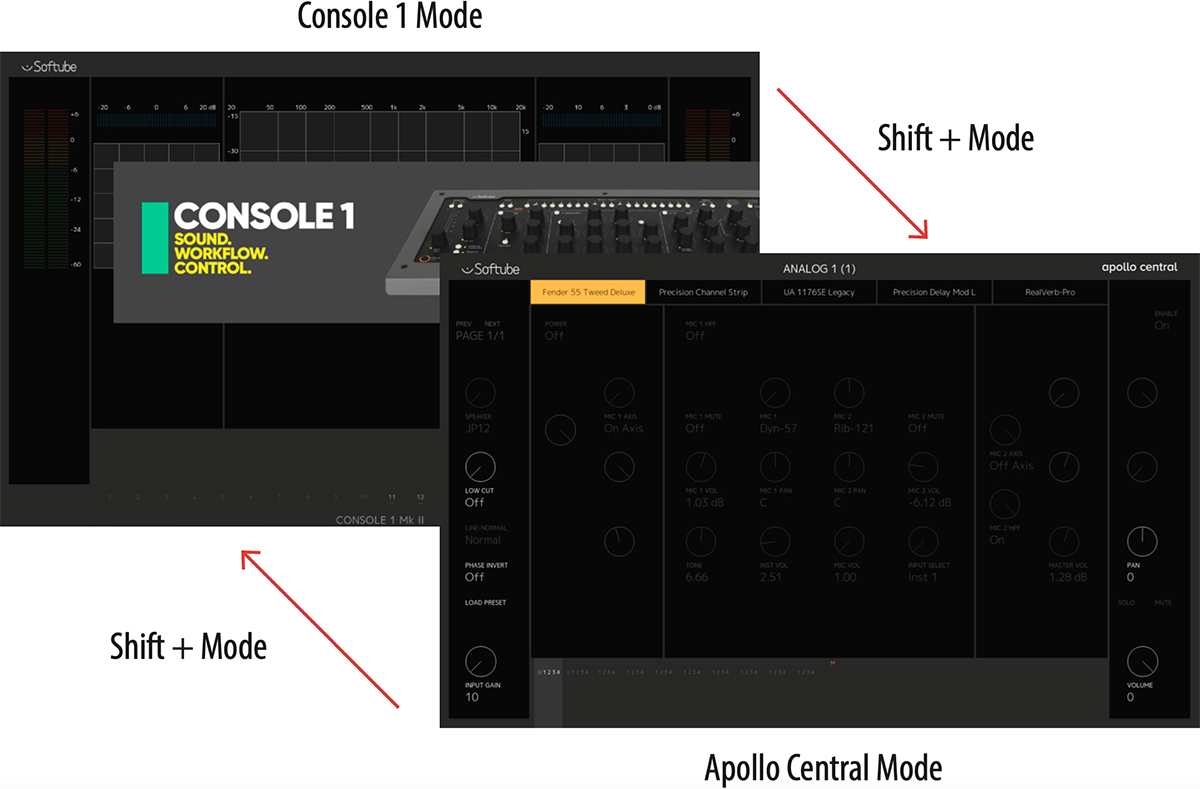
When you first start the Console 1 On-Screen Display, it will be started in the normal Console 1 operating mode. To switch to the Apollo Central mode, press Shift + Mode (Shift + Display Auto on the first generation hardware). This mode is indicated by the "Apollo Central" logo in the top right corner.
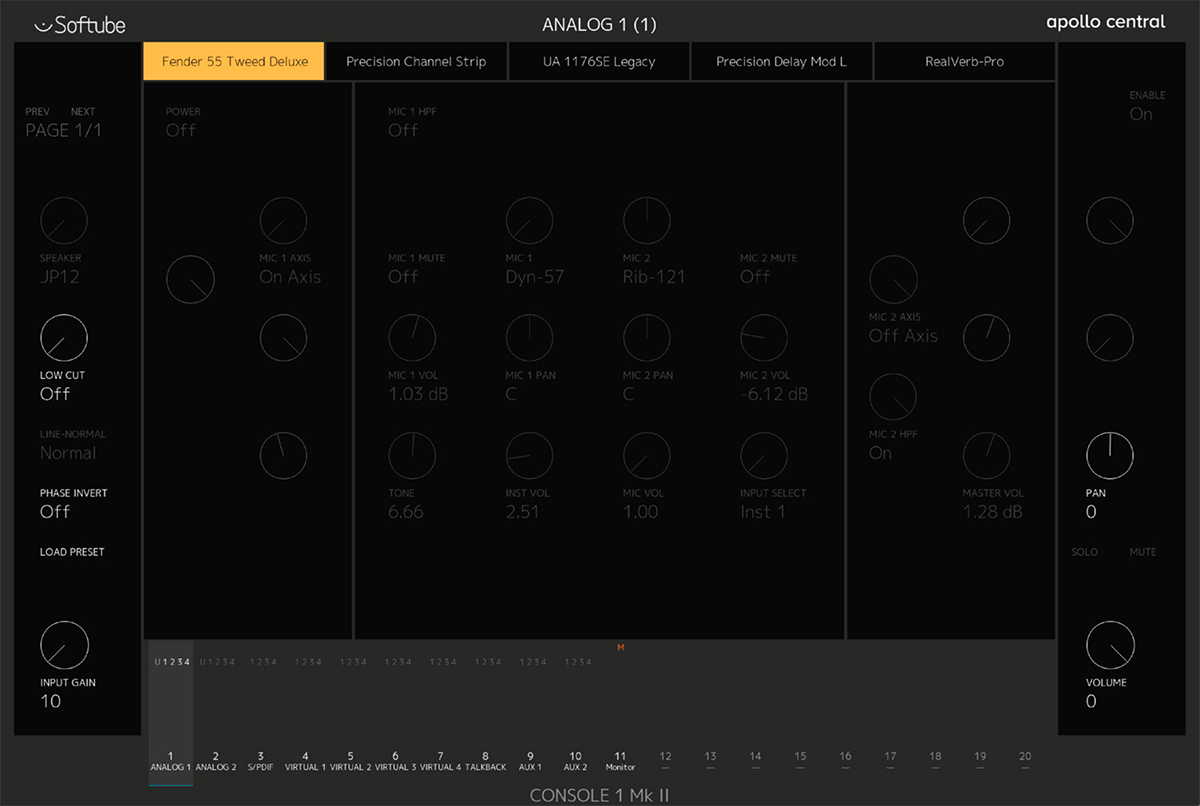
Console 1 On-Screen Display in "Apollo Central" mode with a lot of plug-ins on the "Analog 1" channel.
Almost All Features at a Glance
- Open the On-Screen Display with Display On.
- Switch over to Apollo Central mode with Shift + Mode (Shift + Display Auto on first generation Console 1 hardware).
Insert a Plug-In
- Select the first track with Select Track: 1.
- Press Shift + Select Track: 2 to insert a plug-in in the first plug-in slot. Use Volume/Select to scroll through the list, Solo/OK to select, or Mute/Cancel to cancel.
Load a Preset
- Press Preset to open the preset list. Use Volume/Select, Solo/OK, Mute/Cancel to select a preset.
Tweak
- Use the knobs on the Console 1 hardware to tweak settings of the plug-in.
- Click Select Track: 1 to cycle through the different plug-ins and the channel. It will toggle through "Channel" → "Insert 1" → … → "Insert 4" → "Channel", but only if inserts are present.
- While controlling a plug-in, press and hold Shift to get quick access to some of the channel's parameters (such as Solo, Mute, Pan and Volume).
Send to Auxs
- While controlling the channel's parameters, press and hold Shift, to access the sends with Drive/Send 1, Character/Send 2, Pan/Send 3, Attack, Release, Threshold.
The Console 1 Hardware
Open the On-Screen Display by pressing the Display On button at the top left of the Console 1 hardware, and it's basically "what you see is what you get". The biggest differences to the "normal" Console 1 workflow is.
- You can access extra functions by holding the Shift key on the hardware. The additional functions are displayed in the On-Screen Display.
- You press the track selector several times to cycle through the tracks inserts.
New Functions in Apollo Central
Shift + Mode (Shift + Display: Auto on Mk I hardware): Change modes between Apollo Central and the normal Console 1 mode.
Shift: When you have selected a plug-in, you can press and hold the Shift/Fine Adjust button for quick access to the channel's settings, such as Volume, Pan, Solo and Mute. If the channel is selected, you can access Sends by pressing and holding Shift/Fine Adjust.
Shift + Filters to Compressor: Open or close the plugin window of the current plug-in. Hold Shift and click Filters to Compressor once to open. Press and hold Shift, and double-click Filters to Compressor to close the plug-in window.
Shift + Phase Inv: Toggle the power of the current insert.
Preset: Load presets.
Shift + 1: Insert or remove plug-in from the Unison slot.
Shift + 2: Insert or remove a plug-in from the first insert slot.
Shift + 3, 4, or 5: Insert or remove a plug-in from the second, third or fourth insert slot.
Shift + Page Up/Shift + Page Down: Access next or previous page for plug-ins that have multiple page maps.
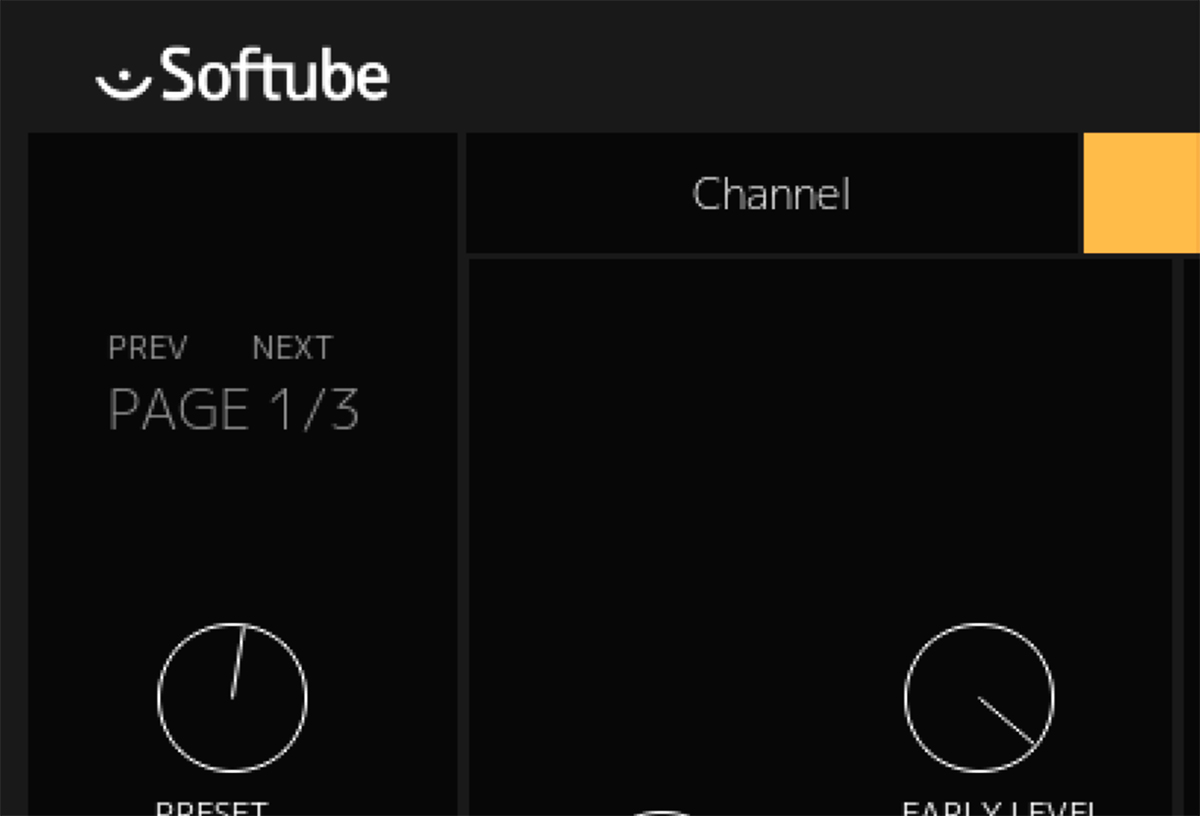
The On-Screen Display
The On-Screen Display functions as guide for the plugin layouts, as well as an overview of plug-ins and levels. Resize the window by grabbing and dragging a corner. The On-Screen Display accepts no mouse or keyboard input except the resize functionality.
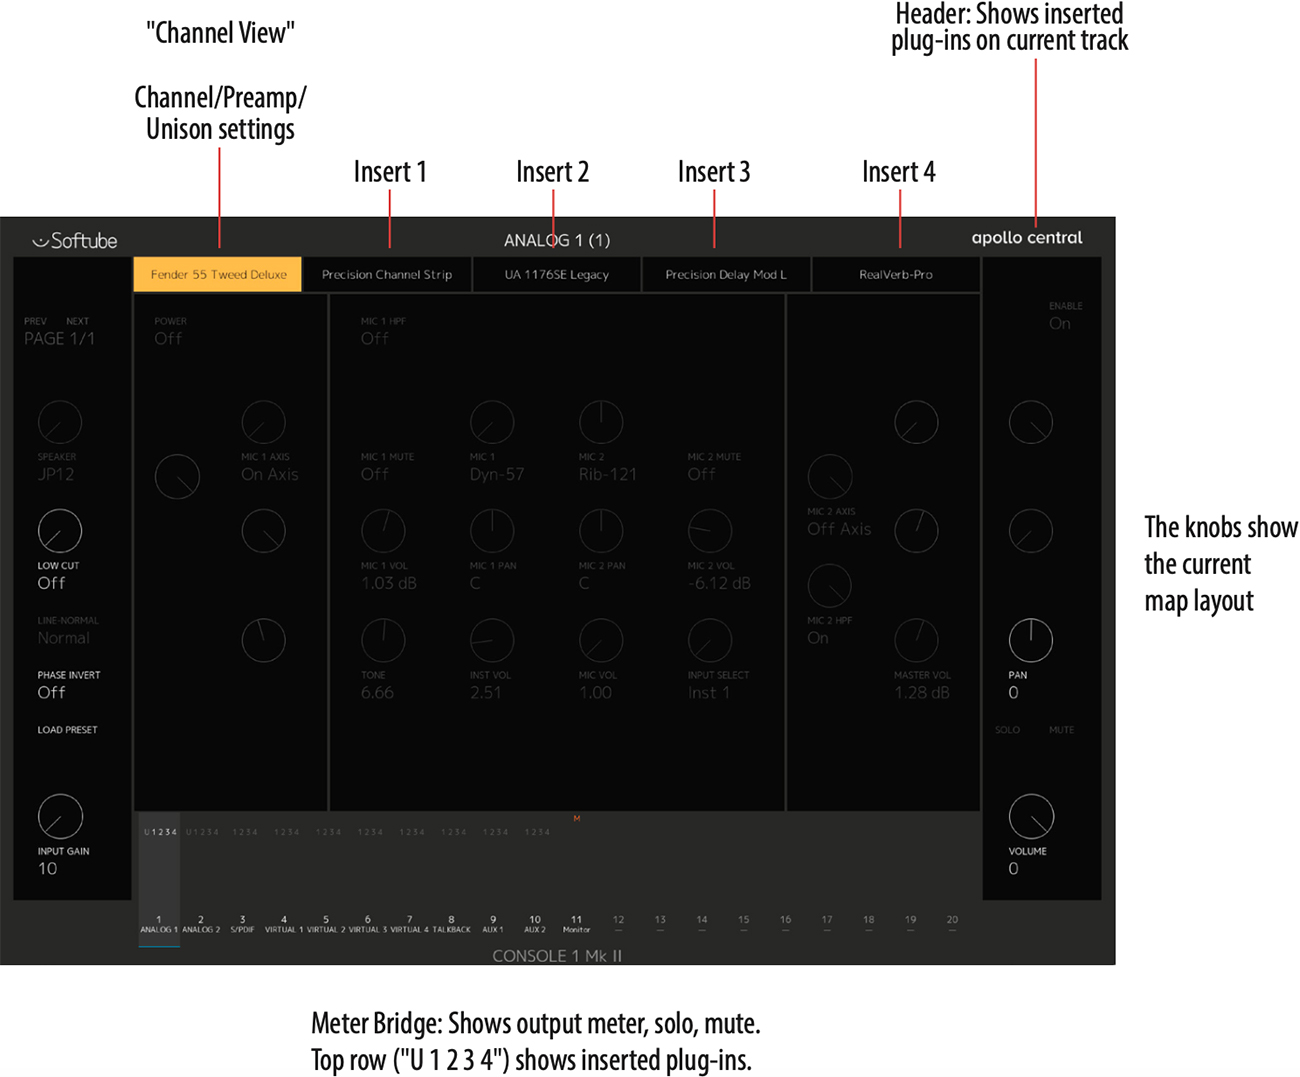
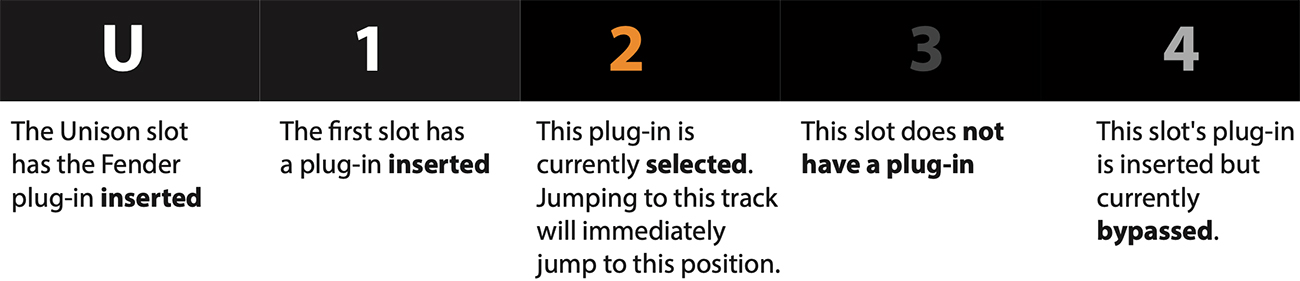
Header
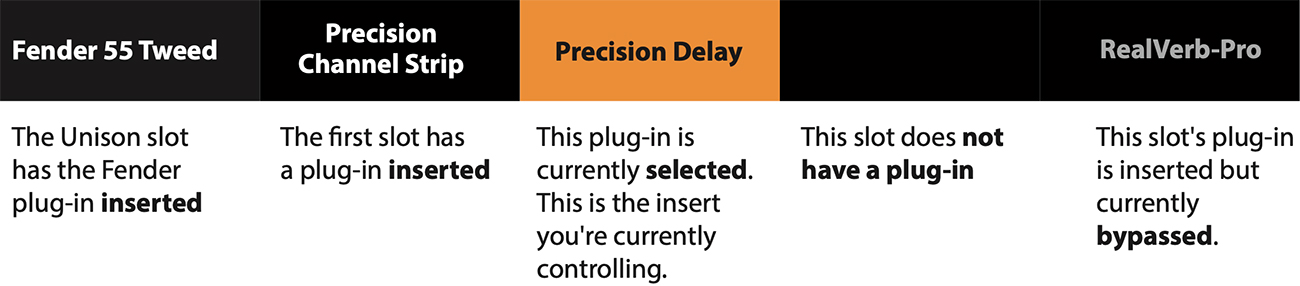
The header shows which plug-ins have been inserted and if they're active. If no plug-ins are inserted, only the first slot is active and says "Channel".
Meter Bridge
The meter bridge shows the output meters of each channel, Solo/Mute/Mono status as well as an color coded overview of the header ("U 1 2 3 4").
Selecting a track in Apollo Central mode is as easy as it is in Console 1 mode. The big difference is that you can click the same track selector button again to cycle through the different plug-in inserts on that track (if there are any inserts).
- Select track X with the Select Track: X button. If you have more than 20 tracks, use Page Up/Page Down to navigate to your track.
- When you select a track for the first time, you'll see to the channel's settings, or if you have a Unison plug-in on that track, the Unison plug-in's settings.
- Click the Select Track: X button again to cycle through the different plug-ins inserted that track. The currently selected insert slot is highlighted with yellow in the On-Screen Display's header.
- The On-Screen Display shows how the plug-in's parameters are mapped to the hardware.
When you're in the "Channel" view (the first yellow slot at the top of the Console 1 On-Screen Display), you can access the basic channel settings.
By selecting a track from the either the Console 1 hardware or the UAD Apollo application, its basic functions (Volume, Pan, Solo, Mute) become directly available from the Console 1 hardware.
Sends
Access the channel's sends by pressing "Shift" on the Console 1 hardware. All six sends become available on Drive/Send 1, Character/Send 2, Pan/Send 3, Attack, Release, and Threshold. Even if your hardware only supports a limited number of sends, Apollo Central will always show all six.
Preamp Settings
If the channel has preamp settings (Input Gain, Phase Invert and Low Cut) these are also immediately accessible from the hardware.
Unison Preamps
Inserting a plug-in in the Unison slot will make its settings available from the channel view, together with the channels "normal" parameters (Volume, Pan, etc).
Controlling Track Parameters
Select the track and make sure you're in first slot, indicated with "Channel" or the name of the Unison plug-in inserted as a preamp. For input tracks, you can control:
Low Cut
Phase Invert
Input Gain
Pan
Solo
Mute
Volume
By pressing Shift you can also access
All 6 Sends
Recording monitor (record with our without UAD plug-ins).
Unison enabled tracks have the same parameters, as well as the parameters from the Unison plug-in.
Tracks without preamp the same parameters, except the input parameters (Low Cut, Phase Invert, Input Gain).
Aux tracks don't have Solo, Pan or Sends, but you get the ability to control Mono instead of Solo. Press Shift and you can access:
HP Level
Line 3/4 Level
Pre/Post
Controlling Plug-ins ("Insert View")
If a channel has inserted plug-ins, access the plug-in's settings by repeatedly pressing the channels track selector until you have selected the plug-in. If, for example, channel 1 has both the UA 1176 and Precision Equalizer inserted, pressing "Select Track: 1" on the hardware will toggle through:
- Channel view (basic mix functions)
- UA 1176
- Precision Equalizer
- ...back to Channel view.
The On-Screen Display remembers the last selected position so that it is easy to jump between different plug-ins on different tracks.
Quick Access to Channel Settings
If you're in Insert View you can quickly access the channel settings by holding "Shift" and get access to:
- Preamp settings (Input Gain, Phase Invert, Low Cut) if applicable.
- Channel settings (Volume, Solo, Mute, Pan).
- The two first sends (usually Aux 1 and Aux 2).
- Current insert's Power button (Shift + Phase Inv/ Bypass).
- Open/Closing the plug-in GUI (Shift + Filters to Compressor).
- Previous/Next page for multi-page plug-ins (Shift + Page Up/Down).
- Recording monitor, record inputs with or without UAD plug-ins. (Shift + Order).
Multiple pages
If a plug-in needs multiple pages of controls, press Shift + Page Up or Shift + Page Down to jump between pages. A plug-in has multiple pages if the "PREV NEXT: Page 1/x" option is visible in the top left corner of the On-Screen Display.
Load or remove a plug-in from the Unison slot:
- Select the track.
- Click Shift + Select Track 1 to select "Select Unison Plug-in".
- Use the "Volume/Select" knob to scroll through the list. Choose "None" if you wish to remove the current plug-in.
- Confirm your choice with "Solo/OK" or cancel with "Mute/Cancel".
Load or remove a plug-in from the 4 normal insert slots:
- Select the track.
- Click Shift + Select Track 2 to open the selection menu for insert #1. Use "Select Track 3", "Select Track 4", and "Select Track 5" for inserts 2-4.
- Use the "Volume/Select" knob to scroll through the list. Choose "None" if you wish to remove the current plug-in.
- Confirm your choice with "Solo/OK" or cancel with "Mute/Cancel".
To load a plug-ins preset, first select that plug-in from the hardware.
- Press Preset.
- Select the preset with Volume/Select, confirm with Solo/OK or cancel with Mute/Cancel.
To load a channel preset, select the channel instead of a plug-in before pressing Preset.
Note: it's not possible to select a channel preset if a Unison plug-in is inserted on the current track. Remove the Unison plug-in before you access the preset menu to access the list of channel presets.