User Manual
Heartbeat
Intro
User Interface
Getting Started
Sound Architecture
Utility Section
The Instruments
Bass Drum 1 “BD 1”
Bass Drum 2 “Kick”
Snare/Rimshot “SD RIM”
Snare/Clap “SD CLP”
Hihats
Percussion 1 and 2 “Perc”
Cymbal
The Mixer
Auto Layer Machine
The Effects
Valley People Dyna-mite
Filter Echo
TSAR-1D Reverb
Master Bus
Velocity
Time Gate
Using Multiple Outputs
Presets
Setup Window
Block Diagram
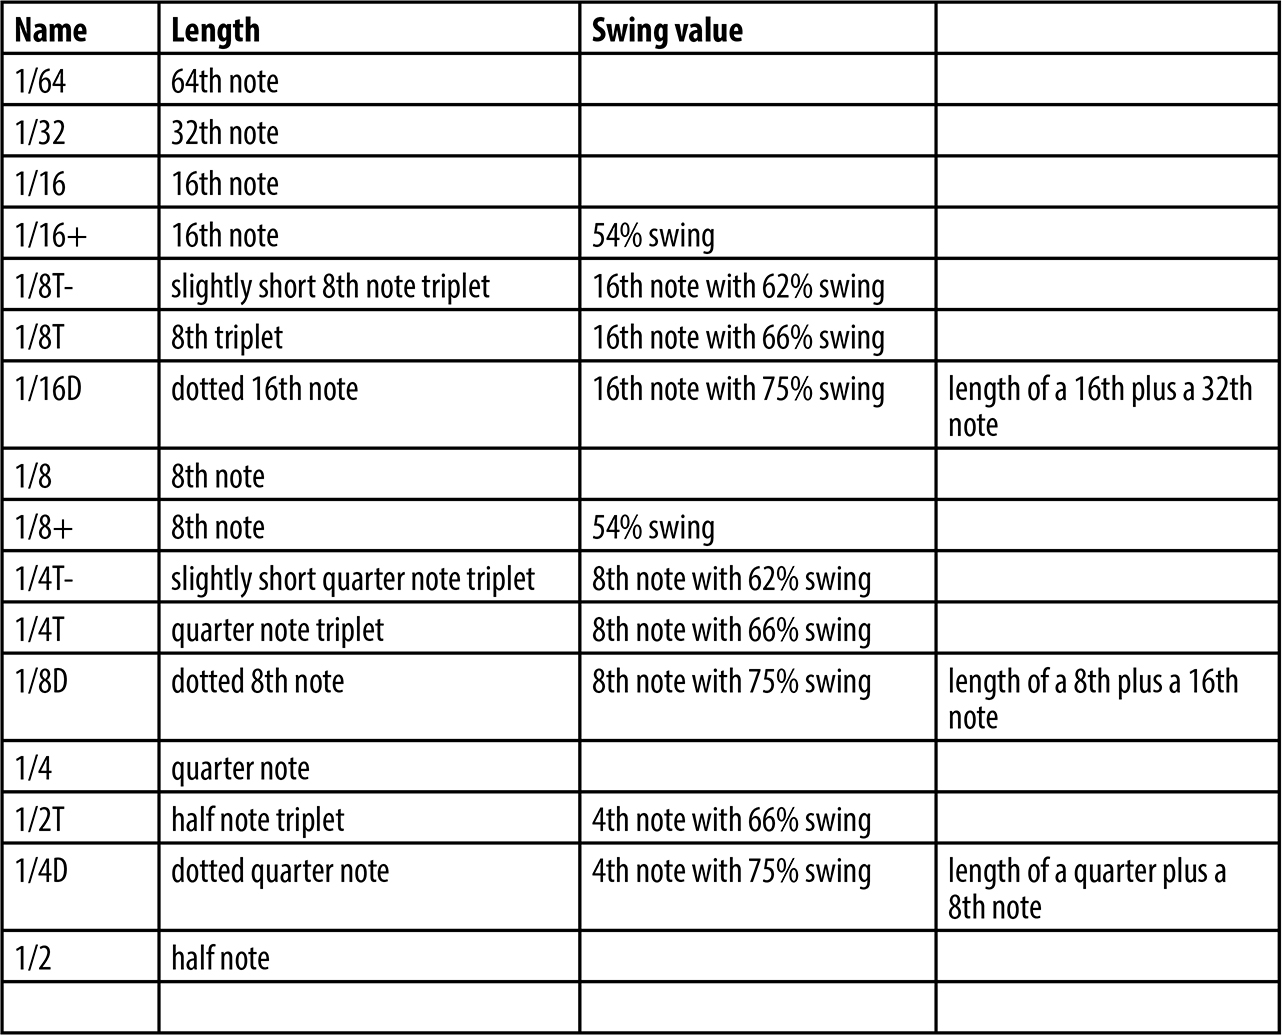
ALM/Filter Echo times chart
Heartbeat modules in Modular
Heartbeat EQ
Credits
Related manuals
Synthesized sounds and imaginary worlds have inspired musicians since the mid 1900s when Dr. Bob Moog invented the first ever voltage controlled synthesizer modules, and eventually launched the electronic synthesizer as a new instrument into the limelight of every day musicians. Around the same time, electronic organ-makers looked into ways of electronically reproducing drums and rhythmic sounds. In the 70s, the electronic drum machine made its way into the public mind and electronic drum production could soon be heard in everything from disco, electro and hip-hop to pop and rock.
This legacy of finding new and exiting electronic percussive sounds is something we want to convey in Softube Heartbeat—the joy and excitement of exploring new and interesting percussive worlds by looking back at history, but at the same time adding something new to the concept.
Heartbeat is an innovative software drum synth with a familiar, yet unique, sound character. A world class effects section is included, as well as the innovative Auto Layer Machine which will take your beats to unexpected places. While Heartbeat draws inspiration from the best analog drum synths from the 1980s, it does not emulate any existing drum machine. The sound mostly originates from Softube’s own modeled analog synthesis, which has been augmented with carefully selected waveforms.
The core of Heartbeat consists of the eight instruments. You will find two different bass drum instruments, which can be as punchy and deep as you want them, but are also perfectly capable of producing snappy and hard hitting woody textures. The two dedicated snare drum instruments have six parameters each which allows you to achieve anything from edgy rimshots, soft and whispery snare rolls to machine-like claps.
The two percussion instruments are identical and can be used to model anything from 80s style synthetic toms to cowbells and noise drops. And just like the other instruments, the hihat and cymbal channels offer flexible synthesis engines—tweak to your heart’s desire! But the idea behind Heartbeat is to make it a one-stop shop for your beat creation, so we also added an effects section and the innovative Auto Layer Machine.

Click here to view the full-sized image in a new tab
- Drum channels
- Master bus
- Auto layer machine
- Valley People Dyna-mite
- Filter echo
- TSAR-1D Reverb
- Utility
- Instruments
- Mixer
- Global
The left half of Heartbeat’s graphical interface is taken up by the eight Drum Channels. These all consist of (from top to bottom) the Utility section, the Instrument and the Mixer Channel. By default, the Mixer Channels’ outputs are summed and sent to the included Valley People Dyna-mite compressor/limiter/gate (read more below), and then on to the Master Channel on the right side of the interface.
Below the Valley People Dyna-mite unit are the Filter Echo and the TSAR-1D Reverb effects. Each mixer channel has send knobs (labeled Echo and Rev respectively), that determine the level of sound that is being fed from the respective channels into the two send effects. The output of the send effects is then summed with the output of each Drum Channel, and fed into the Master Bus.
Above the Valley People Dyna-mite unit you will find the Auto Layer Machine. This is a device that can be used to layer sounds or trigger a chain of events, in order to create new sound textures or create automatic fill patterns in up to four steps. By pulling the Chaos slider to the right, an element of randomness is introduced—so Heartbeat has a mind of its own and might give you some unexpected results.
If you’re familiar with working with software instruments, this section may be all you need to get started. Refer to the in-depth parts of this manual to learn the details.
After you have finished installing Heartbeat, open a new song in your DAW, and launch Heartbeat which you will find in the DAW’s software instruments folder.
Setting up MIDI
Heartbeat is by default set up so the eight Instruments respond to the MIDI notes that are most commonly used for drum machines and drum software. The red text in the Utility section (the black square at the top of each Drum Channel) displays the MIDI note set up for each Instrument. If you would like to change it, click and hold the red text, and pull up or down. Or click Learn and strike the desired key/pad on your MIDI controller to assign this key/pad to the Instrument. Please note that the Hihats instrument receives input from two different MIDI notes, as it can be used for both closed and open hihat sounds. If you don’t have a MIDI keyboard or pad controller available, you can use your mouse to click the green arrow in the Utility section, which will trigger the sound.
Presets
Clicking the white arrow will open a list of presets for that specific Instrument or effect. There are also presets available for entire Heartbeat kits (with settings for all eight instruments, effects, levels and master settings) via the usual preset function in your DAW.
Instrument and mixer
In the Instruments sections, you will see the settings for the instruments. These are all clearly labeled and adjusting them will yield apparent changes to the sound. Below these are the Mixer Channels with effects sends, a one-knob EQ (adapted for each Instrument) and an auto-pan function called Ping/Pong. The Pan knob and volume fader acts as you would expect, as do the Solo and Mute buttons.
Effects
The parameters of the three effects are clearly labeled. The Pre button to the right of Filter Echo and TSAR-1D inserts these effects before the Valley People Dyna-mite, which means the reverb and echo tails are also affected by Dyna-mite’s processing.
Master bus
The output from the Instruments and the effects are all summed in the Master Bus. Mono Cut collapses any stereo sounds below the selected cutoff frequency into mono, to ensure phase compatibility in the important lower frequencies. Width makes the entire stereo image wider or narrower.
Global parameters
At the bottom of the graphical user interface, you can determine Heartbeat’s overall sensitivity to MIDI velocity, as well as separately determine how much velocity will affect Pitch, Attack and Decay. Time Gate can shorten all Instrument sounds independently of their velocity to create a stuttery, machine-like sound—very useful for creating variation to the sound by quickly adjusting a single knob.

Auto Layer Machine
Auto Layer Machine can be used to easily layer sounds from two or more Instruments for new textures, or to trigger flams or autofills. A quick way of learning what it does is to try the different factory presets and note the differences to their settings. Click the white arrow in the Utility section of one of the four Auto Layer Machine channels, and play the pattern by clicking the green arrow, or hitting the MIDI key assigned to that Auto Layer Machine channel (as indicated in red text in the Utility section). Refer to the detailed section for further information.
Keyboard shortcuts
All knobs in can be reverted back to its preset-settings by alt-clicking on the parameter.
Fine-adjust any parameter in Heartbeat by ctrl-clicking (Windows) / Cmd-clicking (Mac OS).
By clicking the Setup button below the Heartbeat logo, you can choose some basic settings for Heartbeat, such as turning off the tool tip pop-up windows.
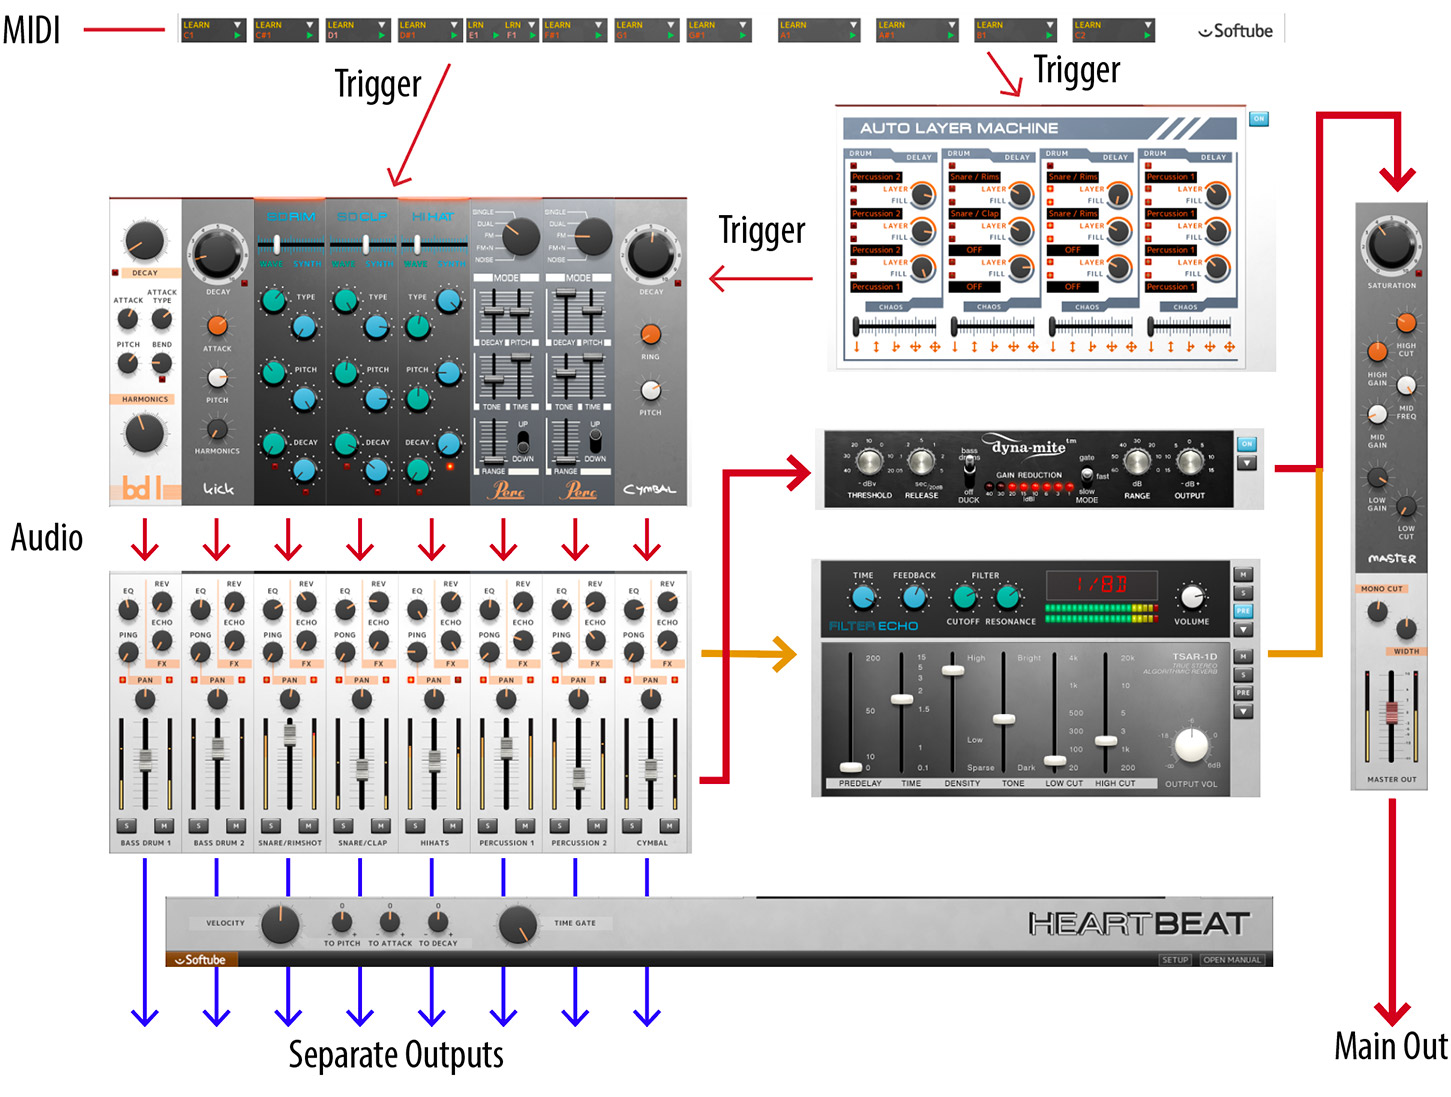
See the image below for a description of the signal flow. The incoming MIDI signals can trigger either the instruments or the Auto Layer Machine. If an Auto Layer Machine channel is triggered, this in turn triggers the instruments.
After the trigger, the instruments generate drum sounds that is routed to the corresponding mixer channels, and then routed through different paths:
- The main signal (red) is sent through the mixer channel’s volume fader and mixed with the other instruments, sent to the Valley People Dyna-mite, gets summed with the signal from the send effects, passes through the Master Bus and is eventually sent out via Heartbeat’s Main Out to the DAW channel.
- If the user chooses to, one signal is sent via the mixer channel’s Rev send to the TSAR-1D Reverb and another is sent via the mixer channel’s Echo send to the Filter Echo (orange).
- One signal (blue) is sent pre-fader to the respective instruments’ Separate Output, to be used as an isolated signal in your DAW, if this is supported by your DAW.
If the TSAR-1 Reverb or Filter Echo’s Pre buttons are activated, the output from the effects are instead routed to the Dyna-mite, instead of directly to the Master Bus section
If Duck is set to Bass Drums, Bass Drums 1 and 2 are also routed to the sidechain of Dyna-mite, where it controls Dyna-mite’s behavior.
For a more detailed overview, please see the chapter “Block Diagram”.
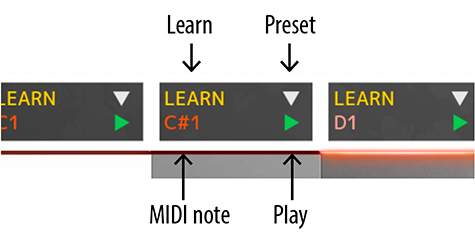
The Utility section is the black field on top of each Drum Channel (and Auto Layer Machine channel).

Click here to view the full-sized image in a new tab
- MIDI note
- Learn
- Channel preset
- Play
Learn: The Learn function is a quick way to assign a key on your MIDI keyboard or pad controller so it triggers the corresponding Instrument, in case you would like to change it from the factory settings. Click Learn, which will start blinking to indicate that it is awaiting an incoming MIDI note. Press the MIDI key on your keyboard controller (or strike the pad on your MIDI pad controller) that you want to assign to the Instrument. The MIDI Note indicator (red text below the Learn button) will show the new MIDI note you assigned to the Instrument, and the Instrument will now respond to incoming MIDI data on that note number. Please note that the Hihats instrument has two Learn buttons, as it can be used for both closed and open hihat sounds.
MIDI Note: The red MIDI Note indicator is located just below the Learn button, and tells you which MIDI note is assigned to the corresponding Instrument. You can change this by clicking, holding and dragging up/down the MIDI note number, as an alternative to using the Learn function explained above.
Channel Presets (white arrow): Click the white arrow to open the channel presets pop-up menu. This reveals a small selection of presets for each individual Instrument, intended as starting points for your own sound creation. Since both percussion channels use the same sound architecture, they also share the same channel presets. The same goes for the Auto Layer Machine channels. Only the Instrument parameters and the Equalizer (EQ) are affected by the channel presets. The effect sends (Rev, Echo), Ping/Pong, Pan, Volume, Mute and Solo are unaffected.
Play (green arrow): Clicking the green arrow will trigger the corresponding Instrument with maximum velocity. This function is handy when auditioning Instrument sounds without a MIDI keyboard or pad controller connected to the computer.
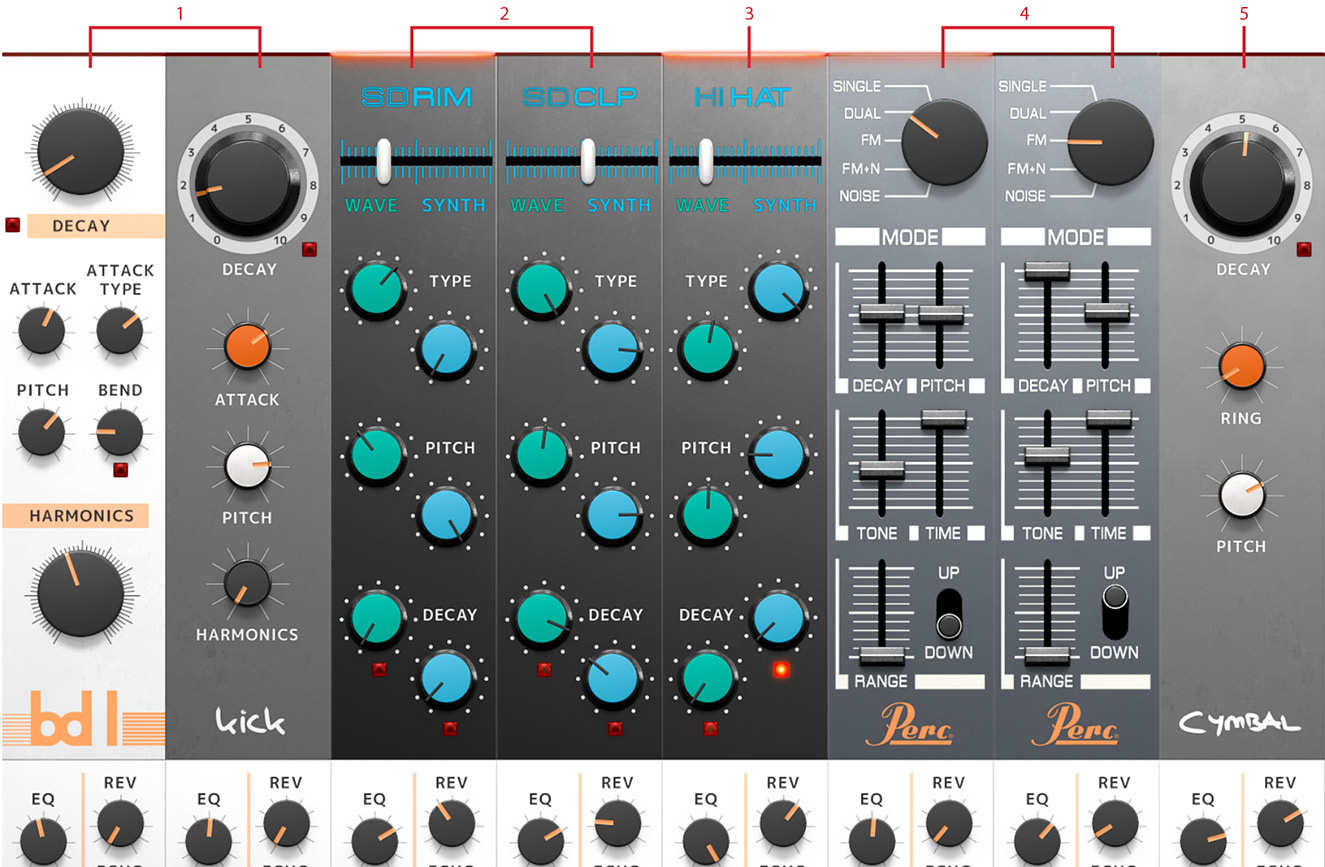
The eight drum instruments occupy most of the upper left part of Heartbeat’s graphical user interface. From left to right, you will find two different bass drum channels, two snare drum channels of which one is more suitable for typical snare sounds and the other leans towards clap sounds, a hihats channel (with both open and closed hihat sounds), two identical and very versatile synth percussion channels and finally a cymbal channel. Below, you will find a detailed description of each of these Instruments.
The equalizer (EQ) is an integral to the Heartbeat sound and should be thought of as part of the drum sound.
Click here to view the full-sized image in a new tab
- Bass drums
- Snare drums
- Hihat
- Percussion
- Cymbal
Bass Drum 1 is highly flexible and was inspired by a well known Japanese drum machine from 1984 that went more or less unnoticed until the end of the 80s, when it became the core of the new house music scene of Chicago, Detroit and New York. Its sound stems from a modeled analog synthesized tone with a slight drop in pitch in its decay, augmented with a waveform attack transient.

Decay: Sets the duration of the bass drum sound. Turn counterclockwise for short popping sounds and clockwise for longer ones.
Auto Glide End: This parameter determines whether the glide will occur at the end of the played sound. When set to the velocity option, the threshold-level will determine at which velocity the autobend is triggered. When set to the aftertouch option, any aftertouch above the threshold occuring while note is playing will trigger the auto-glide at the end of the sound (when the key is released).
Attack: Sets the level of the attack transient waveform.
Attack Type: Sets the character of the attack transient. Turn counterclockwise for electronic style, harsher sounds, and clockwise for more “woody” and acoustic sounds.
Pitch: Sets the initial pitch of the modeled analog synthesis.
Bend: Turn clockwise for a fast pitch bend that goes up and then down again. Set fully counterclockwise to bypass.
To create short percussion-like sounds , set the Eq counter-clockwise to remove the bottom end from the bass drum.
Harmonics: Adds harmonics/distortion to the synthesized tone. Can go from subtle overtones into harsh and bit-crunchy territory above the 12 o’clock position.
EQ: Boosts or cuts the low frequencies of the bass drum.
House music kick drum
Characteristic of the house music kick drum is its short and distinct snappy attack along with its moderate decay. By changing Decay, Bend and Harmonic you’ll get different and useful variations.
Decay: 25%
Attack: 50%
Attack Type: 0%
Pitch: pretty much what ever you like, but 0% will do.
Bend: 50%
Harmonics: anywhere between 0% to 20% will do.
EQ: 30%
Acoustic style kick drum
The acoustic bass drum is short and dry. Decrease the Attack volume if you want the impact to be a bit smoother.
Decay: 10%
Attack: 100%
Attack Type: 71%
Pitch: -75%
Bend: 84%
Harmonics: 0% (clean)
EQ: 0%
The second bass drum is circuit modeled from a classic Japanese drum machine from the early 1980s. It has been heavily used in many genres, ranging from electro and hip-hop to techno and R&B.

Decay: Sets the duration of the bass drum sound. Turn counterclockwise for short popping sounds and clockwise for longer ones.
Attack: Adjusts the filter level of initial click transient. Turn counterclockwise for a darker and more subdued click character, and clockwise for a more edgy and apparent click.
Pitch: Sets the pitch of the bass drum sound.
Harmonics: Sets the amount of clipping distortion.
EQ: Boosts or cuts the low frequencies of the bass drum.
By using Velocity To Pitch in combination with this bass drum it is possible to create nice sounding deep baselines.
Electronic style booming kick drum
Bass Drum 2 is very suited for this type of booming electronic sounds with long Decay times.
Decay: 100%
Attack: 20%
Pitch: -32%
Harmonics: 0% (clean)
EQ: 35%
Techno style kick drum
Short and distinct kick that will cut through any mix.
Decay: 10%
Attack: 100%
Pitch: -45%
Harmonics: 0% (clean)
EQ: 0%
Hollow distorted kick drum
This setting makes the bass drum sound more like a synth bass.
Decay: 73%
Attack: 100%
Pitch: 100%
Harmonics: 100% (clean)
EQ: -100%
The Snare/Rimshot channel blends snare drum waveforms with modeled analog synthesis in a highly flexible manner. The balance between them is determined by the slider at the top, and the Wave and Synth portions each have three knobs that adjust their respective sound character—green for Wave and blue for Synth.

Wave/Synth: Sets the balance between the waveform and synthesized portion of the drum sound.
Type: Sets the character of the sound. Wave (green knob) ranges from a rattling snare to a hard rimshot, Synth (blue knob) takes the sound from a pitched note to a noise sound.
Pitch: Sets the pitch for each sound, and the cutoff for the noise in the synthesized part.
Decay: Sets the duration of the Wave and Synth parts respectively. Turn counterclockwise for short popping sounds and clockwise for longer ones.
EQ: Boosts or cuts the frequency range where most of the snare drum’s tonal content is found. The neutral setting is at 12 o’clock, turn counterclockwise to cut this frequency range (emphasizing the snare/noise character) and clockwise to boost (emphasizing the tonal character).
House snare
A snare sound close to that of a very popular drum machine from the 80s.
Wave/Synth: -42%
Wave type: -34%
Synth type: 0% (TONE)
Wave pitch: 0%
Synth pitch: -27%
Wave decay: 100%
Synth decay: 21%
EQ: 39%
Acoustic Style Snare
A more acoustic sounding snare drum.
Wave/Synth: -13%
Wave type: -60%
Synth type: -57%
Wave pitch: -52%
Synth pitch: -55%
Wave decay: 77%
Synth decay: 72%
EQ: -21%
Create dynamic and interesting sounds by combining a wave portion with short decay with a synth portion with long decay, and vice versa.
The second snare drum is the Snare/Clap and works similarly to the Snare/Rimshot. However, both the Wave and Synth portions of the Snare/Clap have a different sound character which lends itself more to clap style sounds.

Create a double-clap sound by using a clap wave combined with a synthesized clap.
Wave/Synth: Sets the balance between the waveform and synthesized portion of the drum sound.
Type: Sets the character of the sound. Wave (green knob) ranges from different snare sounds to tight claps, while Synth (blue knob) takes the sound from a slightly noisy tonal character to a dark and sluggish clap sound.
Pitch: Sets the pitch for each sound, and the cutoff for the noise in the synthesized part.
Decay: Sets the duration of the Wave and Synth parts respectively. Turn counterclockwise for short popping sounds and clockwise for longer ones. For the Synth portion of the sound, longer Decay times also decreases the tightness of the clap, which gives it an even more loose and sluggish character.
EQ: Boosts or cuts the frequency range where most of the snare drum’s tonal content is found. The neutral setting is at 12 o’clock, turn counterclockwise to cut this frequency range (emphasizing the snare/noise character) and clockwise to boost (emphasizing the tonal character).
House Clap
A clap sound close to that of a very popular drum machine from the 80s.
Wave/Synth: -80%
Wave type: 100% (CLAP)
Synth type: 100% (CLAP)
Wave pitch: -7%
Synth pitch: 80%
Wave decay: 100%
Synth decay: 57%
EQ: 71%
Drummachine Snare
An 80s style digital sounding snare drum.
Wave/Synth: -64%
Wave type: -35%
Synth type: 0% (SNARE)
Wave pitch: 0%
Synth pitch: -20%
Wave decay: 64%
Synth decay: 36%
EQ: 76%
The Hihats instrument of Heartbeat can make both closed and open hi-hat sounds. One sound chokes the other. So if the open hi-hat is played, followed by the closed hi-hat the open hi-hat will be immediately cut off by the closed hi-hat. The Hihats are laid out in the same way as the two snare drums (Snare/Rimshot and Snare/Clap), with a crossfade slider at the top which sets the balance between hi-hat waveforms (Wave), and sounds generated by modeled analog synthesis (Synth). As with the snare drums, the green knobs affect the Wave portion and the blue knobs affect the Synth portion of the sound.

Wave/Synth: Sets the balance between the waveform and synthesized portion of the hi-hat sound.
Type: Sets the character of the sound. Wave (green knob) ranges from classic drum machine-like hi-hat sounds to a more acoustic sounding character. Synth (blue knob) takes the sound from a cluster of high pass filtered pulse waveforms in the far counterclockwise setting, to a filtered white noise when turned clockwise.
Pitch: Sets the pitch for the Wave sound (green knob), and sweeps a low cut filter for the Synth portion (blue knob).
Decay: Sets the duration of the Wave and Synth parts respectively. Turn counterclockwise for short popping sounds and clockwise for longer ones.
EQ: Boosts or cuts the frequency range where most of the hi-hat’s tonal content is found. The neutral setting is at 12 o’clock, turn counterclockwise to cut this frequency range (emphasizing the noise character) and clockwise to boost (emphasizing the tonal character).
Combine the transient of the wave with a longer, noisy, decay of the synth part to get dirty nice hi-hat sounds.
Synthesized Hi-hat
A sound similar to that of a very popular early 80s drum machine.
Wave/Synth: 93%
Wave type: -45%
Synth type: 52%
Wave pitch: 57%
Synth pitch: 68%
Wave decay: 6%
Synth decay: 24%
EQ: 86%
Digital Hi-hat
Dry 80s drum machine style hihat.
Wave/Synth: 33%
Wave type: 3%
Synth type: 100% (NOISE)
Wave pitch: -4%
Synth pitch: 74%
Wave decay: 66%
Synth decay: 6%
EQ: -49%
The two Percussion instruments are identical to each other, so the information given here covers them both. They are highly flexible instruments that draws a lot of inspiration from a lesser known, but very powerful, Japanese synth percussion unit from the early 80s. The sound of the Percussion 1 and 2 are purely generated from modeled analog synthesis.

Mode: This dial selects one of the following five modes.
SINGLE: Employs a single triangle wave oscillator. This is great for disco style toms, additional bass drums and short harmonic snaps.
DUAL: Employs two triangle wave oscillators with a fixed pitch ratio between them. This is ideal for cowbell, agogo bell and marimba type of sounds.
FM: One oscillator is frequency modulated by the other with a fixed ratio. This is useful for disharmonic metal-like sounds.
FM+N: The same as above, but with added noise. Can be used to generate otherworldly metallic sounds.
NOISE: White noise. This is good for generating shakers, thunderous snares and special effects.
Decay: Sets the duration of the sound.
Pitch: Sets the initial pitch of the oscillators.
Tone: Sets the initial cutoff frequency of the low-pass filter.
Time: Sets the speed of the pitch bend and in noise mode the speed of the filter-sweep.
Range: Sets the amount of pitch bend or filter-sweep in noise-mode.
Up/Down: Sets if the bend goes upwards or downwards (filter sweep in noise mode).
EQ: Boosts or cuts the frequency range where most of the drums tonal content is found. The neutral setting is at 12 o’clock, turn counterclockwise to cut this frequency range (emphasizing the noise character) and clockwise to boost (emphasizing the tonal character).
The percussion modules without the bend (Range at zero) in combination with the Velocity To Pitch parameter makes it possible to create small pseudo-melodies and baselines.
The sound of Heartbeat’s Cymbal is purely generated by modeled analog synthesis. It draws inspiration from several early 80s Japanese drum machines. But the Ring parameter has been added for the ability to get a more bell-like high pitched ringing sound.

Decay: Sets the duration of the sound.
Ring: Sets the amount of “ring” character.
Pitch: Adjusts the filtered mix of the harmonics within the cymbal sound.
EQ: Boosts or cuts the frequency range where most of the cymbals tonal content is found. The neutral setting is at 12 o’clock, turn counterclockwise to cut this frequency range (emphasizing the noise character) and clockwise to boost (emphasizing the tonal character).
A high setting of Ring makes the cymbal sound more like a ride cymbal, while a low setting makes the cymbal more vintage drum box sounding.
Noise Hat
Using the cymbal as an extra noisy drum-machine like hihat.
Decay: 0%
Ring: 0%
Pitch: 100%
EQ: 100%
Noise Ride
A cymbal sound close to that of a very popular drum machine from the 80s.
Decay: 14%
Ring: 10%
Pitch: 40%
EQ: 48%
Short and Sweet
Short cymbal sound with some ringing.
Decay: 20%
Ring: 34%
Pitch: 53%
EQ: -47%
The Mixer section takes up most of the lower left part of the Heartbeat graphical user interface. The parameters are identical for all eight mixer channels, with the exception of the EQ (equalizer) which is tuned for each individual instruments, although the knobs look identical.
EQ: Adjusts the equalizer setting. It is tuned for each channel and optimized to work with the sweet spots of the individual instruments.
Rev: Sets the signal level being sent from each instrument to the TSAR-1D Reverb unit, and therefore how much reverb is added to the instrument. The Rev send is post-fader, meaning that the send level is also affected by the setting of the Volume fader. This keeps the proportion between the direct sound and the reverb intact even if the Volume fader is turned up or down.
Echo: Sets the signal level being sent from each instrument to the Filter Echo, and therefore how much delay is added to the instrument. The Echo send is post-fader, meaning that the send level is also affected by the setting of the Volume fader. This keeps the proportion between the direct sound and the reverb intact even if the Volume fader is turned up or down.
Ping/Pong: The automated panning function. Sets the amount of automatic panning for each drum hit.
Pan: The initial position of the instrument in the stereo panorama.
Volume fader: Sets the volume of the instrument.
Solo (S): Activating Solo for a mixer channel mutes all othter channels (unless they are also in Solo mode).
Mute (M): Activating Mute for a mixer channel turns off the sound from this channel.
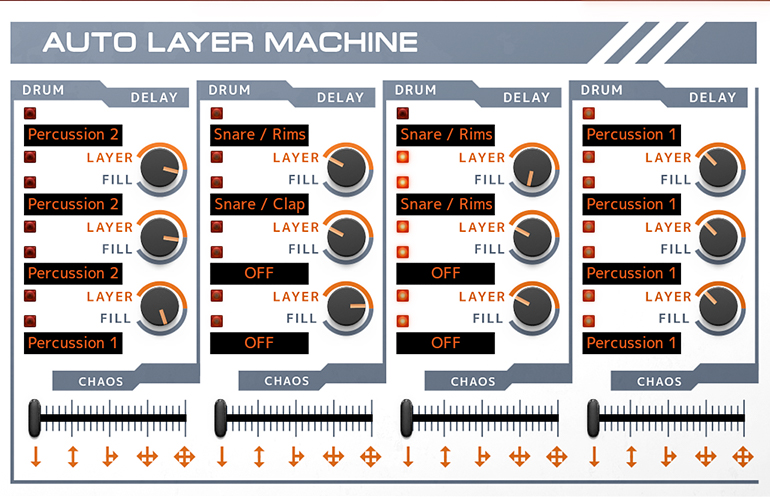
Auto Layer Machine takes up most of the upper right part of the graphical user interface. It can be used to easily layer sounds from two or more instruments for new textures, or to trigger flams or auto-fills—you could compare it to a basic MIDI sequencer. Auto Layer Machine consists of four channels, each with its individual MIDI note number assigned. The four channels are divided into a Drum and a Delay column. In the Drum column you will find four slots per channel. Hitting the assigned MIDI key will make the corresponding Auto Layer Machine channel generate a chain of events, moving from the top slot to the bottom one (in its default state). Each trigger will be slightly lower in velocity which is apparent when using the Velocity parameters.
Get started!
The easiest way to understand what the Auto Layer Machine does is by trying the settings in the factory preset you will have every time you launch a new instance of Heartbeat. Here, the four Auto Layer Machine channels are set up to perform different tasks.
Layering
Hit the MIDI key A1 to trigger the first Auto Layer Machine channel (or click its green arrow in the Utility section, the black field above the channel). You will hear that this triggers three of the instruments—Snare/Rimshot, Snare/Clap and Percussion 1—simultaneously. This creates a layered sound. You can also see the names of these three instruments in three of the slot windows of the first Auto Layer Machine channel, indicating that the slots have been assigned to these instruments.
Patterns and fills
If you instead trigger the second Auto Layer Machine channel, by hitting A#1, you will hear the closed and open Hihats playing a short pattern with four hits. Again, you can see in the slots that they are assigned to the closed and open Hihats. But unlike the first channel, they were not playing simultaneously—a delay was added for each step.
This is done with the knobs in the Delay column, to the right of each slot. The Delay knobs set how long it takes after a slot has been triggered until it passes on the trigger impulse to the slot below it. In the first Auto Layer Machine channel, you will see that the Delay knobs are all set to LAYER (fully counter clockwise), meaning that there is no delay from one slot to the next—the instruments are triggered simultaneously.
But in the second channel, they have other positions, which is what creates the delay between the instruments being triggered, and thus creates the small pattern you hear each time you trigger the channel. If you change the positions of the Delay knobs, you will hear the short pattern change accordingly.
Velocity
The Instrument in the first Auto Layer Machine slot will be triggered with the velocity of the incoming MIDI note. For each subsequent step in the Auto Layer Machine, the velocity will automatically drop by a predefined amount. This means that if the incoming MIDI note has a very low velocity to begin with, the subsequent steps might drop below 0 velocity, and thus not trigger the Instrument at all.
On: Turns on and off the Auto Layer Machine. You can save some CPU power by turning the Auto Layer Machine off when not in use.
Slot window: The slot windows in the Drum column indicates and determines which of Heartbeat’s instruments is triggered via the slot. Click or shift-click to select next or previous instrument. You can bypass the slot entirely by selecting OFF. It is also possible to click and drag to scroll back and forth among the instruments.
Delay: Determines how long it takes after an instrument has been triggered until it passes on the trigger impulse to the slot below it. By setting it to zero (the knob indicator pointing at LAYER), there is no delay, so the two instruments are triggered at the same time and thus layered. By turning it clockwise, the following trigger will be more delayed. Use this to create flams or automatic fill patterns. When the indicator is by the orange part of the marking, the delay is expressed in milliseconds in the tooltip window that pops up. Turn it to the blue side to set the delay expressed as beat divisions of the DAW project’s tempo.
Chaos: In its default state with the slider set all the way to the left, the trigger impulses move from the top to the bottom as indicated by the orange arrow underneath the Chaos slider. Moving the slider a bit to the right will enable the Auto Layer Machine to reverse the direction of the triggers so that some triggers will randomly populate upwards instead of only downwards. Moving the slider even further will make the trigger impulses “spill” over to the adjacent Auto Layer Machine channels, as indicated by the arrows. In its far right position, you will have full chaos with triggers sent everywhere in a rather unpredictable manner. Even more so if you have all four Chaos sliders to the far right!
Heartbeat includes three different effect units: The Valley People Dyna-mite compressor/limiter/gate, the TSAR-1D reverb and the Filter Echo. These are shared by all the drums. The signal level sent from each drum to the TSAR-1D and the Filter Echo is set with the Rev and Echo knobs in each mixer section. Valley People Dyna-mite is inserted across the stereo sum of all the instruments, so as long as it’s activated it affects all instruments (apart from the bass drums when Duck is set to Bass Drums).
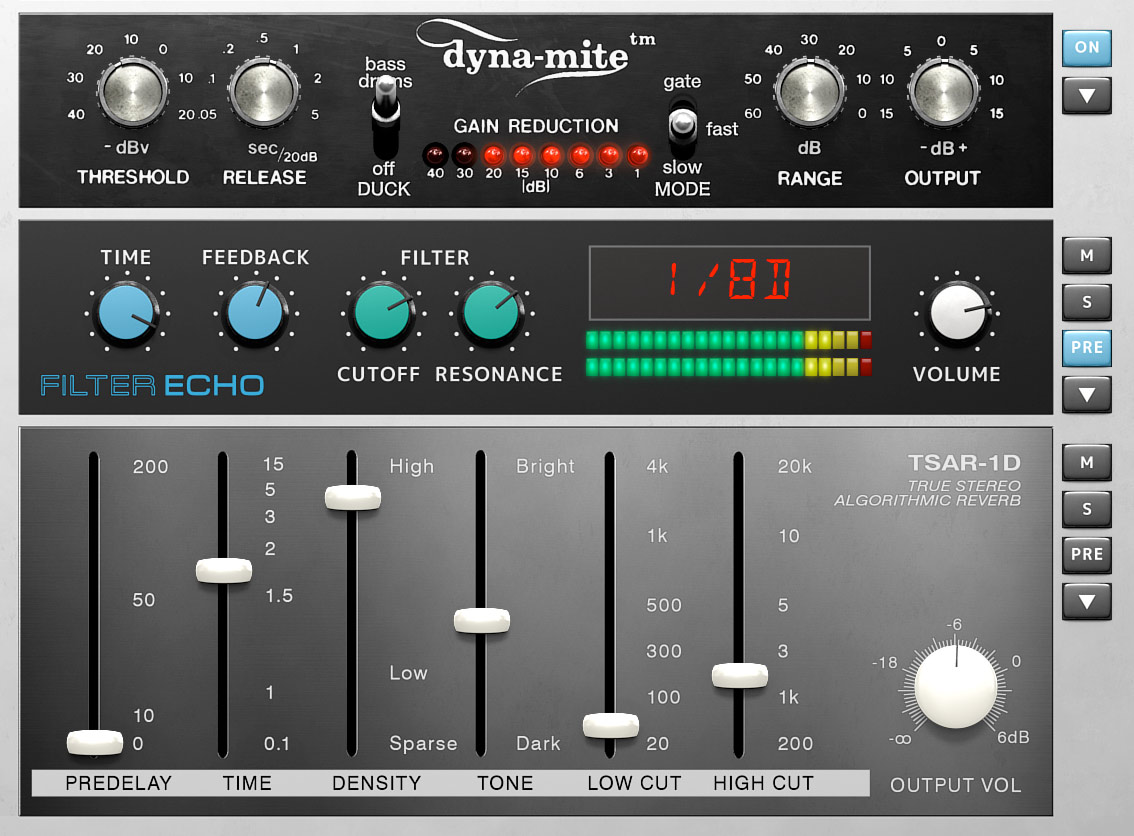
The Valley People Dyna-mite built into Heartbeat is a specially adapted version of the Valley People Dyna-mite plug-in, separately available from Softube. The original analog Valley People Dyna-mite unit came out in the early 80s and was a very popular tool for gating/expanding, compressing/limiting and ducking—highly loved for its ability to compress sounds with fierce aggression, and to gate in an ultra-musical manner. The Heartbeat version features four operating modes:

Compression
A compressor is basically an automatic volume control, which turns down strong sounds but leaves the weaker sounds unaffected. This makes the dynamic range of the sound (the difference between strong and weak parts) smaller, which is why it’s called compression. Using compression lightly can make the sound compact and coherent (often described as glueing the sounds together), while using it heavily can create an aggressive mash. With the Mode switch set to SLOW, the Dyna-mite will act as a compressor with a slow attack. This lets the initial transient of the sound through before Dyna-mite reacts and starts compressing, resulting in a punchy and snappy sound. The Threshold knob sets the threshold level. Any time a sound reaches above this level, Dyna-mite will start compressing—so a high threshold setting will only affect the strongest peaks, while a low threshold setting will affect most of the incoming sound, resulting in a very apparent compression. The Release knob determines the time it takes for the Dyna-mite to recover after it has compressed. This can be used to emphasize the rhythmic feel of the beat, making the Dyna-mite “breathe” in time with the music.
Limiting
A limiter is a very fast compressor that uncompromisingly slams down the sound any time it exceeds the threshold level. Its original use was to protect loudspeakers from sharp sound spikes that could potentially damage them, but it can also be used creatively for music mixing. Set Dyna-mite’s Mode switch to FAST, and it will act like a limiter. Compared to the Slow mode, you will note that the Dyna-mite now doesn’t let the initial transient of the sound through. Instead, the sound hits a brick wall, creating an aggressive and pumping sound—even more so with a low threshold setting.
Gating
With the Mode switch set to GATE, Dyna-mite will shut off the sound completely if it drops below the threshold level (set by the Threshold knob), and open up as soon as the sound rises above the same level. This can be used to make sounds appear shorter (for example creating gated reverb effects), and to get rid of low-level sounds for a cleaner and more focused impression. If the Dyna-mite is set to gate out the weaker sounds entirely, the Range knob can be used to mix them back in, but at a lower level than they originally had. This is called expansion—you expand the dynamic range of the mix by making the weak sounds (the ones below the threshold level) weaker, and thus in comparison making the strong sounds (above the threshold level) stronger. So an expander is basically a compressor in reverse. This can be used to enhance and alter the dynamic feel of a drum beat.
Ducking
Ducking is the effect of one sound source controlling the output volume of another. In its Heartbeat version, Dyna-mite can be set to let the bass drum channels duck the others. By setting the Duck switch to BASS DRUMS and the Mode switch to either FAST or SLOW, every time a hit from one of Heartbeat’s bass drums is strong enough to reach above the threshold level, the sound level of all the other instruments will be turned down by Dyna-mite. This creates a pumping and energetic effect that is prominently used in a lot of electronic dance music. The Mode switch can also be set to GATE while the Duck switch is set to BASS DRUMS. In this case, the gate opens up every time the bass drum hits, and shuts off the sound of the other instruments between the bass drum hits.
On: Turns Dyna-mite on or off.
Presets: Clicking the button with the white arrow below the On button brings up Dyna-mite’s preset menu. It contains some examples of applications of Dyna-mite compressor which are good starting points for further tweaking.
Threshold: Sets the threshold level, above which the Dyna-mite starts to limit or compress (in Fast or Slow modes), or lets the sound through (in Gate mode).
Release: Adjusts the time it takes to restore the original gain after gating/compressing.
Duck: Activates/deactivates bass drum ducking, which makes the bass drums affect Dyna-mite’s processing of all the other instruments.
Mode: Sets the main mode of operation: Gate, Fast (limit) or Slow (compress).
Range: Sets the maximum amount of gain reduction.
Output: Sets the output volume. If necessary, turn this up to compensate for the volume loss caused by compressing/limiting.
Filter Echo is a gritty little delay effect with a resonant lowpass filter in its feedback loop. The filter can be set to near self-oscillation for that lo-fi sound.

Mute (M): Turns off the sound of the Filter Echo.
Solo (S): Solos the sound of the Filter Echo.
Pre: Places the Filter Echo before Dyna-mite in the effects chain, which means Filter Echo’s sound will also be affected by Dyna-mite’s processing. When the Pre button is not activated, the Filter Echo’s output will be post the Master Bus Saturation effect, but before the Master Bus equalizer.
Presets: Clicking the button with the white arrow below the Pre button brings up Filter Echo’s preset menu. It contains some examples of Filter Echo settings that are good starting points for your tweaking.
Time: Determines the delay time, how long time passes between each delay “hit”. In the left half of the knob’s path, the range is from 1 to 1000 milliseconds. In the right side, the delay time can be set in divisions of the DAW tempo, ranging from 1/64 to 1/2 beat. The latter is useful for setting the delay to act in time with the song.
Feedback: This set the amount of feedback, how many delay repeats there will be. It ranges from one repetition to roughly 10 repetitions at full feedback.
Cutoff: Sets the cutoff frequency of the low-pass filter.
Resonance: Sets the resonance of the low-pass filter.
Volume: Sets the output volume.
The TSAR-1D is a version of Softube’s acclaimed TSAR-1 Reverb, adapted for use with Heartbeat. TSAR-1 Reverb is available as a separate plug-in from Softube.
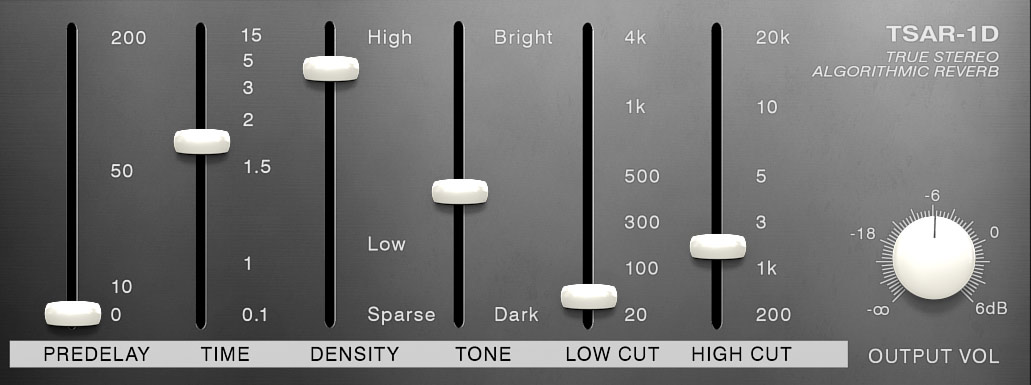
Mute (M): Turns off the TSAR-1D.
Solo (S): Solos the TSAR-1D reverb.
Pre: Places the TSAR-1D before Dyna-mite in the effect chain, which means that the reverb will also be affected by Dyna-mite. When the Pre button is not activated, TSAR-1D’s output will be after the master saturation, but before the master equalizer.
Presets: Clicking the button with the white arrow below the Pre button brings up TSAR-1D’s preset menu.
Predelay: Determines the time between the dry signal and the reverb tail. Set to 0, there is no delay. Delayed settings are often used to achieve the impression of a large room, by making the reverb tail arrive later.
Time: Sets the duration of the reverb sound, from short to long.
Density: Adjusts is the thickness and smoothness of the reverb.
Tone: Overall tone of the reverb signal.
Low Cut: Applies a low cut filter to the reverb sound, taking away the lower frequencies that might make the sound cluttered and undefined.
High Cut: Applies a high cut filter to the reverb sound, taking away the higher frequencies that might make the reverb sound take up too much space in the mix.
Output Vol: Output volume of the reverb.
The Master Bus is the section on the far right of Heartbeat’s graphical user interface. This affects the main output of Heartbeat, letting you add saturation, make EQ adjustments to the overall sound and more.

Saturation: Sets the amount of saturation applied to the entire drum mix, post the Dyna-mite compressor. It mimics the saturation that can be achieved by devices using electronic vacuum tubes, which results in a pleasing and thick saturation.
High Cut: Applies a high cut filter to Heartbeat’s output, which cuts treble frequencies and makes the overall sound darker. This is very similar to the High Cut function of a DJ mixer.
High Gain: Boosts the treble frequencies.
Mid Freq: Sets the center frequency of the midrange equalizer filter.
Mid Gain:Boosts the midrange at the frequency determined by the Mid Freq knob.
Low Gain: Boosts low frequencies.
Low Cut: Applies a low cut filter, which cuts bass frequencies and makes the overall sound thinner. This is very similar to the Low Cut function of a DJ mixer.
Mono Cut: Determines a cutoff frequency below which everything is summed to mono. This is a great way to ensure that your mix will sound solid on any playback system, since it guarantees that you will have no phase issues in the low end of the frequency spectrum.
Width: At 12 o’clock, Width is disabled and all stereo settings work as expected. Turning it counterclockwise gradually makes the sound become more mono. Turning it clockwise makes the sound wider.
Master Out: Master fader which controls the volume of Heartbeat’s main output.
At the lower left of Heartbeat’s graphical user interface, below the mixer section, are the global Velocity parameters. These knobs determine how responsive Heartbeat will be to the velocity of the incoming MIDI signals—i.e., how strong or soft the incoming MIDI note is. The Velocity settings are global for Heartbeat’s instruments, meaning that they effect them all simultaneously.

Velocity: Sets how strongly the velocity of the incoming MIDI note affects the volume of the instrument being triggered. Setting this to 0% (fully counterclockwise) will result in no volume difference of the sounds, regardless of the velocity. Conversely, when Velocity is set to 100% (fully clockwise), the Instruments will respond very dynamically to the velocity. So in this setting, higher velocities give louder sounds.
To Pitch: Sets how the initial pitch of Heartbeat’s instruments is affected by velocity. In its 12 o’clock position, velocity has no effect on pitch. Turning it counterclockwise will result in higher velocities giving the sounds a lower initial pitch. Conversely, turning it clockwise will result in higher velocities giving the sounds a higher initial pitch.
To Attack: Sets the amplitude of the attack portion of the instrument’s sounds. In its 12 o’clock position, velocity has no effect on attack levels. Turning it counterclockwise will result in higher velocities giving lower attack amplitude. Conversely, turning it clockwise will result in higher velocities giving the sounds a higher attack amplitude. This applies only to instruments that have the Attack parameter.
To Decay: Sets how the decay time of Heartbeat’s instruments is affected by velocity. In its 12 o’clock position, velocity has no effect on decay time. Turning it counterclockwise will result in higher velocities giving the sounds shorter decay times. Conversely, turning it clockwise will result in higher velocities giving the sounds longer decay times.
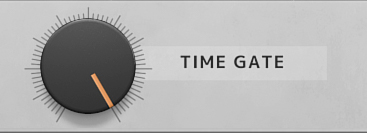
Time Gate is a fun and useful function that cuts the decay short of all instruments globally. This creates a jerky and chopped up cool sound reminiscent of old 80s sample-based drum machines with very small memory. Since Time Gate is controlled by a single knob, it offers a quick way of altering the sound of the entire beat—this is not least useful for live applications.
Heartbeat is designed to be a one-stop shop for drum sound creation, where the resulting sound package comes out of a single stereo output. But for added flexibility, it is also possible to send the individual instruments through separate outputs, and have them appear on individual mixer channels in your DAW. The separate outputs can be used in situations where you would like to add mix effects from your DAW to the individual instrument sounds of Heartbeat—for example if you have a particular reverb plug-in in your DAW that you would like to use for the snare drums, and only for the snare drums. Or if you want Heartbeat’s bass drums to duck all the other sound sources in your song, such as synths and vocals.
When using separate outputs, the signal from the instrument is being split into two. One is sent the usual way through Heartbeat, via the volume fader and the effects to Heartbeat’s Master Bus. The other one is sent to the direct output. This is tapped out of the Drum Channel mixer pre-fader. This means that the Drum Channel volume fader (as well as the Solo and Mute buttons) will not affect the signal being fed to the direct output. If you want an instrument sound to only be sent to the direct output, and not appear in your main Heartbeat mix at the same time, you can set the corresponding Drum Channel’s volume fader to zero, or press its Mute button.
Sending effects to a separate output
If you want all the instruments on separate outputs, and also get the send effects (Filter Echo and TSAR-1D) as a separate stereo signal, in total 8 + 1 stereo pairs, you can achieve this using the Solo buttons for the Filter Echo and TSAR-1D—then you will only have the outputs of these sent to Heartbeat’s Master Bus.
Using multiple outputs
Your DAW will automatically detect that Heartbeat has a total of nine stereo outputs—the Main Output, plus a stereo pair for each of the eight instruments. These outputs are named in accordance with the Drum Channels:
- BASS DRUM 1
- BASS DRUM 2
- SNARE RIMSHOT
- SNARE CLAP
- HIHATS
- PERCUSSION 1
- PERCUSSION 2
- CYMBAL
The different DAWs all have their own particular ways of handling instruments with multiple outputs, such as Heartbeat. Therefore, please refer to your DAW’s manual to learn how to use Heartbeat’s multiple outputs on your particular system.
Heartbeat features 50 different preset drum kits, ranging from classic drum machine sound-a-likes to more contemporary sounds of all kinds. They also contain settings for the effects as well as programmed Auto Layer Machine settings. Each preset name begins with a two-letter acronym of the name of the creator. They are:
KU: Kristofer Ulfves, Softube
CB: Christoffer Berg (Depeche Mode, The Knife, Hird)
DG: David Giese (Joxaren, Flogsta Danshall)
TB: Tomas Boden (Differnet, Liminals)
Clicking the Setup tab in the bottom right corner of Heartbeat’s graphical user interface will bring up the setup configuration menu. Some of the changes made here will only take effect after relaunching Heartbeat.
Always Use Small GUI: This toggles between bigger and smaller versions of the graphical user interface. We recommend that you check this box if you use Heartbeat on a small computer screen, such as a laptop screen.
Enable Tooltip: Toggles Tooltips on and off. These are the small pop-up windows that appear when hovering the mouse pointer over most of Heartbeat’s controls.
Show Value Display: Toggles the value display in lower left corner of Heartbeat on and off.
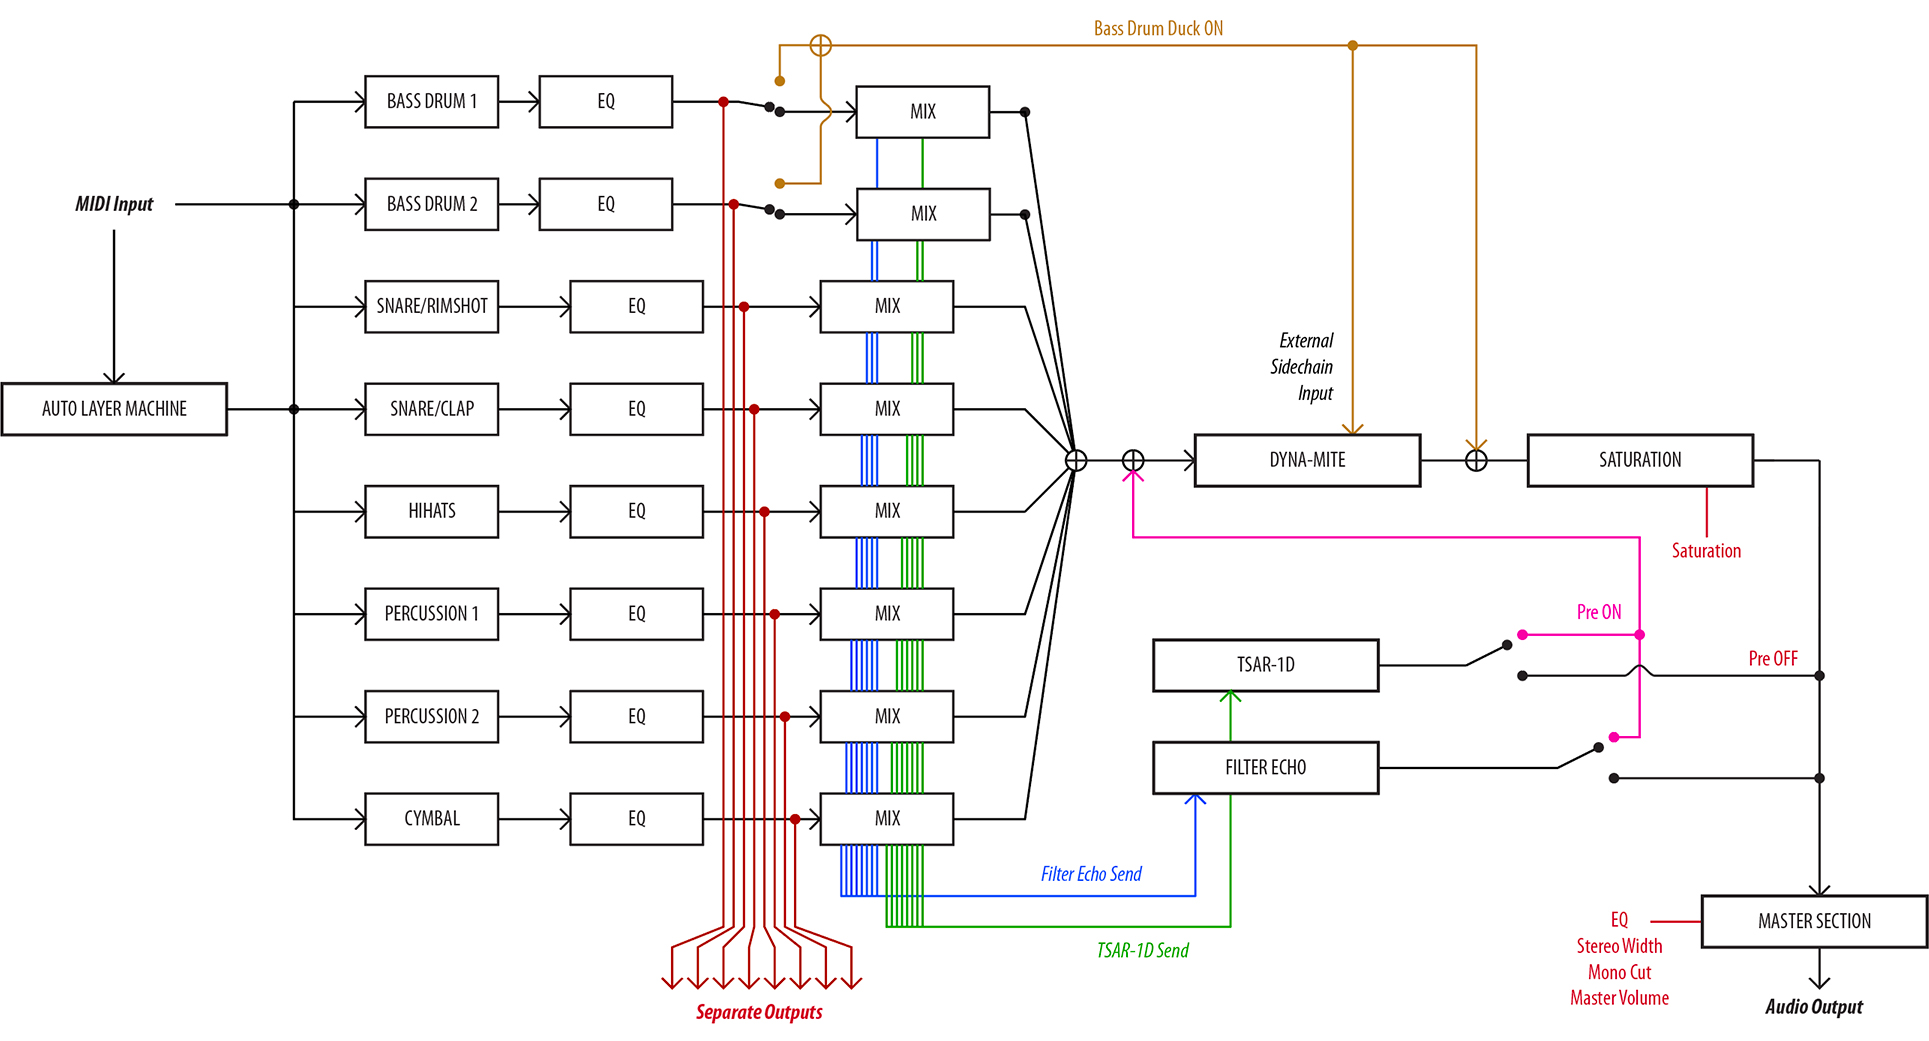
This is a simplified block diagram of the Heartbeat functionality and signal paths.
MIDI notes are received by the Auto Layer Machine and the Drum Channels. Audio from the Drum Channels are routed both to the separate outputs as well as to the Valley People Dyna-mite.
Bass Drum Ducking
If Dyna-mite’s Duck switch is set to Bass Drums, the audio from the bass drums are being routed to the external sidechain of the Dyna-mite, as well as being mixed together with the output of the Dyna-mite.
Send Effect Pre/Post
If the send effects (TSAR-1 Reverb and Filter Echo) are set to Pre (Pre button is blue), the outputs from the effects are routed to the input of the compressor.
If the send effects’ Pre button is off (Pre button is gray), the output from the effects are routed directly to the master section, but after the saturation circuit.
Click here to view the full-sized image in a new tab
Heartbeat consists of seven drum modules, and a dedicated two-channel one knob equalizer. These are the drum modules from Softube Heartbeat, and if you own and have installed Softube Heartbeat the modules are available right from the Modular.
The drum modules are the same as in Heartbeat, with the addition of input and output jacks.
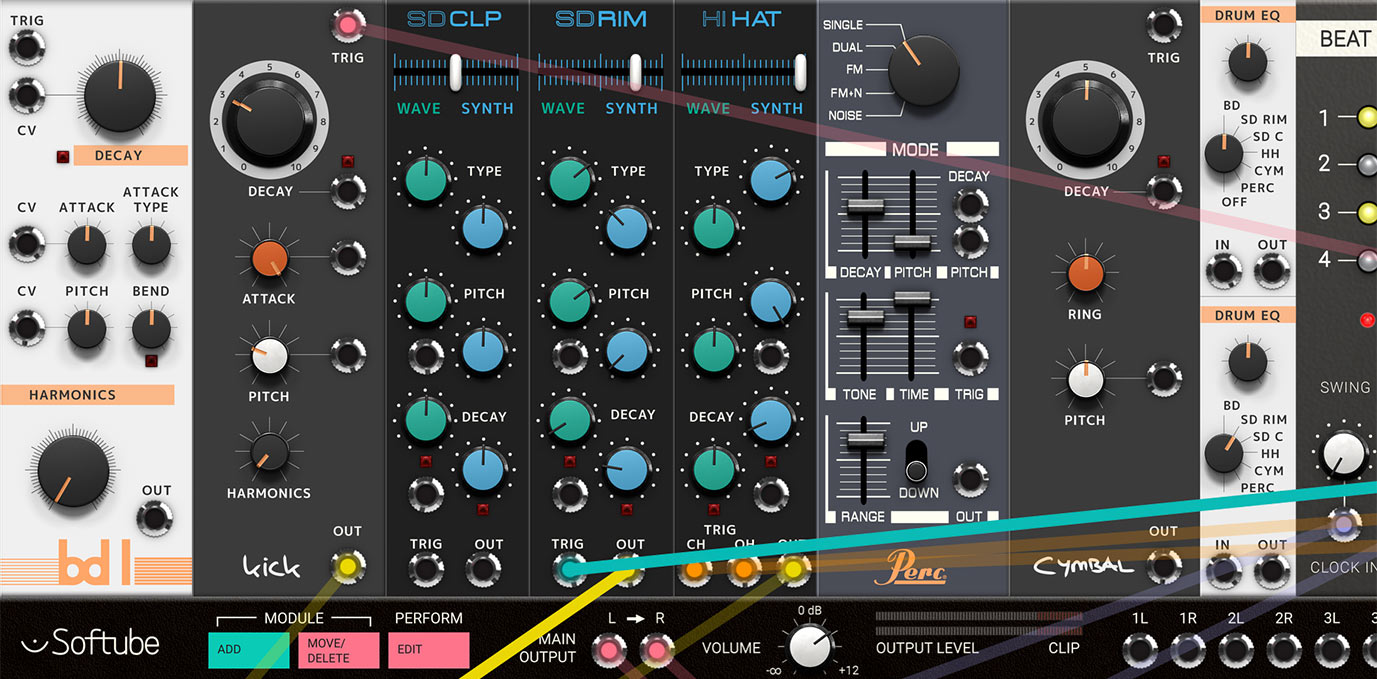
Heartbeat Bass Drum 1
The Bass Drum 1 channel from Heartbeat—the drum synth with a soul! It's very versatile and can sound anything from analog boomy to acoustic dry. All the parameters that are velocity controllable in Heartbeat can be CV controlled in the Modular.
Heartbeat Bass Drum 2
Circuit modeled from a classic Japanese drum machine from the early 80s. The parameters that arevelocity controllable in Heartbeat can be CV controlled in Modular.
Heartbeat Snare/Rimshot
A mixture of carefully selected waveforms and synthesis. It is designed to do snare drum and rim shot sounds. All parameters that are velocity controllable in Heartbeat can be CV controlled in Modular.
Heartbeat Snare/Clap
It is a mixture of carefully selected waveforms and synthesis. It is designed to do snare drum and clap sounds. All parameters that are velocity controllable in Heartbeat can be CV controlled in Modular.
Heartbeat Hihat
A mixture of carefully selected waveforms and synthesis. It does hihats, both analogue sounding and acoustic. All parameters that are velocity controllable in Heartbeat can be CV controlled in Modular.
Heartbeat Percussion
The percussion channels from Heartbeat.
Heartbeat Cymbal
Purely generated by modeled analog synthesis and draws inspiration from several early 80s Japanese drum machines. But the ring parameter has been added for the ability to get a more bell-like high pitched ringing sound. All parameters that are velocity controllable in Heartbeat can be CV controlled in Modular.
Each mixer channel in Softube Heartbeat has a one knob equalizer, with tailor made EQ curves for each drum sound. The close integration between these equalizers and its drum is a large part of how to shape the sound from the drum, but instead of adding the EQ to each drum module we decided to make it a module on its own so that you can use it wherever you feel it works.
Drum E: Boosts or cuts the frequency range where the tonal content of the instrument selected by mode switch is found. The neutral setting is at 12 o’clock, turn counter-clockwise to cut this frequency range and clockwise to boost.
[mode]: Selects which frequency bands that the EQ affects. For example, BD boosts or cuts the low frequencies of the Bassdrum and so on. Off is bypass mode.
In: Audio input.
Out: Audio output.
In Use
Use the Heartbeat EQ it to equalize your Heartbeat drum sounds or why not add some bass to your favorite synth sound? Each setting (BD, SD RIM, SD C, HH, CYM, PERC) has its own sweet spot. Off is bypass.
Oscar Öberg – Product lead and signal processing
Kristofer Ulfves – Research, sound design, presets and user manual
Niklas Odelholm – Graphic design and presets
Patrik Holmström – GUI programming
Henrik Andersson Vogel – User manual and marketing
Paul Shyrinskykh – Quality assurance
Arvid Rosén – Framework programming
Ulf Ekelöf – Graphics rendering
Torsten Gatu – Framework programming
Mattias Danielsson – Technical support
Johan F. Antoni – Help with initial concept
Andreas Tilliander – Hardware reference
Tomas Boden – Testing and presets
Christoffer Berg – Testing and presets
David Giese – Testing and presets
Jakob Herrman – Sound reference
Marcus Schmahl – Demo and feedback