User Manual
Model 84 Polyphonic Synthesizer
Intro
Getting Started - “What are all this stuff?”
Quick tweaking sounds
Browsing presets
Sound architecture
The Keyboard
The Expanded View
Parameter description
The Voice Modes
The Expanded View Parameters
Creating sounds - tips and tricks
Saving and loading sounds
Model 84 modules in Modular
Model 84 Chorus in Amp Room
Credits
Related manuals
Softube Model 84 Synthesizer System is our new fully modeled vintage polyphonic synthesizer based a one of the most selling analog/digital hybrid synths of the 80s. The hardware was originally launched in 1984.
Getting Started - “What are all this stuff?”
Model 84 is a six-voice polyphonic synthesizer – what does that mean? Well, it means that it can play up to six notes at one time, just like the original hardware it was based upon. Each voice is made up with a simple concept: each voice is identical and contains a single DCO, a fat sub-oscillator, a great sounding filter and, of course, a gorgeous sounding chorus.
So, when you make a change on a parameter, this change will apply to all six voices.
These simple blocks all add up to a powerful sound that easily can be edited from the front-panel switches and sliders. This no-nonsense architecture and approachable workflow of Model 84 equals effortless creation of great sounds.
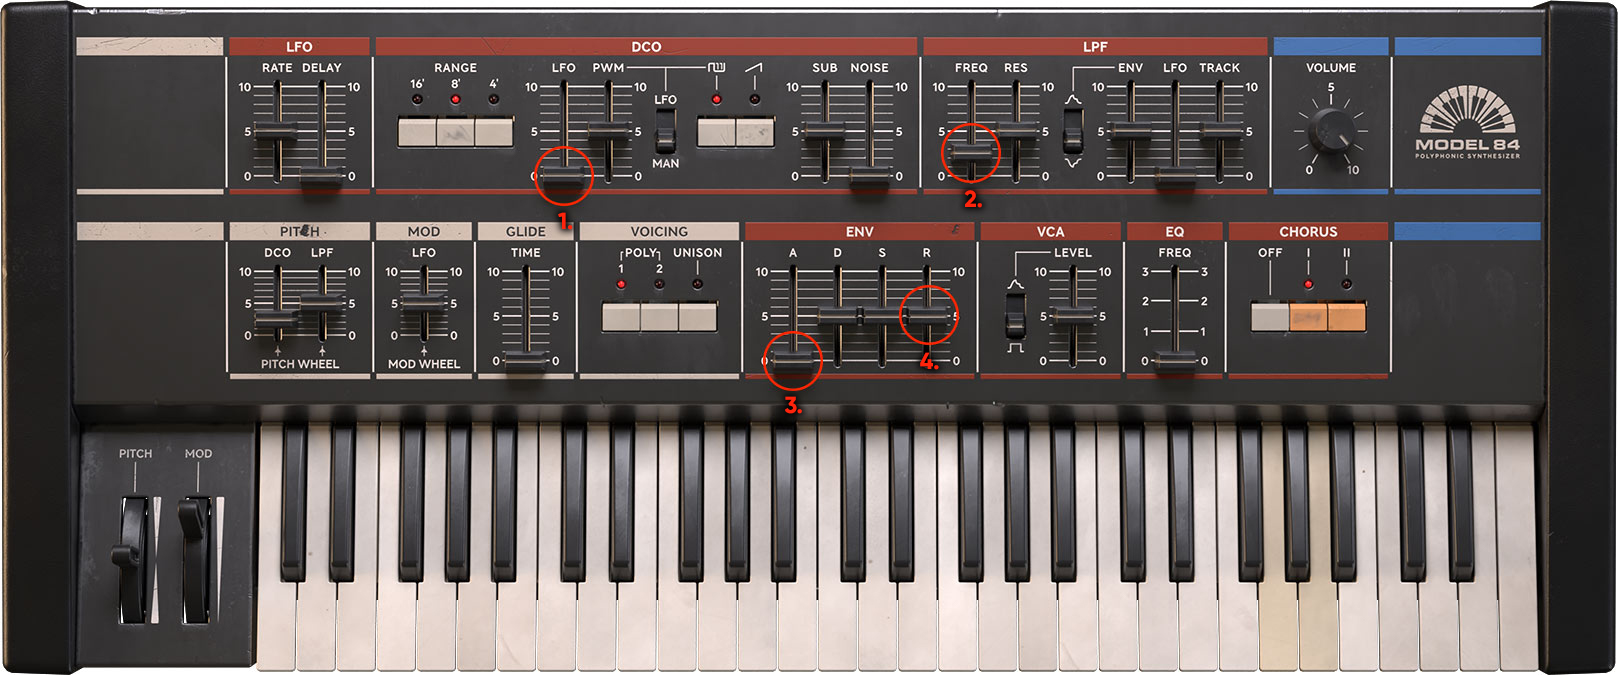
On top you will see the front-panel – this is where you program the Model 84 by clicking and changing sliders and switches that changes various aspects the sound behavior.
On the bottom of the plugin screen, you will see the Pitch wheel, the Modulation wheel, and the Keyboard. These are performance controls that will reflect your playing and can be used to quick and easy check of a sound by clicking on the keyboard to play single notes (this feature is not currently supported in AAX format).
Model 84 can make use of two separate GUI sizes, one compact - for small screens (without keyboard), and one for larger screens (with keyboard). You can force Model 84 to use the small GUI unchecking the checkbox “Show keyboard” in the option menu and then restarting the plugin.
Click here to view the full-sized image in a new tab
Here some general quick directions for editing sounds:
- Add vibrato: the DCO LFO parameter will add vibrato while the LFO Rate will change the speed of that vibrato.
- Make your sound duller or brighter: increase or decrease the LPF freq parameter in the lowpass filter section to your liking.
- Make your sound's start harder or softer: increase or decrease the ENV Attack (A) parameter while repeatably playing the same notes over and over – you'll notice the difference.
- Extend your sound duration after keys have been released: increase the ENV Release parameter while repeatably playing the same notes – observer the difference. Sometimes this effect cannot be heard – then increase ENV Sustain level and/or change the VCA Mode switch to ENV (the figure depicted top position of the switch).

The the top left of the Model 84 plugin window you see two arrow buttons, a preset name drop-down and a short-cut symbol for Softube Preset Collection. This is where you access all presets available for Model 84, both the ones we have created for you and the ones you create. If you want to browse the presets with full overview and information, options for filtering etc. – click on the Preset Collection window to bring up this additional window with full view of your preset library.
For more casual preset browsing, simply use the back and forward buttons to scroll up and down in the order selected or filtered in the Preset Collection window.
The dropdown menu can also be used for preset browsing, but more importantly for quick saving of your own sounds into the preset User library. Notice that you can filter out all factory presets in Preset Collection to only browse your own User library if needed (see separate description in the user manual for Softube Preset Collection).
LFO section: This Low Frequency Oscillator is used for modulation in Model 84. It can be applied to pitch (vibrato), PWM (pulse width modulation of the square wave) or to modulate filter cutoff frequency.
DCO section: This section is the heart of the Model 84 Polyphonic Synthesizer. It sets up the type of harmonic or inharmonic content that is shaped by the LPF, VCA, EQ and Chorus.
LPF section: This is the Low Pass Filter section. It contains a filter that shapes the sound of the oscillators overtones and will make the sound duller if you lower the cutoff frequency, or brighter, if the cutoff frequency is raised.
PITCH and MOD performance modulation section: These parameters determine how much the pitch-bend and modulation wheel on your keyboard will affect pitch, filter and vibrato.
GLIDE and VOICING section: In this section you can set the glide time between each note and set voice allocation mode: Poly 1, Poly 2 or Unison.
ENV section: The Envelope generator is used to describe time-based changes in a sound. In Model 84, the Envelope generator (marked by the Attack, Decay, Sustain and Release sliders) can be used to shape either the harmonic content of the sound or the amplitude of the played sound, or both at the same time. The Envelope generators is started when you play a note and will go through their individual phases in time set by the sliders on the Model 84 panel.
VCA section: This section determines the behavior (gated or enveloped) and bias of the VCA going into the EQ and Chorus section.
EQ and CHORUS section: The last section is the EQ and Chorus section where a simple four preset EQ and a stereo chorus adds the finishing touch to your Model 84 sound.
The big GUI of the Model 84 features an on-screen keyboard with the main purpose for fast and ease of use for sound design. Without reaching for your midi keyboard, you will have the possibility to trigger sounds off Model 84. The build in keyboard will play notes equal to a mid velocity (64) level but cannot be recorded as automation or midi-notes - it is merely meant as a tool for instant sound reference. Note that input from onscreen keyboard is handled as poly 2 mode keyboard voice allocation. Noteworthy is also that the AAX version of Model 84 currently does not support the on-screen keyboard action – it will not respond when clicked upon.
If you want to turn remove the keyboard, you can uncheck the “Show Keyboard” option in the options menu – the next time the plugin GUI is shut down and opened, Model 84 will show the minimal “panel only” GUI. Note that the pitch-bend and modulation wheel parameters are not available in this minimal view.
Click here to view the full-sized image in a new tab
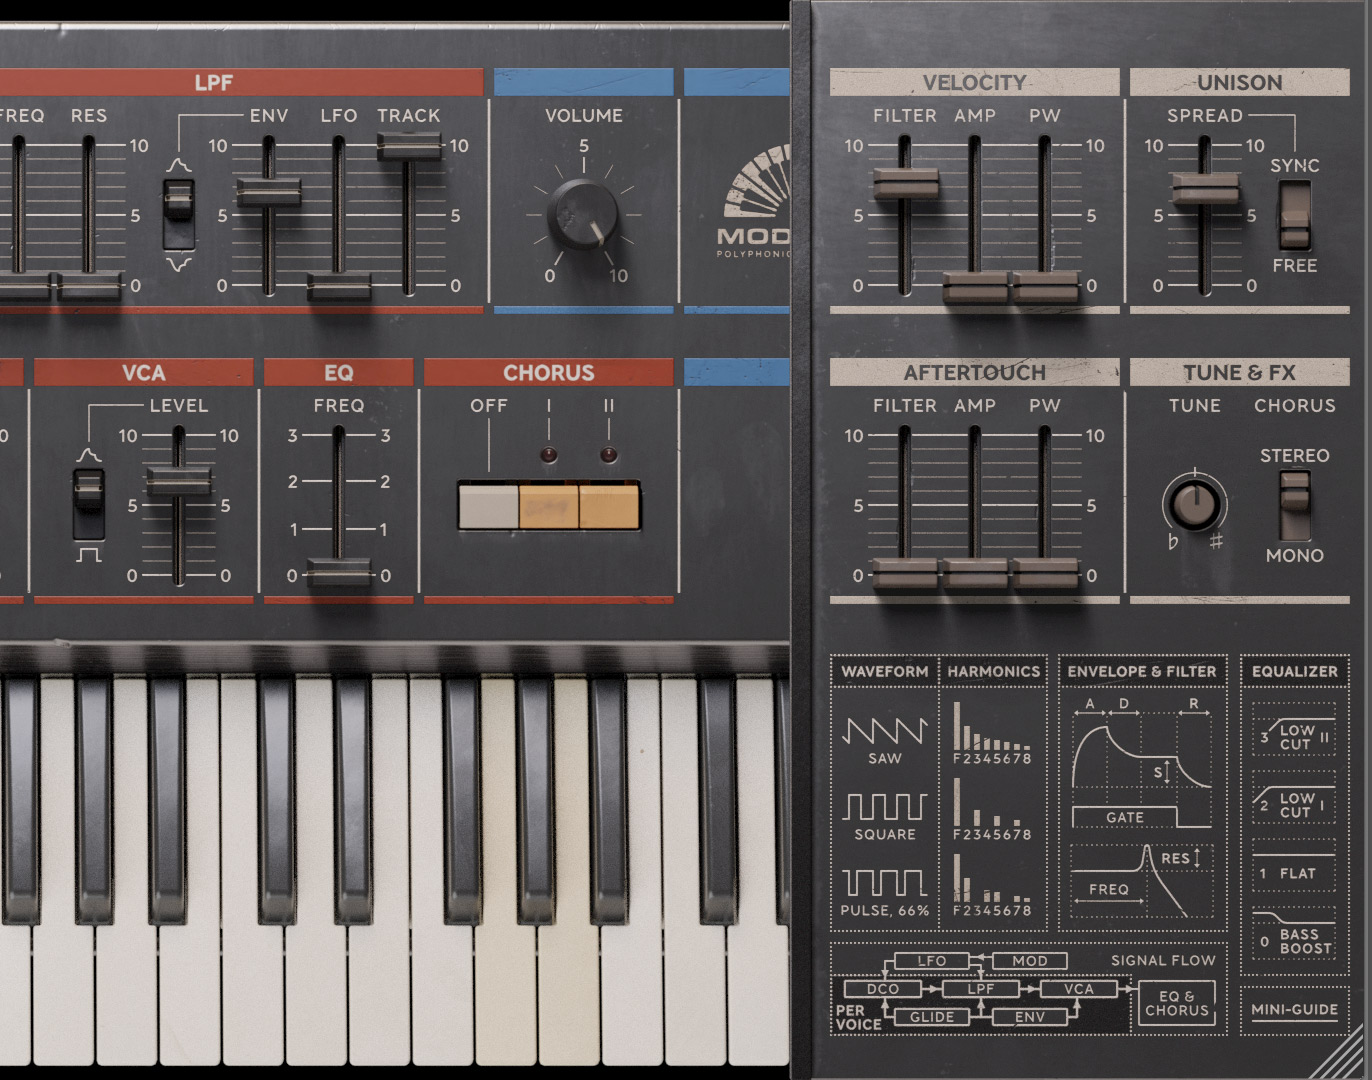
The side expander panel contains the additional features like tuning and chorus setup (mono/stereo), but also velocity and aftertouch options. A detailed description of this follows below.
Here follows a more detailed description of each knob and button in Model 84:
LFO Rate: This slider controls the rate of Model 84s LFO used for modulation in both the DCO and the LPF section.
LFO Delay: This parameter controls the time it takes from a keyboard stroke until the LFO impact on pitch and/or filter cutoff is noticed. The effect is monophonic (first keystroke) and gradual, like a fade in vibrato (pitch) or tremolo (filter). LFO modulation applied to pulse width (PWM) is not affected by this.
DCO Range: These three switches change the basic pitch-range of the Digitally Controlled Oscillators. 16' is the lowest, 8' is midrange and 4' is the highest pitch range.
DCO LFO: This slider introduces LFO to pitch modulation on the DCOs. Use it for everything from subtle vibrato to extreme siren-like effects.
DCO PWM: This parameter sets the width of the DCO square/pulse waveform when the DCO PW switch is set at MAN (manual), or the amount of LFO modulation to pulse-width if the DCO PW switch is set to LFO.
DCO PW: This switch determines the behavior of the DCO PWM slider as described above. When DCO PW is set to MAN (manual), it will set the static width of the DCO square/pulse waveform, while when set to LFO, it will LFO will control the pulse-width with the amount set with the DCO PWM slider.
DCO Square: This button will turn on or off the DCO square/pulse waveform.
DCO Sawtooth: this button will turn on or off the DCO sawtooth waveform.
DCO Sub: this slider controls the volume of the square-wave sub-oscillator always playing one octave below the main DCO.
DCO Noise: This slider controls the volume of the white noise mixed in with the DCOs and sub oscillator.
LPF Freq: This slider sets the Low Pass Filter (LPF) cutoff frequency initial value. This means that it represents the filter's cutoff frequency, to which all other modulation (pitch-bend, keyboard tracking, LFO, envelop) has as a reference point.
LPF Res: This slider determines the amount of feedback in the filter. The higher this value, the more “electronic” will the filter sound. At a certain point, about the value 9, the filter will start to self-resonate and create an oscillation of its own.
LPF Env Mode: This switch determines the polarity of the envelope modulation, POS (positive) or NEG (negative) on the filter cutoff frequency. Note that when using negative envelope modulation, the initial cutoff frequency (LPF Freq) will need to be set to a fairly high value, otherwise the effect will be muffled and hard to hear.
LPF Env: This parameter sets the amount of effect the envelope generator will have on the filter cutoff frequency. The higher value set on this parameter, the more dramatical movement in the filter.
LPF LFO: This parameter sets the amount of effect the LFO will have on the filter cutoff frequency. The higher value set on this parameter, the more dramatical movement in the filter. LFO modulation of the filter cutoff can be used to create everything from slow subtle movements to dramatic tremolos or auto-wah effects.
LPF Track: This parameter set the amount of filter cutoff frequency tracking by the keyboard. At maximum amount, the cutoff frequency of the filter will track accurately enough for the user to “play the filter” while it is self-resonating (LPF Res above 9). Try it!
VCA Mode: This switch determines whether the Voltage Controlled Amplifier will be controlled from the envelope (ENV) or “gated”. When ENV is selected (the upper symbol), the VCA is controlled from the envelope generator meaning that the Model 84 amplitude volume will change over time in accordance with the controlling signal. When set to GATE (the lower, “square” symbol) volume is simply turned on and off from the keyboard, no volume “swelling” or “decaying” will be applied to the VCA – the great thing about this is that then you’re free to use the envelope for the LPF anyway you want!
VCA Level: This slider sets the VCA bias level after the voices are being summed, but before entering the EQ and Chorus. Use this parameter to compensate for volume loss due to high resonance or if you want to drive the chorus extra hard.
The ADSR envelope generator is a keyboard-triggered time-controlled series of events outputting timed changes in voltage output. This means that different phases represent that of an acoustic sound described in its Attack, Decay, Sustain and Release phases.
ENV Attack: This is the Attack phase, which is the swelling phase, from zero to the maximum value of the envelope.
ENV Decay: This parameter controls the Decay phase which is the subsequent falling time taken until the Sustain level is met.
ENV Sustain: This parameter controls the Sustain level which determines the held level as long as the MIDI key (or gate voltage) is held.
Env Release: This is the control of the Release phase which is the ending time taken starting when the key (or gate voltage) is released and determines the time it takes until the envelop have reached zero again, the end point.
EQ Freq: This parameter selects between the four different EQ modes of the Model 84 voices before they are sent into the chorus. Mode 0 is bass boosts which adds some “ompf” to the frequencies below 100Hz. Mode 1 is neutral, while Mode 2 and 3 adds additional high-pass filtering.
Chorus Mode: This parameter determines whether the Chorus is shut off or using Chorus mode I or II. The difference between Chorus mode I and II is the speed of the modulation, where the latter is faster. Chorus I and II cannot be used simultaneously since this is how the original hardware worked back in 1984.
PITCH: This is the on-screen pitch-bend wheel. It is virtually “sprung” which means that it will repel back when moved and released on screen, reflecting its real-world counterpart. This parameter is by default linked to the MIDI pitch-bend messages through the MIDI link functionality and can be unlinked if desired. When moved this parameter will bend pitch up or down the amount set by the Pitch DCO parameter (see description below), and/or open and close the filter cutoff by the amount the set by the Pitch LPF parameter (see description below).
MOD: This is the on-screen modulation wheel. This parameter is by default linked to the MIDI controller change message nr 1 (MIDI CC#1) through the MIDI link functionality and can be unlinked if desired. This parameter adds pitch vibrato to the DCO from the LFO up to the maximum amount set by the Mod LFO parameter (see description below).
PITCH DCO: This parameter will set the range of the pitch-bend of the DCO, from zero amount up to a maximum of + - 12 semitones. The default value is + - 2 semitones.
PITCH LPF: This parameter will set the range of the pitch-bend to the filter cutoff frequency.
MOD LFO: This is the maximum amount of LFO to pitch modulation introduced via the modulation wheel. This modulation is added to the (initial) amount set by the DCO LFO parameter.
GLIDE Time: This parameter controls the glide time between notes, sometimes called portamento.
VOICING Mode: see description below in the section called “The Voice Modes”.
Volume: This is the main output volume of Model 84.
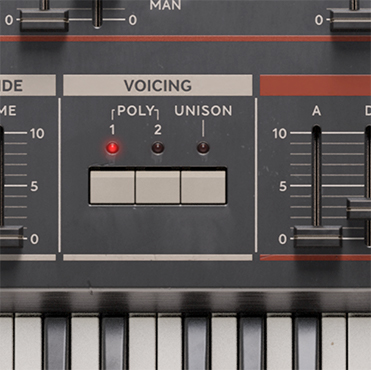
Model 84 faithfully replicates the internal six voice structure and voice allocation modes of its original counter-part hardware. Here is a detailed description on the inner workings of the voice modes:
Poly1 mode is designed with polyphonic performance in mind – great for playing chords and pads where voices need to overlap. In Poly1 each new key will assign a new voice until six keys are assigned, the 7th keystroke will assign the first voice again if that note is different from the six notes played previously.
Played and held notes have priority over new notes. Voice stealing while receiving pedal hold is however behaviour different from voice allocation while playing and holding down more than six notes. This behaviour is in line with the behaviour of the original hardware.
Poly2 mode is designed for a more consistent performance of the glide function. In this mode gliding between notes is easier to control, making it ideal for baselines with glide and gliding tritone chords for example. In Poly2 mode each voice is assigned to first keystroke, second keystroke etc. - So, playing staccato will use only first voice in Poly2 mode.
If only the same key is repeatably played, the same voice will always be assigned – true regardless of Poly1 and Poly2 mode.
This is an example of the difference between the Poly1 and Poly2 voice allocation modes:
Sequence played: C, C, D, E, F, G, A, B - chord C-E-G
Poly1: voice 1, voice 1, voice 2, voice 3, voice 4, voice 5, voice 6, voice 1 - voice 2-3-5
Poly2: voice 1, voice 1, voice 1, voice 1, voice 1, voice 1, voice 1, voice 1 - voice 1-2-3
The Unison mode replicates the behavior of the hardware original's Poly1+Poly2 mode (the two buttons pushed together). In this mode all voices are played at once, turning Model 84 into a powerful 6 voice monophonic synthesizer. In Unison mode, each new note will retrigger the envelope, as well as held notes will retrigger envelopes while others are released – all in the same quirky fashion as on the original. We have also added some additional Unison-specific features in the Expanded View (see description below) that makes this mode even more versatile that on the original.
By clicking on the upper right side of the Model 84 panel, the side expander panel with additional “pro-tweaking options” becomes accessible. They are:
VELOCITY Filter: This parameter controls the midi velocity to filter cutoff. When this parameter is increased the dynamics of the played keyboard will add to the cutoff frequency performance of Model 84.
VELOCITY Amp: This parameter controls the midi velocity to Amp (output volume). Increased value of this parameter will increase the dynamics of the played performance of Model 84. At maximum a velocity value of zero will appear silent.
VELOCITY PW: Velocity's influence on DCO PW/PWM. This parameter controls the amount at which the PWM amount will influence the pulse-width or pulse-width modulation of the DCO. To hear the effect of this parameter, make sure that DCO PWM is set to the maximum value you want to reach with full velocity.
Chorus Mono/Stereo: This parameter sets the output Chorus mode – Mono or Stereo, reflecting the use of a mono or stereo cable inserted on the original hardware.
AFTERTOUCH Filter: This parameter controls the midi channel pressure's influence on the filter cutoff. When this parameter is increased aftertouch will add to the cutoff frequency performance of Model 84.
AFTERTOUCH Amp: This parameter controls the midi channel pressure to Amp (output volume). Increased value of this parameter will increase the dynamics from the aftertouch of Model 84. At maximum an aftertouch value of zero will appear silent, while maximum aftertouch will reach the output volume set by the Volume knob.
AFTERTOUCH PW: Aftertouch to PW/PWM. This is the aftertouch influence on DCO PW/PWM. This parameter controls the amount at which the PWM amount will influence the pulse-width or pulse-width modulation of the DCO. To hear the effect of this parameter, make sure that DCO PWM is set to the maximum value you want to reach with full aftertouch (channel pressure).
UNISON Spread: This parameter will control the voice tuning spread between voices in Unison-mode making it possible to create razor-sharp leads as well as incredibly fat sounds.
UNISON Mode: This parameter determines whether or all oscillators reset on each stroke (synced) to effectively be in phase regardless of their individual detune. This effect is very evident when turned on and can give the sound and extra “boost” in the attack. When this parameter is set to “free” all DCO resets on each key stroke will be discarded (this is the default behavior).
Tune: Overall tuning offset.
Creating sounds - tips and tricks
Here’s some short tips and tricks for you that can come in handy when creating your own sounds on the Model 84:
Use keyboard tracking of the filter as an oscillator
This is great for adding overtones to your organ-like patch or drone. Experiment with using keyboard tracking at half for dissonant 6 notes chromatic vs 12 notes chromatic tuning for even more excitement.
Attack at zero, short decay, sustain at zero and a longer release can be used to great effect when playing short and long notes when trying to create for example a hi-hat sound. Play longer notes for closed hi-hat and shorter notes (releasing before decay has close), in order to create open hi-hats.
Use PWM to add subtle movement to your sound
This is especially great when using highly resonant filter settings in collaboration with pulsewaves.
Click here for more information about Preset Collection.
Saving and recalling your own or other sounds is amazingly simple in Model 84. In the top left corner of the plugin window is the preset display window and just to the left of that are the two buttons for next and previous preset quick browsing.
When clicking on these you will scroll back and forth in the list that is selected and filtered in the preset collection browser.
The preset collection browser window is quickly open by clicking on the window symbol to the right of the small preset name display. For details about Preset Collection see the separate user manual available.
When you have created a great sound that you want to save, simply click on the drop-down arrow just to the right of the preset display window and choose Add preset or Save as – you'll now be promted to give your preset a name (the same procedure can of course also be performed in the preset collection by itself) and press enter to save it.
Your preset has now been saved and can found among the user presets in Preset Collection. You can even share it with your friends by exporting it along with other presets as a separate “.softubepreset”-file. Details about this can be found in the Preset Collection chapter.
When just tweaking a sound, you will notice that the name will get an * addition after the name, indicating that this preset has been changed from its saved state. If you want to save those changes simply choose “save” in the preset dropdown menu.
Click here to view the full-sized image in a new tab
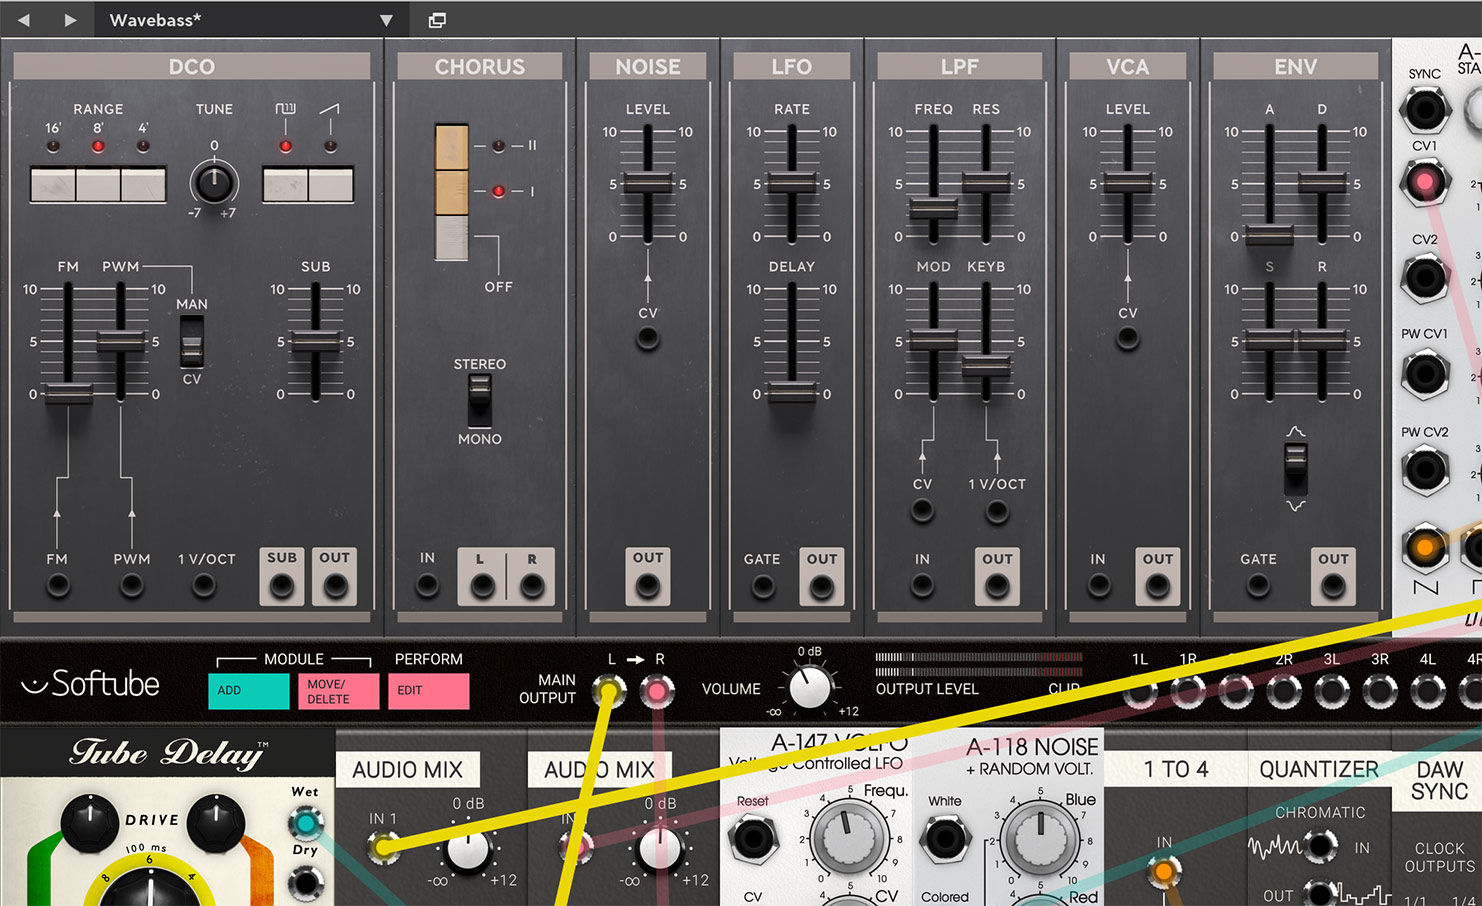
Model 84 can also use as 7 separate Modules in Softube Modular. This is a brief description of the functions of these modules:
Model 84 DCO
Parameters
Range buttons: These buttons set the current octave range of the Model 84 DCO.
Tune slider: This slider detunes the oscillator up or down 7 semitones.
FM input attenuator slider: This slider scales the signal at the AC coupled input for frequency modulation.
PW mod attenuator slider: This slider scales the external signal used for pulse-width modulation (CV) or manual pulse width (manual). See further description below.
PW/PWM switch: This switch determines whether an external signal controls the pulse-width of the pulse waveform (when the PW/PWM switch is set to CV), or if the sets slider position itself will set the manual pulse-width (PW/PWM set to MAN).
Saw engage button slider: This button turns on/off the sawtooth waveform.
Pulse engage button: This button turns on/off the pulse waveform.
Sub Level: This slider sets the level of the sub oscillator in the combined output.
Inputs
CV in: DC coupled input for 1v/octave tracking. Can be used for sequencing melodies etc.
FM in: AC coupled input for frequency modulation at audio-rate or for vibrato etc.
PW CV in: for CV control over the pulse-width of the square-wave when the PW/PWM switch is set to CV. CV input here 0 to 5V will mimic the fader, 0 to -5V about the same but inverted. When +-5V are exceeded, PW will be limited (no PW choke).
Outputs
Combined output: This is the main output with the mixed waveforms (sawtooth, pulse and sub oscillator post Sub Level). Output is about +- 7.5V when all the waves are summed.
FM in: AC coupled input for frequency modulation at audio-rate or for vibrato etc.
Sub oscillator output: This is output of the sub-oscillator by itself (+- 5V). It is not affected by the Sub Level setting.
Model 84 Chorus
Parameters
Chorus mode buttons: These buttons change the operational mode of the chorus (off, I, II).
Chorus Mono/Stereo Switch: This switch changes the output mode of the chorus between mono and stereo.
Inputs
input: This is the input of the Model 84 Chorus. Be careful with high input-signals here since it will distort the same as the original hardware.
Outputs
outputs: These are the left and right outputs of the Model 84 Chorus.
Model 84 Noise
Parameters
Noise level slider: This slider sets the initial level of the noise when the CV jack is not connected and the scaling of the input signal when connected to an external modifier or modulator.
Inputs
CV in: This external CV input jack is used to externally control the level of the noise in the Model 84 Noise module. CV in at 0 to 5V will mimic the fader. Above this value will be clipped.
Outputs
output (mono): This is the output of the Model 84 noise module. It outputs white noise.
Model 84 LFO
Parameters
LFO rate slider: This slider controls the rate of the Model 84 LFO module output waveform.
LFO delay slider: This slider sets the time for the fade-in of the LFO from the moment a positive gate signal is received at the gate input jack (see further description below).
Inputs
gate in: This is the gate input jack to trigger the delay fade-in period for the LFO waveform. When a positive gate signal is received here (crossing 2.5V on a rising flank.), the LFO will reset to 0 and slowly fade-up by the rate set by the LFO delay slider.
Outputs
output: This is the output of the LFO triangular waveform of the Model 84 LFO at +-5V. Use this for vibrato.
Model 84 LPF
Parameters
Cutoff frequency slider: This parameter controls the cutoff frequency of the Model 84 low pass filter.
Resonance slider: This slider sets the resonance (Q) of the Model 84 low pass filter. When set higher than around 9, the filter will start to self-oscillate due to the feedback in the filter.
Modulation attenuator slider: This slider scales the control signal arriving via the Mod CV input jack.
Keyboard track attenuator slider: This slider scales the control signal arriving via the Keyboard CV input jack. When the slider is set to full (10), the filter will track 1 v/octave via the Keyboard CV jack.
Inputs
mod CV input: Use this jack for external modulation of the filter cutoff frequency.
keyboard CV input: Use this jack for external keyboard modulation of the filter cutoff frequency. When the Keyboard track attenuator slider is set to full, the filter will track 1 v/octave via the Keyboard CV jack.
audio input: Feed this jack with the external signal you would like to filter.
Outputs
output: This is the output jack of the Model 84 LPF module. It outputs the lowpass-filtered version of whatever signal is fed into the filter.
Model 84 VCA
Parameters
Level attenuator slider: This slider sets the initial level of the Model 84 VCA when the CV jack is not connected and the scaling of the input signal when connected to a external modifier or modulator.
Inputs
audio input: Input the signal here that you want to attenuate through the VCA.
CV in: This is the input of the external CV signal to control the VCA. Input CV 0 to 5V will mimic the fader. Above will be clipped.
Outputs
output: This is the output of the Model 84 VCA.
Model 84 Envelope
Parameters
Attack slider: This is the Attack phase of the Model 84 Envelope which is the swelling phase, from zero to the maximum value of the envelope.
Decay slider: This parameter controls the Decay phase which is the subsequent falling time taken until the Sustain level is met.
Sustain slider: This parameter controls the Sustain level which determines the held level as long as the gate input is held.
Release slider: This is the control of the Release phase which is the ending time occurring when the gate voltage at the input is released and determines the time it takes until the envelop have reached zero again, the end point.
Envelope invert (on/off switch): This switch determines the polarity of the output envelope waveform.
Inputs
gate input: This gate input jack starts the envelope when high (triggers when crossing 2.5V on a rising flank.) and initiates the release phase when set low again.
Outputs
output: This is the output envelope modulation signal of the Model 84 envelope (0 - 10V when positive, 0 - -10V when negative). Use it to modulate for example VCA levels, LPF cutoff frequencies or DCO pitch for bends.
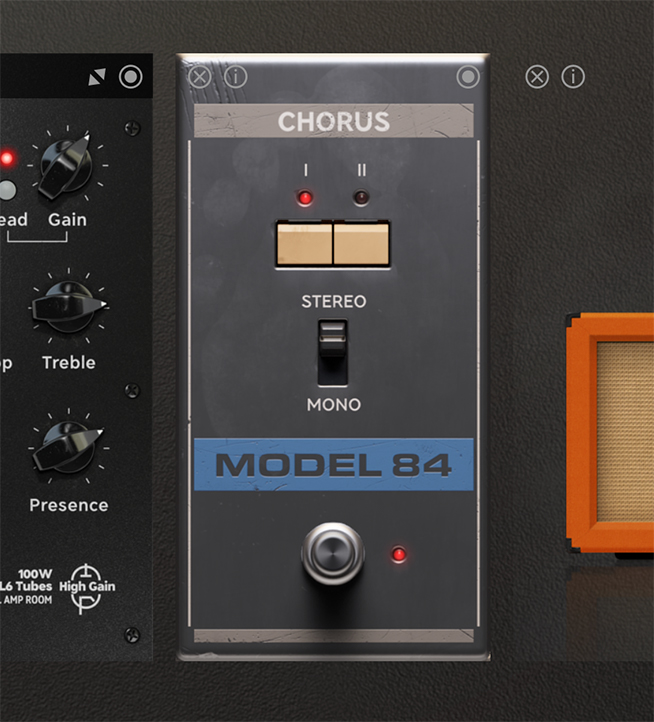
This is the lush stereo chorus taken from the Model 84 reimagined as a pedal effect in Softube Amp Room. The chorus has two modes with different chorus speeds and can also be run in mono if desired.
Kristofer Ulfves – Project lead, sound design, presets, testing and user manual
Jacopo Lovatello – Tech lead, DSP models
Niklas Odelholm – Sysex conversion and testing
Björn Rödseth – Mentoring
Patrik Holmström – UI programming
Nis Wegmann – GUI design
Tord Jansson – Programming and GUI engine customization
Maxus Widarsson – Deep testing, Qualification
Henrik Johansson, Fredrik Mjelle, Mario Pierro, J3P0, Andreas Tilliander and Jo Webb – Exclusive factory presets

