User Manual
Monoment Bass
Intro
User Interface
Source section
Tone section
Filter section
Effects section
Sources of sources
Monoment For Modular
Monoment For Amp Room
Credits
Related manuals
It is not always possible to achieve a modern bass sound with “just a synth”. While it is possible to create absolutely fabulous and punchy sounds with two oscillators, modulation and filters, a modern production usually requires more. And that “more” often consists of layers, movement, stereo imaging, and other effect processing that is normally done after recording the synth line.
But it doesn’t have to be that way. In Monoment Bass we threw out the “ordinary” oscillators and replaced them with a collection of well-crafted stereo samples; taken from unique, highquality synths, processed through the finest boutique gear, and sometimes with layer upon layer to create the sources that you need to craft your sound.
On top of that we created a synth workflow with filters, envelopes and modulation, all easily accessible and adjustable, for you to shape the sources into the tone you need right now.
And if the textures of the sources aren’t enough, there’s an effects section with ambience, spatialization, distortion, multi-band compressor, and equalization. All that you need to make your bass line take the desired position in the mix.
It’s about sound quality and workflow. A modern bass sound in no time.
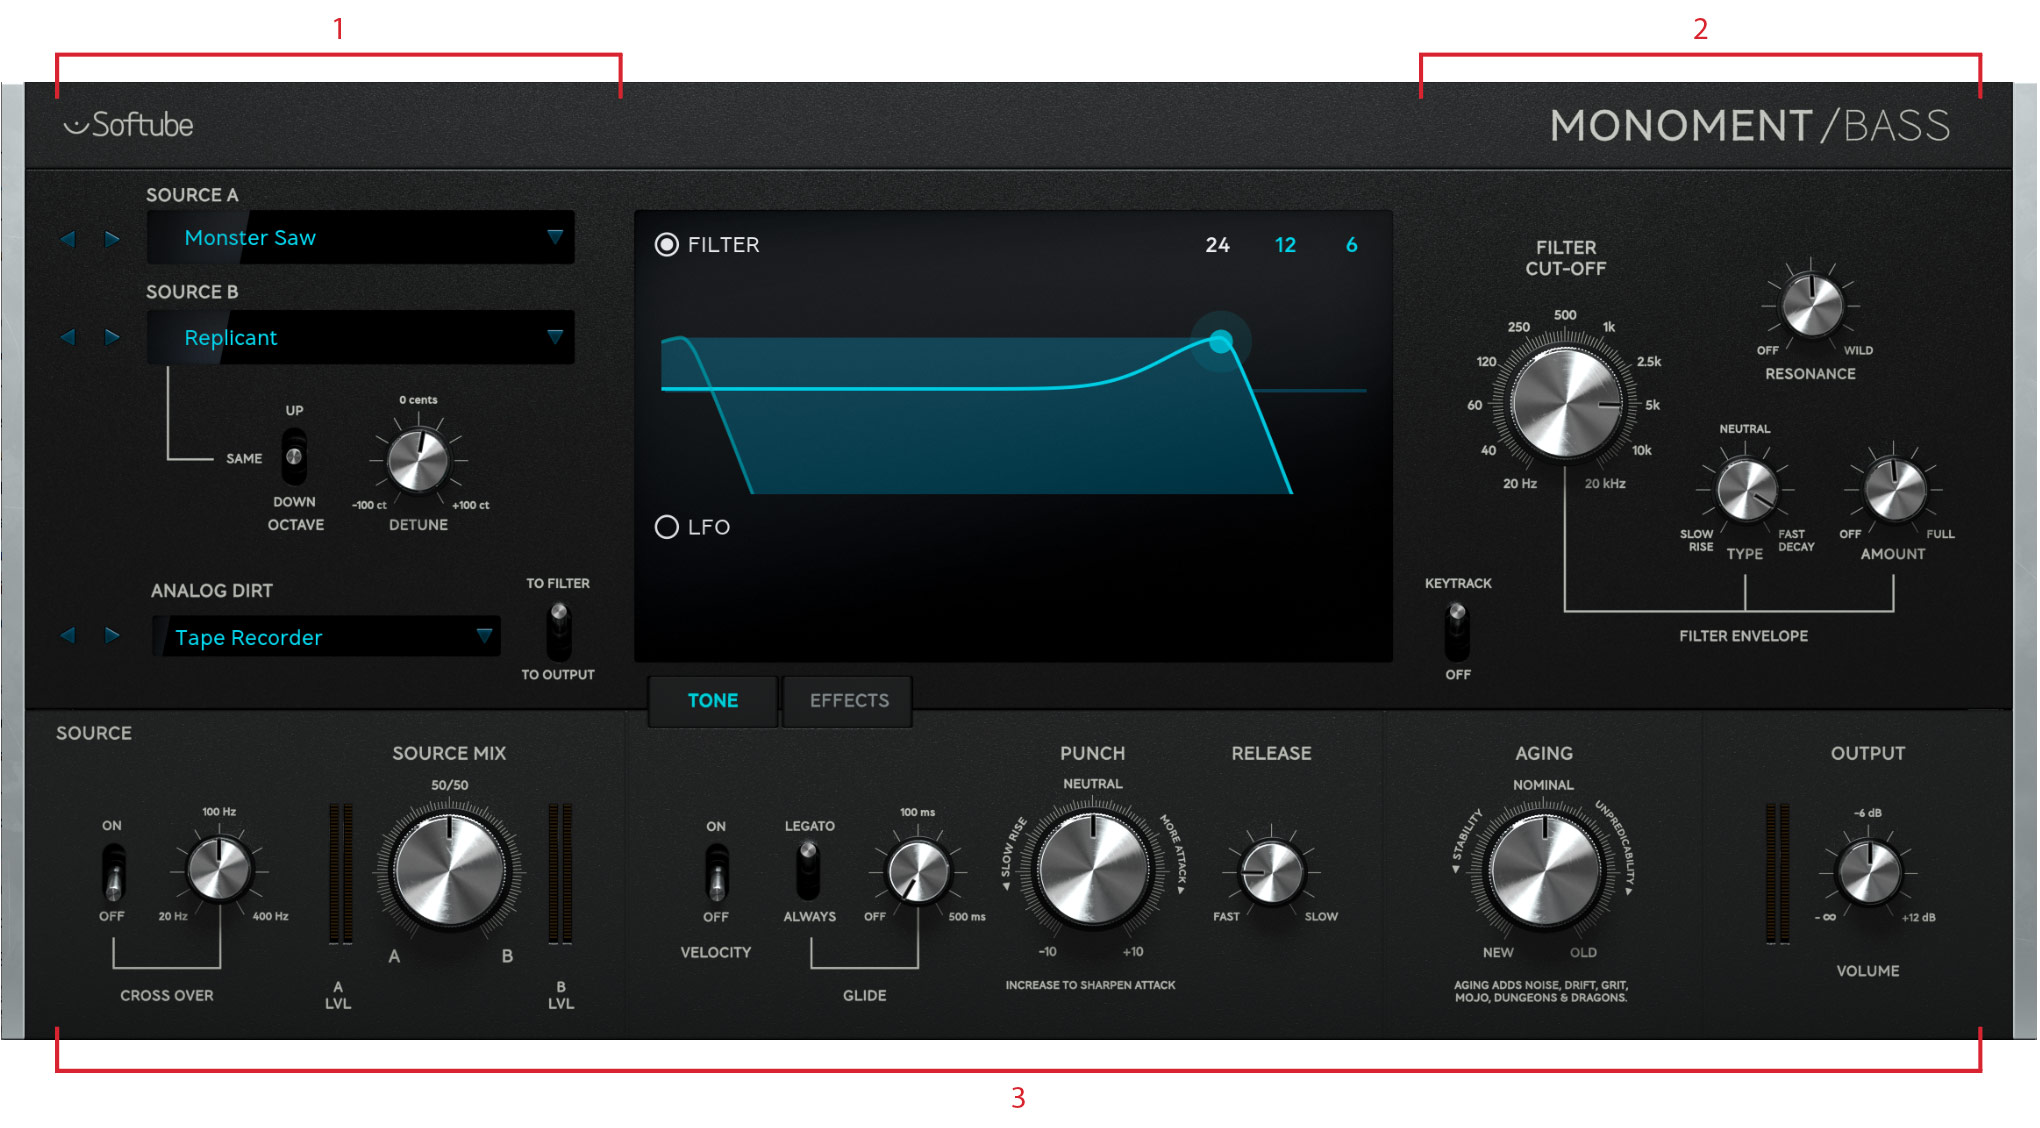
Click here to view the full-sized image in a new tab
The user interface consists of four parts:
- Source section, where you select different sound sources
- Filter and LFO section, where you set the cut-off frequency of the filter, or use filter modulation to automatically change filter cut-off
- Tone, where you balance your sources and set the punchiness of the sound.
- Effects, the place for distortion, reverb, EQ, compression and spatialization.
On top of all this you also have a quick selector for presets that allows you to easily step through the presets in the Preset Collection, or if you’ve narrowed down the search by using tags or search words, step through the presets in the current search.
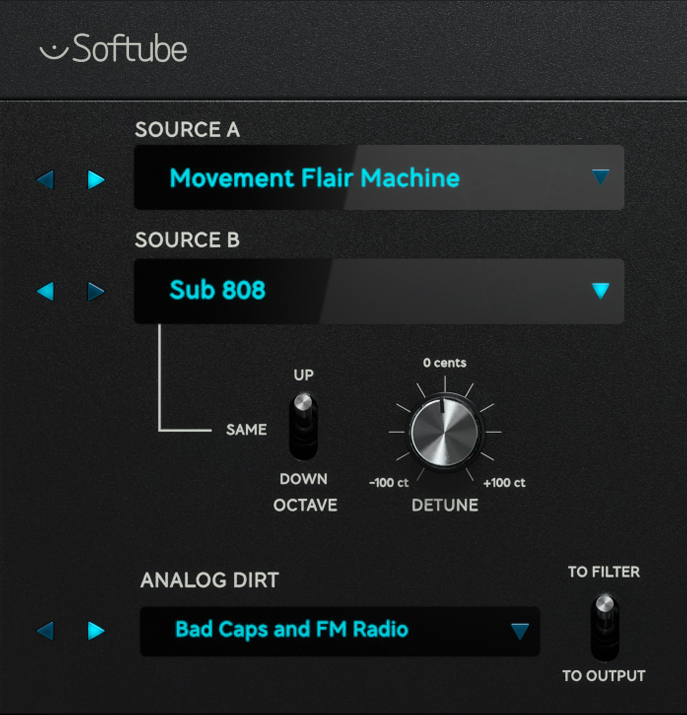
The Source section’s main purpose is to select the sources that are the foundation of the bass sound. You do that by clicking on the title of the source and choose which source you want from the different categories. On the second source (source b), you can also select which octave it should play in, so that you can have source a and source b playing an octave apart for an even fatter sound, or you can slightly de-tune source b to get a nice chorus-y effect.
The last source does not come from pristine and high-quality synths, but from the different flaws they have. We call it analog dirt and these are a unique collection of noises that have been carefully sampled and adapted for Monoment Bass. These can be used as an almost regular noise source, or can be filtered together with the other sources and together create complex textures and richness. There’s just something about good noise. It just makes everything feel more alive! It’s like a pretty black-and-white photo. The noise makes it real, and without it, it would just look like something you snapped with your mobile. But the noise has to be right.
The level of noise, and also the amount of analog “goodness” is controlled by the Aging control in the tone section.
To set the mix between source a and source b, use the Source Mix knob in the tone section.
Parameters
Source A, Source B: Selects the sound for the first or second source. Click on the < > arrows or use the dropdown menu to navigate the different categories.
Octave: Sets the octave (-1, 0, +1) for the second source.
Detune: Detunes the second source. A bit of detuning makes everyone happier!
Analog dirt: Sets the sound of the analog dirt. Choose between noise sources and different attack sounds.
Dirt to filter: Engage if you want the analog dirt to be filtered by the same filter as source a and b. Otherwise it will go directly to the effects section.
The amount of analog dirt is effectively controlled by the Aging knob in the tone section.
What source-ry is this?
The sources are divided into different categories, to help finding the right source quickly. Below we describe each category, and also point you to our favorite sources.
Analog Clean
A collection of rather clean analog sources without any harshness and distortion. These sources are a good starting point for add distortion using the drive section. By combining a clean and less clean source you can create an unique sonic richness.
Listen to: “Monster Saw”, a rather fat analog sound designed with the Schmidt Synthesizer, try out DRIVE with the MODERN setting.
Analog dark
Listen to: “Voltage Overload”, sound designed using the Schmidt Synthesizer, using Schmidt’s unique filters to darken the sound.
Analog Punchy
A collection of analog sources with a punchy attack, mainly designed with a filter envelope. Each synths’ envelope and filter have something special and we didn’t just want to offer oscillator sounds from several synths, but also capture the different filter and envelope behavior.
Listen to: “Unisono puncher”, sound designed using the Schmidt Synthesizer, but here we used the filters and their envelopes to create a punchy source.
Analog Rich
A collection of full spectrum analog sources. Don’t call it super saw, these are all analog sources with analog richness!
Listen to: “Big Ship”, this monster sound was designed with the Modal 002 synth, play it again and again with open filter and Aging above 60% to hear the rich and lively sound.
Digital Clean
A collection of rather clean digital sources without any harshness and distortion - but with early digital “low resolution” fun! These sources are a good starting point for adding additional distortion. By combining a clean and less clean source you will get unique sonic richness.
Listen to: “Early Digital 1”, this sound was designed with the Modal 002 synth, capturing sonic fingerprints similar to the famous PPGs. Try out DRIVE with the MODERN setting.
Digital Dark
A collection of analog sources that don’t have a full frequency spectrum and sound rather dark. Each source use specific filtering of the synthesizers they were sampled from, which gives another character using the filter section in Monoment Bass.
Listen to: “Winter Night”, a really warm, but digital, sound designed with a rare Jomox Sunsyn, which great filters we had to use!
Digital Noisy
A collection of rather noisy digital sources of all kinds. The different kinds of harshness was designed with onboard features of the specific synths like distortion, FM or other modulations, as well as with external processing of the sources.
Listen to: “Truck FM Radio”, a sound designed using the Nonlinear Labs C15 synth - now you can hear that Monoment Bass is not a standard bass synth, but an instrument with really unique and inspiring sample sources!
Digital Punchy
A collection of digital sources with a punchy attack, mainly designed with a filter envelope. Each synths’ envelope and filter have something special and we didn’t just want to offer oscillator sounds from several synths, but also capture the different filter and envelope behavior.
Listen to: “Synclavier FM1”, did we say filter envelope before? This sound was designed using the famous Synclavier synth. It uses no filters, but has incredible sound shaping features, like harmonic envelopes and more.
Digital Rich
A collection of full spectrum digital sources. For these sources you have to try out filter section and filter envelopes to form the rich spectrum in the right way.
Listen to: “Outburst”, a monster of sound. Designed with the Nonlinear Labs C15. Make sure to use the filter here, unless you want the audience to panic from all fatness!
Organ
A small collection of sources that remind of organ sounds. These sounds are a fundamental part of timeless dance and house tracks, but they definitely fit many other genres as well.
Listen to: “Hot Washed Organ”, another sound designed with the Nonlinear Labs C15, not a typical house organ, but a really deep and noisy organ for your next pop, dance or indie track!
Processed
A small collection of sources that have been heavily processed with analog filters, FM modulation, secret stomp boxes and hardware modular devices. These sources enrich the Monoment source collection with sonic content, far beyond standard waveforms.
Listen to: “Circuit Board Fire”, the name isn’t entirely accurate, but that’s what it sounds like. Another sound designed with the Nonlinear Labs C15 and several secret processing tools on top.
Sub
A collection of sub bass sources, typically with a low harmonic content, which is useful for creating sub or 808 like basses. Be careful with your speakers! These sources are very useful when you need to add more bottom to any other source.
Listen to: “Earth Shaker”, the subtle richness and movement in the source makes even a single note bass line interesting. It was recorded with the Schmidt Synthesizer including filtering.
The purpose of this section is to sculpt the tone: how you mix the sources, if it should have a sharp attack, or a slow fade-out. A lot of the “playability” of the sound can be adjusted here with just a few powerful controls.
First step is to blend source a and b. In many cases it’s enough with a single source, and you can set Source Mix all the way to a or b, but for modern production styles you often need to blend multiple sources. If you want to take the subs from source a, and the sizzle from source b, that’s easy to do by engaging the Crossover. It separates source a and b at the Crossover Frequency.
Next step is to adjust the shape, the envelope, of the tone. That’s easily done by adjusting the Punch control. Increase Punch and you’ll get a snappier, punchier sound. Decrease it and you’ll get a sound with a slow build-up. The Release sets the time it takes for the sound to fade-out.

Click here to view the full-sized image in a new tab
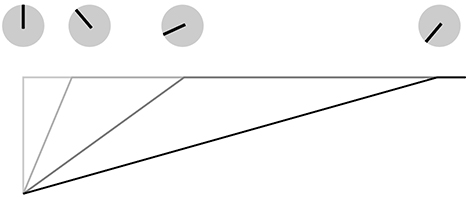
Decreasing Punch from 12 o’clock down to nothing will make the onset of the note slower. This is useful for creating slow building sounds or to reduce the built-in attack of a source.
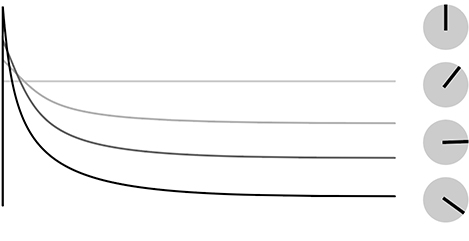
Increasing Punch from 12 o’clock will create a sharper attack with a lowered volume on the sustained note. Increase Punch to get a pluckier and sharper sound.
When designing Monoment Bass we wanted to make something that feels alive and real. Like a big beast that emits a lot of heat and creates earth-shattering lows. But sometimes you need something more static and a bit more predictable. That’s what Aging does. More Aging gives you a more authentic, but also slightly more unpredictable sound with more dirt and grit. Don’t want that? Fine, turn Aging all the way down.
Parameters
Crossover ON/OFF: Activates the crossover filter between source a and b.
Crossover frequency: Sets the crossover frequency. source a will get the low part, all frequencies below Crossover Frequency, and source b will get the frequencies above.
Source mix: Sets the blend between source a and b.
Source meters: Shows the volume level of source a and b after the crossover and mix.
Velocity ON/OFF: Engage to get a velocity sensitive instrument.
Glide type: Sets the type of glide or portamento.
Always on: the note’s pitch will always glide between the former and the current note, in the time that is set by Glide Time.
Legato: the note will only glide when you play legato, ie. connected notes. If there is a space between to notes being played, the pitch will immediately jump to the latest played note. This mode is often called fingered glide, or auto glide.
Glide time: The amount of time it takes for the glide to reach the target note. At its minimum position (0.0), the glide functionality is turned OFF.
Punch: Sets the shape, the envelope, of the sound. At 12 o’clock it doesn’t do anything. Increase it to get a sharper attack and more punch. Decrease it to get a softer attack with a slow build-up.
Release: Sets the time it takes for the note to fade out.
Aging: Sets the amount of unpredictability in Monoment Bass. More Aging means less stable pitch, more unpredictable attacks, more dirt and grit and more analog goodness.
Volume: Sets the final output volume.
Output meter: The level of the output signal.
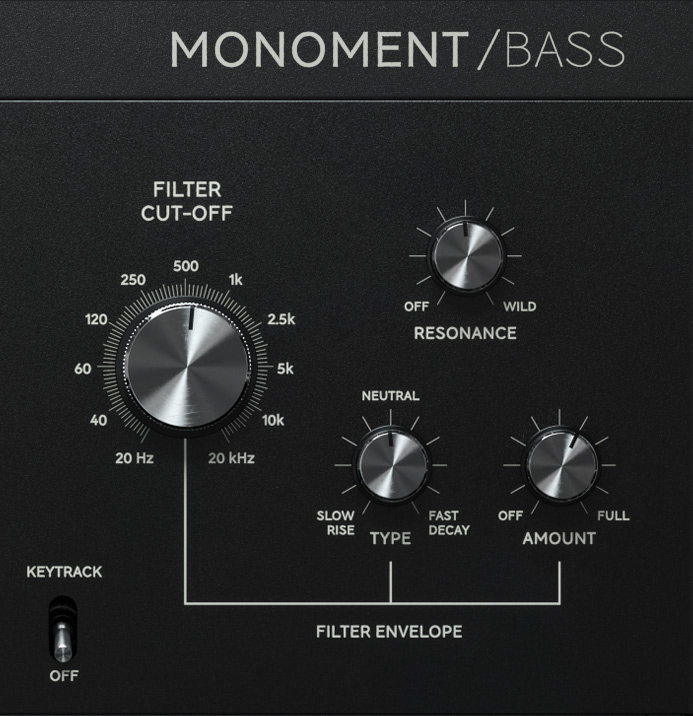
Even if a source, or a blend of sources, sound fantastic on its own, a synth bass sound is all about how you filter it, and how the filter changes when you hit a note. We want to make that as easy as possible and boiled it down to four main controls: the four knobs to the right.
Filter Cut-Off is the king. It rules them all. From subby bass to screeching high. That’s what the Cut-Off do. Resonance is the trickster, that sets the amount of screechiness, and can be overdriven so that it distorts into a creative mayhem. (No, it’s not your speakers breaking, it’s how it should sound.) But the real heroes are Filter Envelope Type and Amount. They control how the filter changes when a note is being played! And that’s how you get the classic synths sounds, like the “pluck” (the filter is closes when the note is played), or the “rise” (the filter is slowly opening then a note is played).
Filter Envelope Type goes from “slow rise” at its minimum position. The filter will slowly open up and reach the cut-off filter after a while. Turn it up to 11 o’clock and the filter will open up faster. At 12 o’clock it does nothing. Then when you increase it after that, the filter will close faster and faster, and at its maximum position the synth doesn’t sound much more than a knock on your door. (“But hang on, I tried that, and IT DIDN’T DO NOTHING!”)
Filter Envelope Amount controls how much of the Type effect you are getting (“Now you’re telling me?”) and with Amount on full, the filter sweep will go from nothing up to the cut-off frequency, or vice versa. Set it half-way, and the filter sweep will go from half-way between cutoff and nothing all the way up to the cut-off (or vice versa).
You can clearly see how the cut-off is set, how it is changing, and how much it can change in the filter graph.
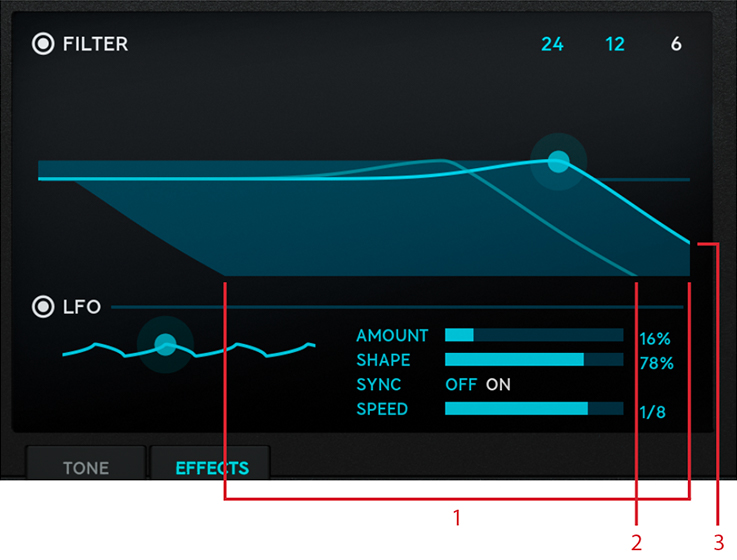
- Amount
- Current frequency
- Cut-off frequency
The combination of Cut-off, Resonance, Type, and Amount is by far the most powerful knobs in Monoment Bass. And we’ve spent a lot of time to make them as versatile as possible yet maintaining workflow and speed.
These filters distort. With too much resonance you’ll get a very gritty (gritty-nice, not gritty-bad distortion!
Parameters
Filter cut-off: Sets the cut-off frequency of the filter. Can also be adjusted by clicking and dragging the curve in the window.
Resonance: Sets the amount of resonance (squealing) of the filter. With a lot of resonance, you can get the filter to distort in a very nice way! Can also be adjusted by clicking and dragging the curve in the window.
Filter envelope type: Sets how the filter reacts to notes being played. Neutral at 12 o’clock, increase for a decaying sound, all the way to a short “plucky” sound. Decrease to get a rising filter sweep.
Filter envelope amount: Sets how much the Filter Envelope Type should affect the filter cut-off. This is indicated by the shaded zone in the window.The current cut-off frequency (the combination of cut-off, filter envelopes and LFOs) can also be seen in the window.
In the window you can also set some additional filter parameters:
Filter ON/OFF: Activates the filter.
24, 12, 6: Sets the type of filter:
24 db/octave, classic analog synth filter with steep cut-off.
12 db/octave, typical 2-pole filter
6 db/octave, a gentler filter used in a lot of modern productions. Technically, a 6 dB filter cannot be resonant, but many modern analog synths have combined the gentle 6 dB filter with a resonant circuit and achieving a filter like this.
You will notice that heavy filters (like 24 dB/OCTAVE) will remove too much of the built-in character that the sources have, while 6 dB/OCTAVE lets the sources keep more of their character.
LFO (low frequency oscillator) is another way of automatically change the filter frequency, but instead of having it change when a note triggers, you can get it to rhythmically change in time with your music. In general, you want to set it to sync the tempo with your DAW (sync on) and set the LFO Speed to 1/4TH notes.
LFO ON/OFF: Activates the filter LFO.
LFO Rise (The dot on the LFO Curve): Sets the start point of the LFO, from triangle to saw-tooth.
LFO Amount: Sets how much the LFO should affect the filter cut-off, similar to Filter Envelope Amount.
LFO Shape: Sets the shape of the LFO, from shark-fin to triangle.
Sync ON/OFF: Activates tempo synced LFO.
LFO Speed/LFO DAW Speed: Sets the speed of the LFO, in seconds in the first case, in beats/bar in the latter case.
A note on filter modulation: synth enthusiasts will probably scratch their head about how the modulation amount on the filters work, so let’s state it clearly: the modulation will always lower the cut-off frequency. Set the cut-off to the highest you need and adjust amount until the modulation goes low enough.

Click here to view the full-sized image in a new tab
The effects section consists of five different effects that you can use to further sculpt your bass sound. These effects have been carefully chosen and designed for bass sounds, and the control set has been thoroughly tweaked to give you as much control as possible with as few knobs as possible.
Drive
If you need more dirt and grit, Drive is king. For a typical bass sound you often need one of two different types of distortion: either a low frequency roar (transf.) that adds harmonics to the lowest frequencies so that they can be heard even on a small mobile speaker, or a full-band distortion to make the bass sound sit better in the mix (modern).
When dialing in distortion on a bass sound it’s often best to listen to the bass in context of the whole mix. Bass distortion sounds very different in a context of other high frequency instruments.
The algorithms for the drive section come from the Harmonics Analog Saturation Processor plug-in, so if you like them, or want more options for the distortion, please check out the Harmonics plug-in.
Parameters
Drive ON/OFF: Activates the drive section.
Type: Sets the type of distortion,
TRANSF: a transformer based low-frequency distortion. Will only affect the lowest frequencies.
MODERN: a full-band distortion
Drive: Sets the amount of distortion.
Ambience
Many have been taught that putting reverb on the bass is a classic mistake. That is often true, since the reverb smears out the bass in time, and you often need a very focused and tight bass. But what would creativity be if you can’t break rules?
The ambience algorithms in Monoment Bass was designed for synth bass and are meant to enhance the stereo goodness and movement of the bass sounds. It can add amazing texture to your sound, and it is quite effective to use the spatialization features in conjunction with the ambience to further tailor the sound.
Parameters
Ambience ON/OFF: Activates the ambience section.
Tone: Sets the tone of the ambience, with dark tones counter clockwise and brighter tones clockwise.
NEUTRAL: A short all-round reverb, created with a modern hardware device combined with analog filtering. This ambience gives your basses some natural “air” and size.
ELECTRIC: A short robotic reverb, created with a French reverb device from the 80s, combined with some secret offline processing of the recording. Use this ambience to create a very special sonic fingerprint of your basses.
METAL: A unique metallic reverb, created with a French reverb device from the 80s. This ambience gives your bass sound some industrial metallic sonic flavor.
RUSTY: A short unique reverb, created with a modern hardware device combined with offline pitch shifting and other vintage tools to give a rusty edge to your bass sound
DIRTY: A dirty reverb, created with a famous modular reverb device and combined with some secret stomp boxes. Use this ambience to create a trashy little space around your bass sound.
EQ
Equalization, tone control, is an essential part of all sounds. The EQ in Monoment Bass is an extremely powerful two-knob algorithm that, of course, has been tailored for bass synths (do we need to say that again?).
You can see the two controls (Bass and Tilt) as having two different purposes. With the Tilt knob you adjust the overall sound, the balance between the high frequency harmonics and the sub-frequency content. The Bass control is what you use to specifically target the bass frequencies. In other words: Tilt is used to shape the character, and Bass is for making it sit in the mix.
Parameters
EQ ON/OFF: Activates the EQ section.
Bass: Counter clock-wise: cuts bass frequencies
Clock-wise: reduces high frequency content.
With the semi-resonant nature of the cut-filter it’s very easy to find sweet-spots where the low frequency rumble has been removed while the fundamental frequencies are being emphasized. This technique has been used in many famous low-frequency EQ circuits.
Tilt: Turn clock-wise for a brighter sound, turn counter clock-wise for a darker sound. This is the knob you reach for when you need to balance the bass sound in the mix.
Multiband
The knob to rule them all. Multiband makes everything fatter, clearer, better, more defined… it’s hard to not use it on everything. We got our product manager Paul, who also designed the preset algorithms for Weiss MM-1 and Drawmer S73, to design a one-knob multiband compressor especially for bass synth, and the result is the multiband you see in Monoment Bass. With just a bit of compression you’ll get a warmer and fuller sound. Dial it up even more and you get something that is ready to cut on a record. Overdrive it and it gets a character on its own.
Parameters
Multiband ON/OFF: Activates the multiband compressor.
Amount: Dial in the amount of compression.
Meters: From left to right: the amount of low-frequency gain reduction, the amount of mid-frequency gain reduction, the amount of high-frequency gain reduction.
Spatialization
All sources and algorithms in Monoment Bass are stereo, and sometimes you want to enhance the stereo-ness of them, or maybe reduce it. That’s what the spatialization block does.
The Sub Mono knob forces the audio below the set frequency to become mono, which is great if you’re cutting vinyl or need a firmer low end. The High Freq Widener will increase the stereo information in the audio. When used in tandem, the Sub Mono will still make all frequencies below in mono, regardless of what the High Freq Widener is set at.
Parameters
Spatialization ON/OFF: Activates the spatialization effect.
Sub Mono: All audio below the set frequency will be in mono. Pull it all the way up to force the output to be completely in mono.
High Freq. Widener: Increase to get more stereo width.
The Spatialization section is a mid/side matrix with built-in EQ. Sub Mono enhances the “mid” part while High Freq. Widener enhances the “side” part.
We spent a huge effort selecting and recording the sources for Monoment Bass, in order to reach a new level of quality and fun using this product.
All samples were recorded in 96 kHz in stereo via Merging Technologies Hapi AD converters and resampled to 44.1 kHz after all external processing.
All samples were designed with and sampled from real hardware synths. We didn’t sample the standard Moog or Roland synths for basses, but those exclusive and rare products such as the following synths:
- Schmidt Synthesizer
- Modal 002
- Non Linear Labs C15
- Kawai K5000
- Jomox Sunsyn
- Yamaha DX5
- NED Synclavier
Synths from four decades were sampled via secret processing chains of hand-picked boutique pre-amps, EQs and compressors. We sampled every 3rd note over two and a half octave and sampled every note three times to capture typical minimal sonic variations, controllable via the Aging knob.
The ATTACK samples in the ANALOG DIRT section are based on real recordings of objects with a certain attack sound, sonically fitting to a bass for additional punch and dirt. The noise samples are based on real noise source recordings and processed sounds from field recordings. Those noises add controllable dirt to the basses.
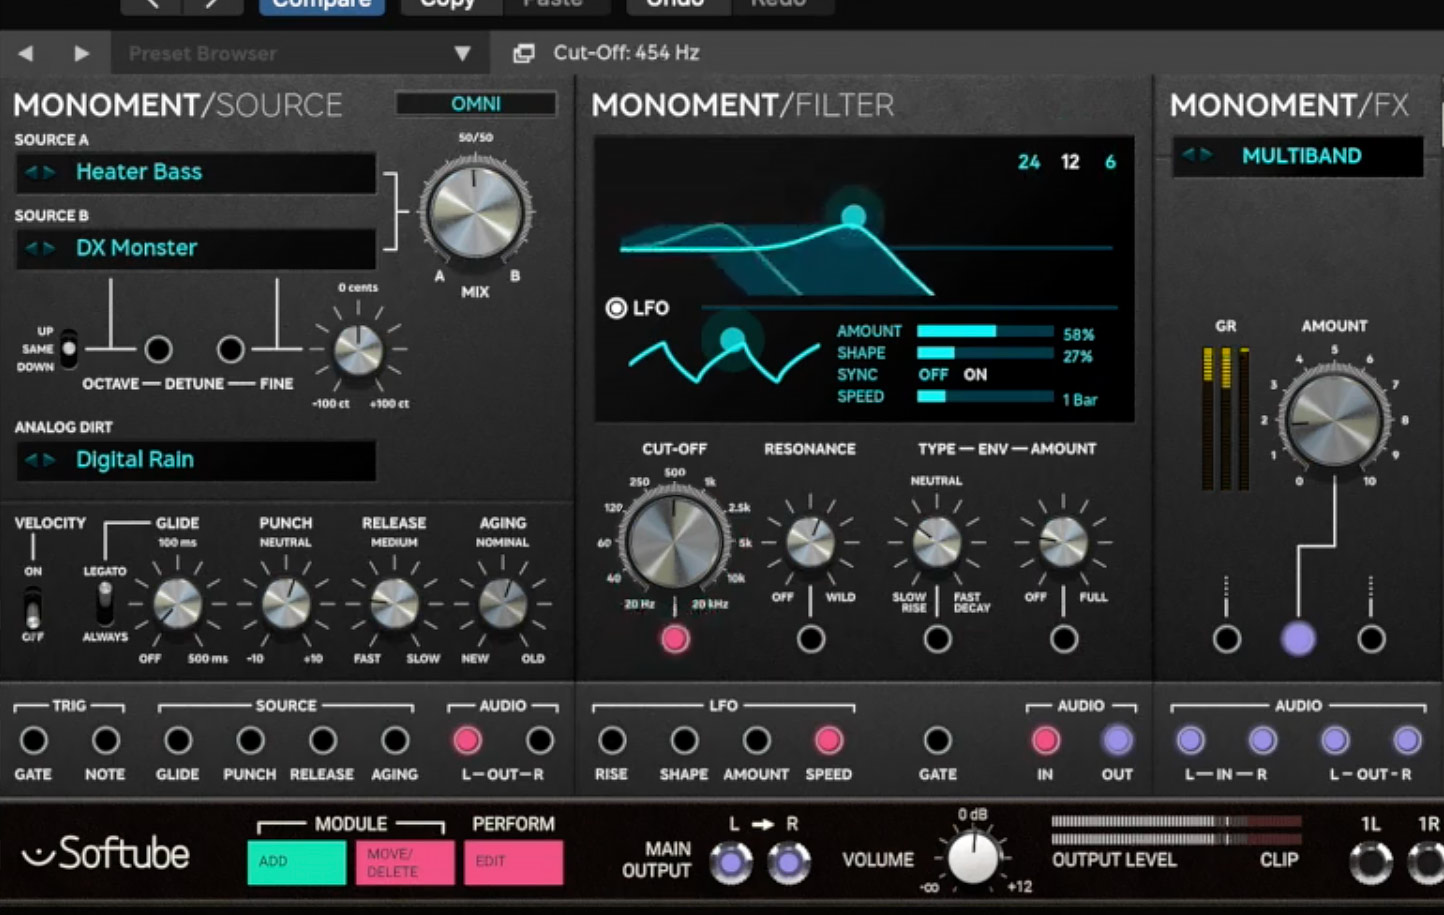
When you purchase Monoment Bass, you're also purchasing the possibility to use it as three separate blocks in our modular platform Softube Modular!
The three different modules for you to use in Softube Modular: Monoment Source, Monoment Filter and Monoment FX. Here's a brief description of them:
Monoment Source
This is the Source engine from Monoment Bass, available as stand-alone module. It has a built in amplitude envelope, waveform mixing, dirt level and aging. It can be played monophonically within modular over midi or monophonically via the gate and note jacks. Glide, Punch, Release and Aging parameters features external CV control via jacks.
Monoment Filter
This is the Filter section from Monoment Bass, available as stand-alone module. It has a built in filter envelope and LFO. The envelope is triggered through the external gate jack. All sequencer functions - Slew, Range, Amount and Swing parameters - features external CV control. The LFO can be automatically locked to the DAW tempo or set to free running mode.
Monoment FX
This is the Effect engine for Monoment Bass, available as stand-alone module. It has four modes that can be run one at a time – Drive, EQ, Multi comp and Spatialization. Up to three parameters in each mode has external CV control.
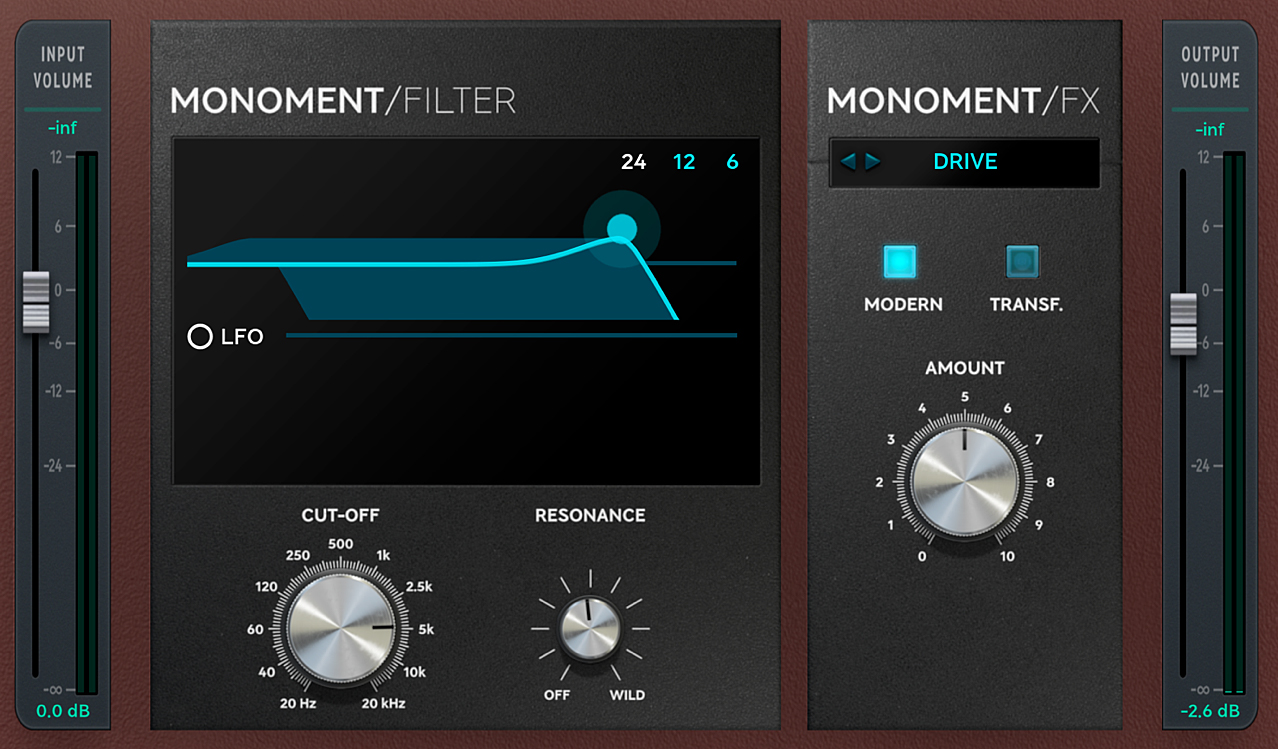
When purchasing this product, you automatically gain access to running two Monoment Bass modules, the Monoment Bass Filter and the Monoment Bass FX, as modules inside the Amp Room platform. The Monoment Bass FX modules has four different FX types to choose: Drive, EQ, Multiband compressor and Spatialization. The modules can be matched and arranged together with any other native Amp Room module or other Amp Room-ready modules that you might own.
Tobias Menguser – Initial concept, multi sample sound recording
Niklas Odelholm – Sound, visual and product design, project management
Björn Rödseth – DSP programming
Erik Sight – Framework programming
Filip Thunström – GUI programming
Jacopo Lovatello – Filter design and modeling
Paul Shyrinskykh – Compressor sound design
Johan Bremin – Quality assurance
Kristofer Ulfves – Synth expert
Ulf Ekelöf – 3D graphics modeling
Klaus Baetz – Programming
Madison Mars, Vandalism, Cr2, WA Production, Black Octopus, Function Loops – Factory presets