User Manual
Parallels
Intro
Foreword by Johan Antoni, concept creator of Parallels
User Interface
Introduction to Parallels's different Sections
MIDI
Interface
Getting started
Getting Started: Let’s get to know Parallels’s Source section!
Getting Started: Now let’s turn our attention to Parallels’s Shaper section.
Getting Started: Getting to know Parallels's Effects section!
Getting Started: Looking at Parallels’s Modulation section
Parallels in detail
The Source Section
The Shaper Section
The Mod Pod
Modulation Routing
The Effect Section
Tips and tricks
Parallels For Modular
Credits
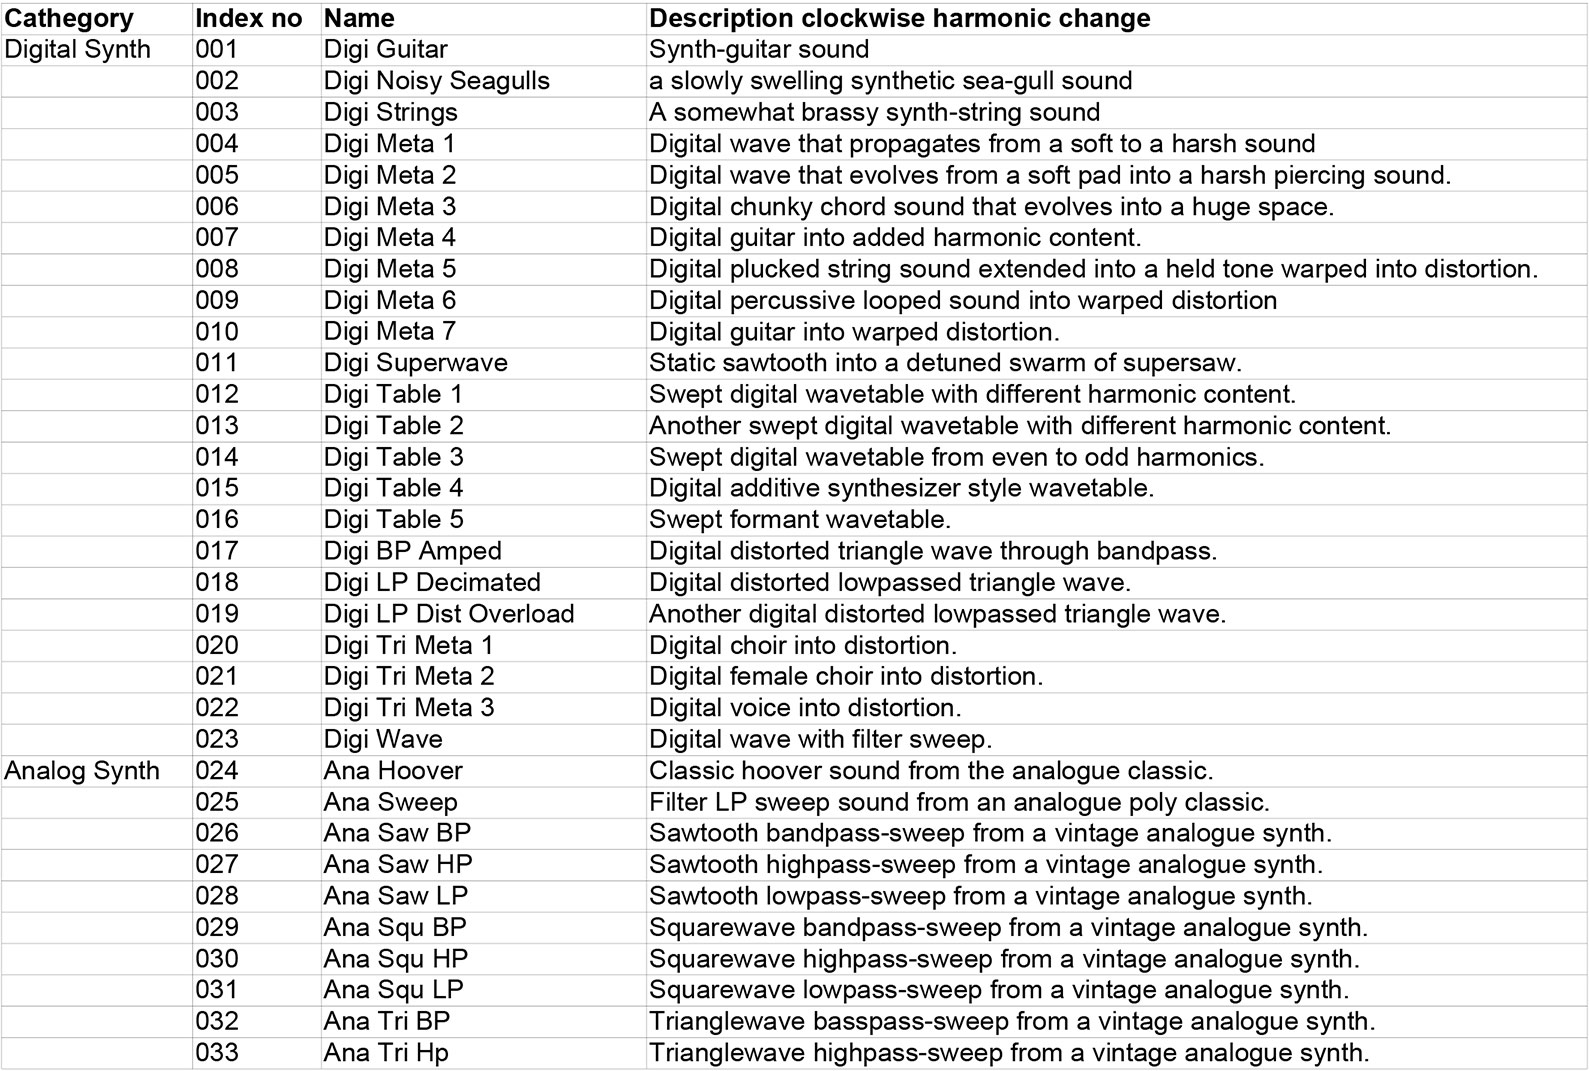
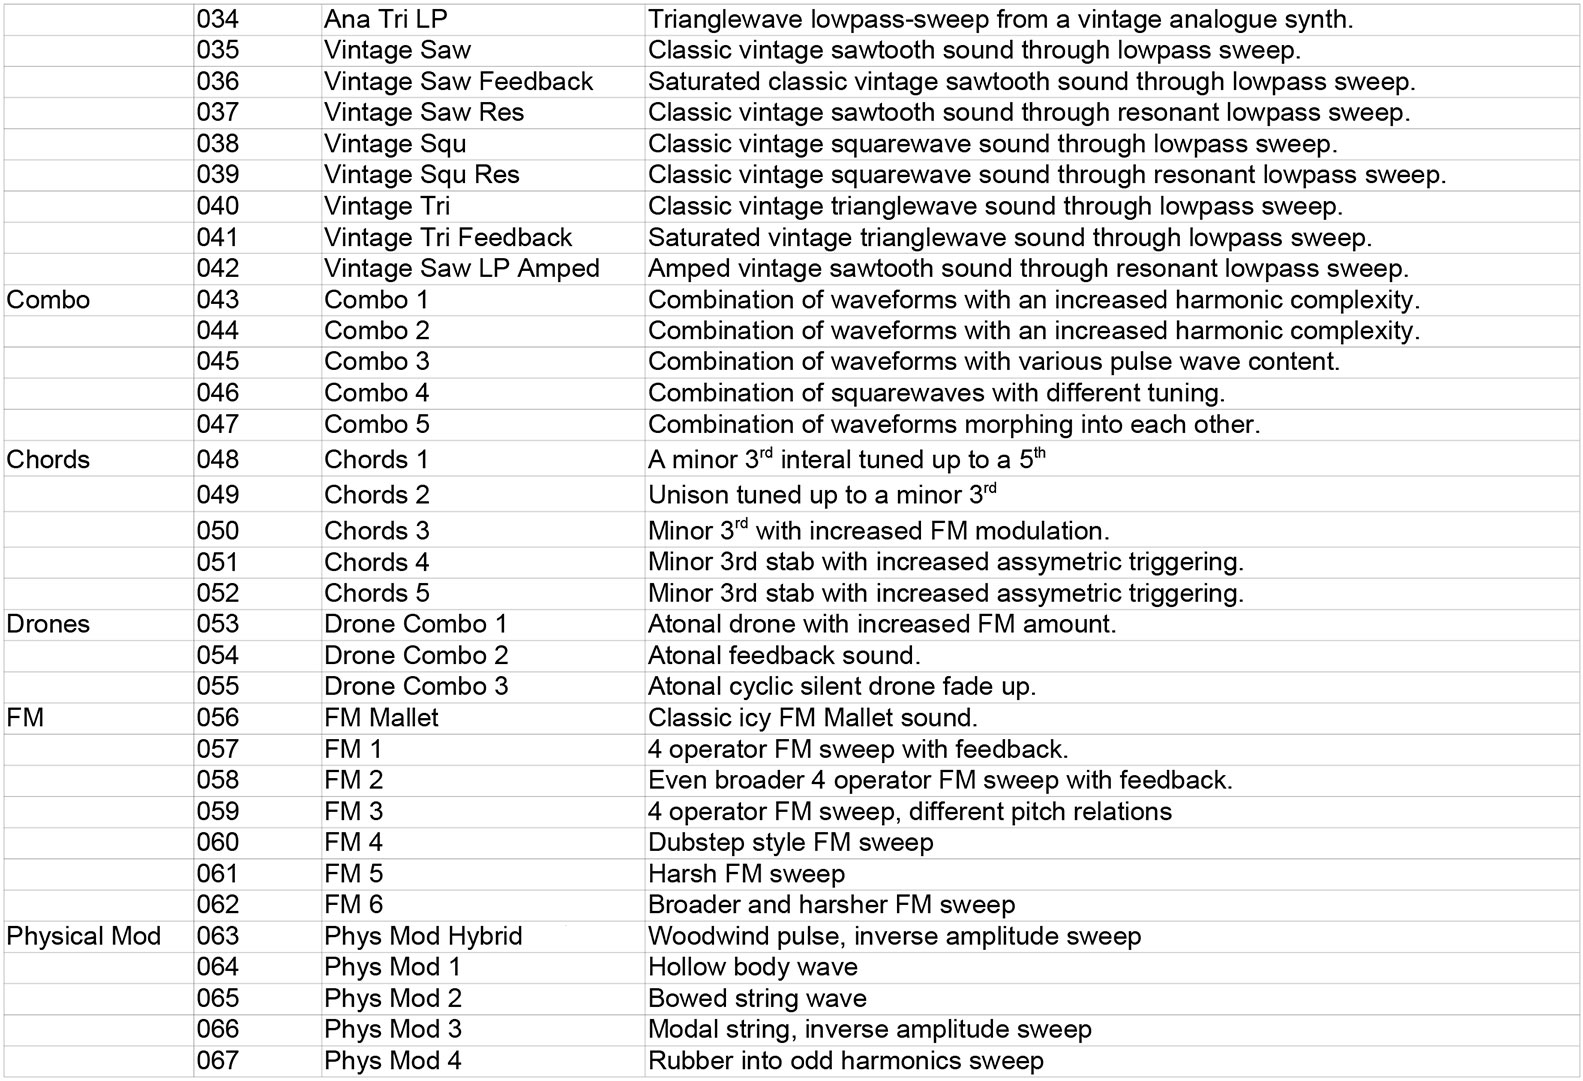
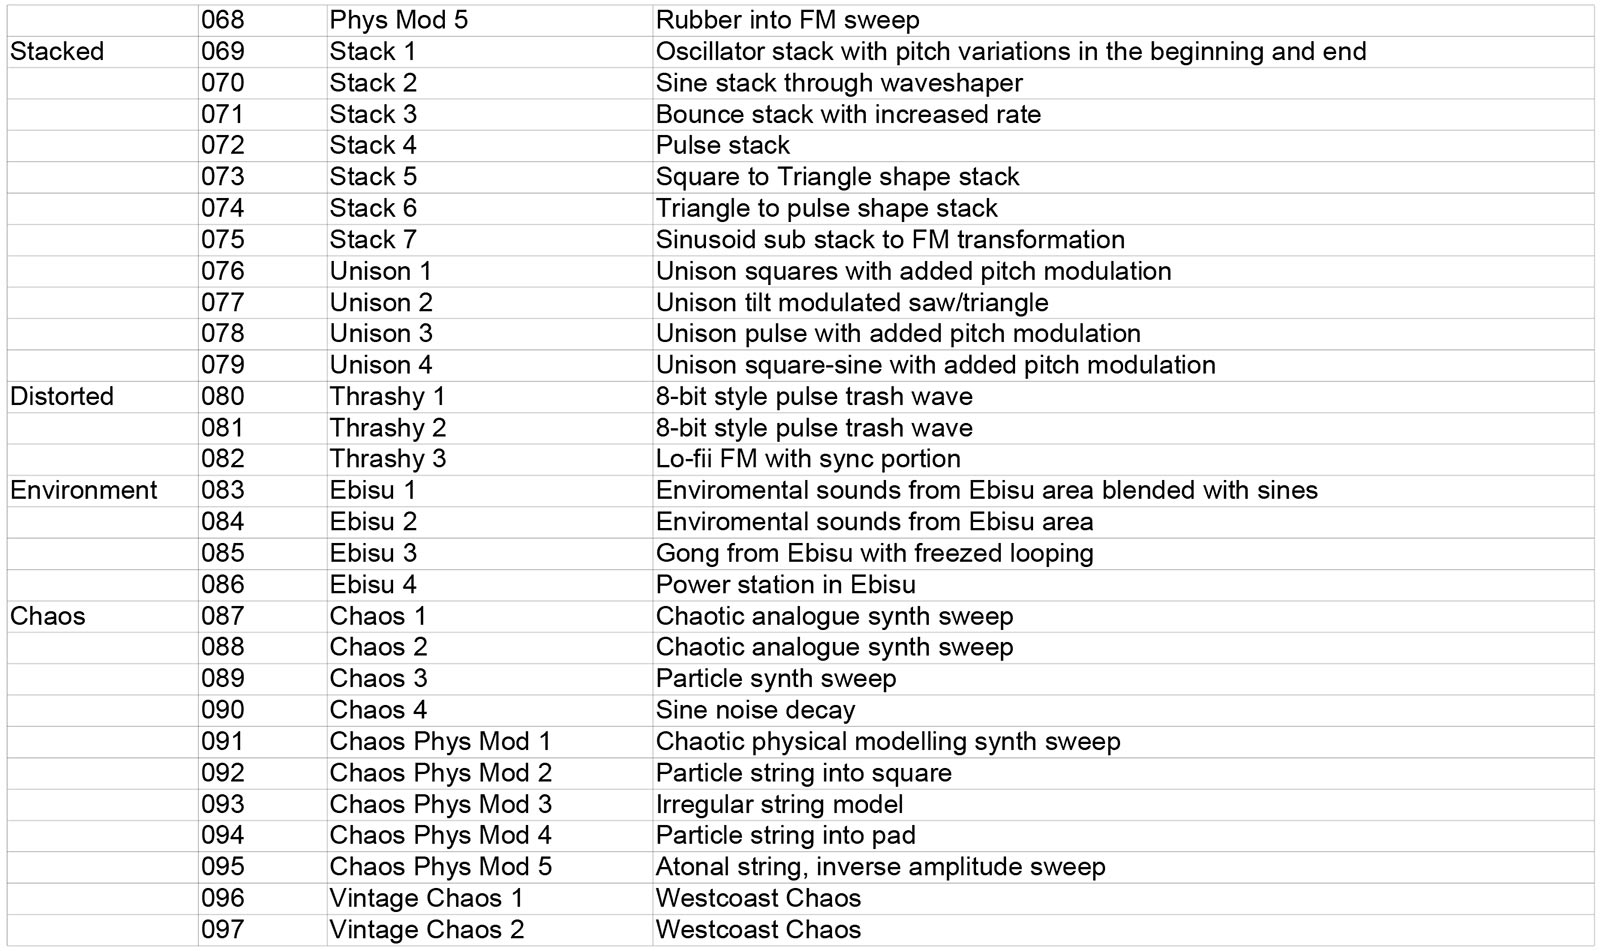
Appendix: Waveforms list
Related manuals
Parallels is all about sonic exploration. Softube Parallels is a plugin synthesizer featuring high quality pre-recorded multi-waveforms in the Source-section, custom made filters in the Shaper-sections and a special selection of different effects in the, you guessed it - Effects section (right hand side panel). Most of the parameters in the different sections can be modulated by one of the five modulator types (LFO, RND, EUC, ENV, SEQ) available in the Mod Pod section (left hand side panel).
We hope you will find Parallels inspirational and that you will have fun sound exploring its hidden depths!
Foreword by Johan Antoni, concept creator of Parallels
I have been using, selling and buying synthesizers as long as I can remember. My father had a music store and imported the famed EMS Synthi-synthesizers (among others) in the mid 70s. You could say that I grew up with synthesizers and that they occupied much of my time since I was a kid. Since 1996, I followed in my fathers footsteps and have been running (dare I say?) Stockholms premier synth shop, selling mainly vintage, quirky and boutique synths. Or any synth I find interesting, really. Lately, its been mostly expensive or rare modular systems.
A couple of years ago, after having played around with a Korg 800DV and an Oberheim TwoVoice in the store for a couple of lazy summer days with no customers, I realized that I sort of missed a less complicated and instead more direct way of doing more complex sounds. As you may or may not know, both of these synths mentioned are old 70s vintage analog synths with a kind easy-to-follow architecture, very versatile filters (even compared to todays standards), not that many parameters and they work by giving you two of everything. In short, they are very competent, user friendly, and they allow you to layer two sounds on top of each other in order to make complex sounding sounds very quickly and easy.
Combined with my idea of the ”source waveform” based synthesis (explained later in this manual) which allows you to switch quickly between different snapshots of synthesis, this became a concept I could not let go of. I wanted this as a software plug-in. After some very basic software idea tests I approached my friends at Softube and they loved the concept; why not start developing this right now?
For my part, what followed was producing the ”source waveforms”. This took place mostly
after hours in the store using whatever I could think of (mostly vintage synth gear), some basic programming at home and a period visiting friends in Tokyo.
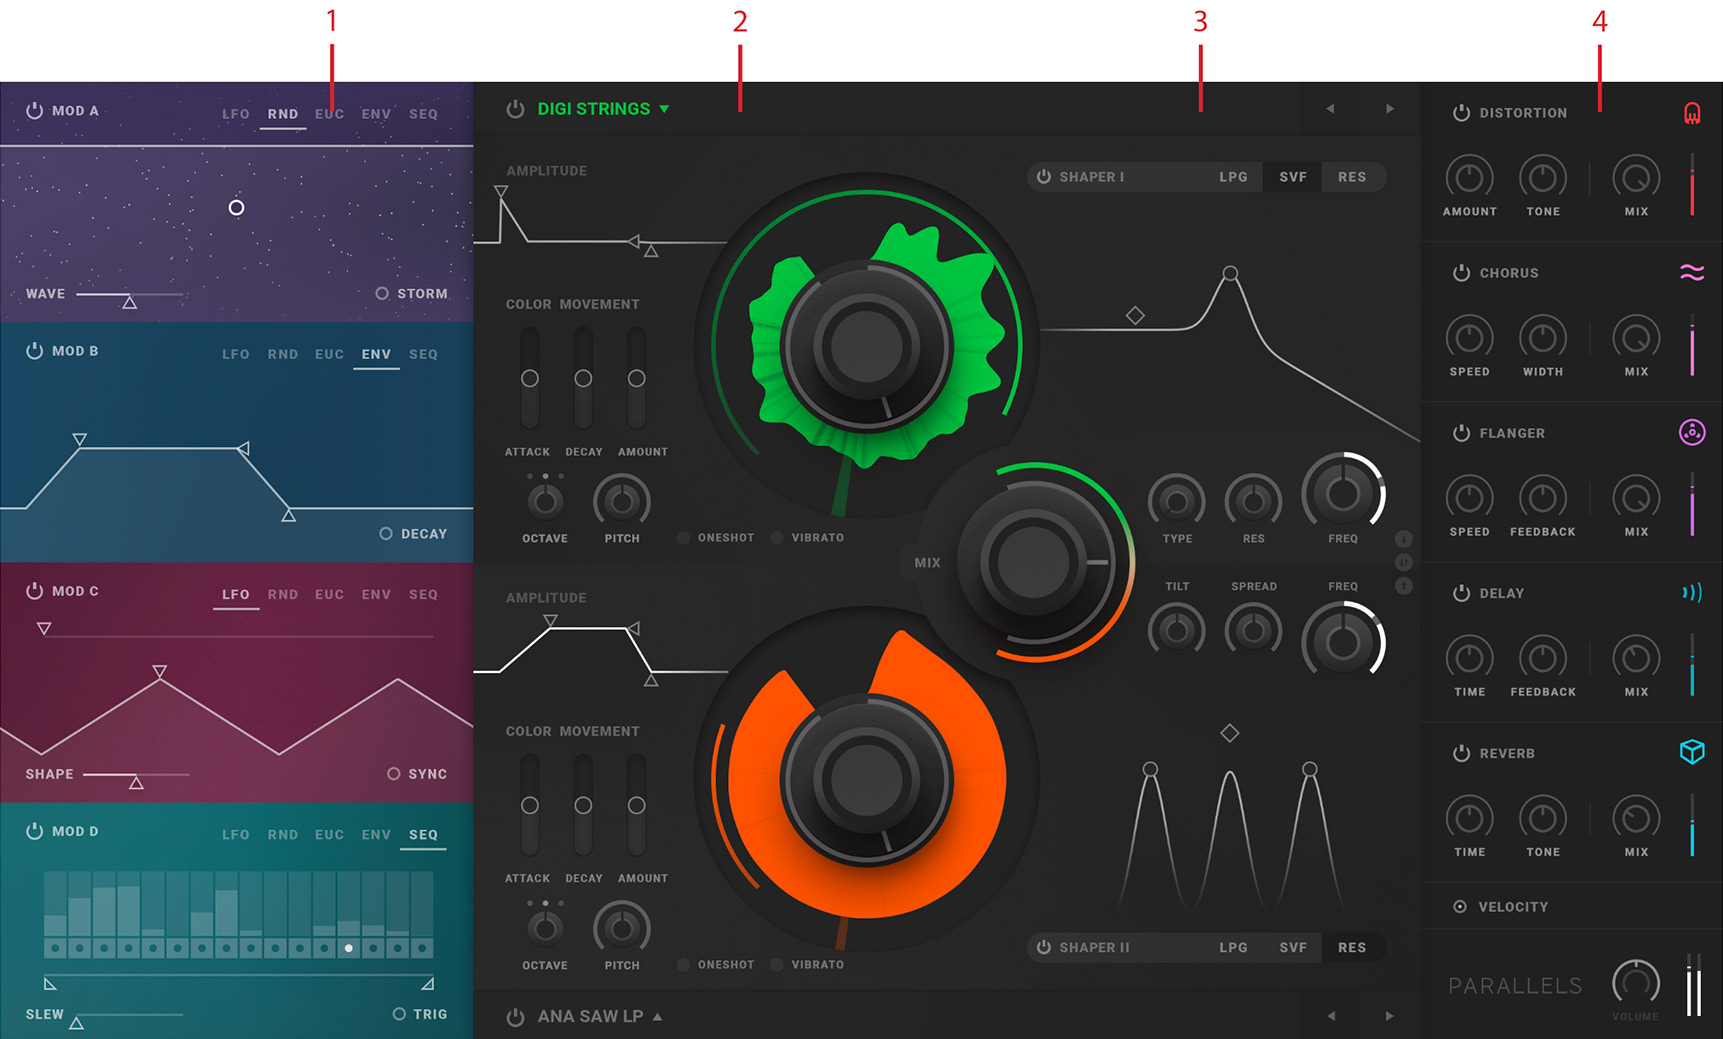
Click here to view the full-sized image in a new tab
- Mod pod
- Source section
- Shaper section
- Effect section
Parallels signal flow chart
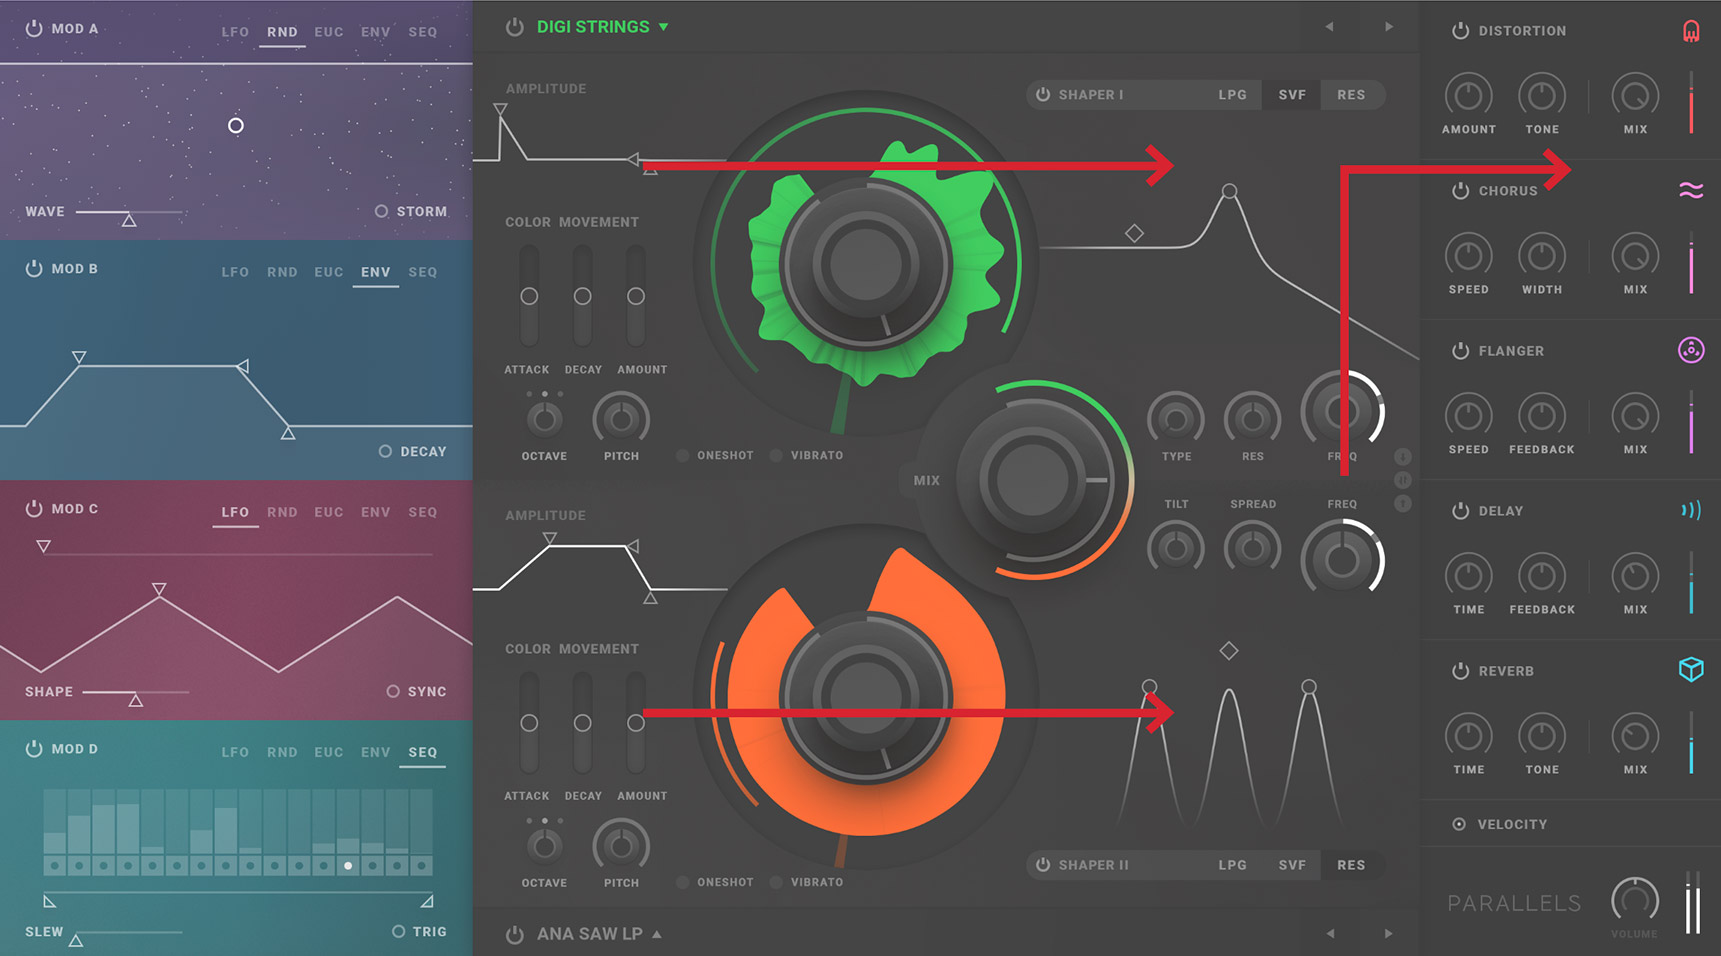
Introduction to Parallels's different Sections
Parallels is a very simple, but at the same time, complex 14 voice polyphonic synth. Polyphony is shared among two layers, upper and lower. Parallels's simplicity lies in that it has a very logical signal flow for the audio. However, for the complex part, Parallels also has a modulation resource, the Mod Pod, with multiple slots that can be customized and routed to a huge number of available destinations. Here follows a brief description of the different sections of Parallels:
Source section
Let's start looking at the Source section: placed in the middle left at the top and bottom, Parallels's Source section and is the heart of the instrument. Each Source section, the upper and lower parts, contains a waveform that is selected through the Wave dropdown menu or via the wave selection arrows. This waveform is displayed as wrapped around so called the Color knob which clearly indicates the waveform start-point and modulated loop. Each Source section also have a dedicated Color modulation envelope and a dedicated amp envelope.
Shaper
The Shaper section contains three different filtering modes – Low Pass Gate (LPG), State Variable Filter (SVF) and Resonator (RES) - each one with three modulatable parameters.
Mod Pod
This Modulation Pod (alias Mod Pod) contains five different kinds of modulation that can be routed virtually everywhere in Parallels (with a few exceptions). It contains four Modulation Slots named Mod A to D which can contain any of the five different modulation types at ones. The Modulation types are a Low Frequency Oscillator (LFO), a digital Random Source (RND), a Euclidian sequencer (EUC), a polyphonic modulation envelope (ENV) and a modulation sequencer (SEQ).
Effects
The effects section contains five different effects in series that can be turned on or off/bypassed, each with control over two parameters and dry/wet portion. The effects are Distortion, Chorus, Flanger, Delay (unsynced/synced) and Reverb.
Click here for more information about MIDI Mapping.
Parallels is a virtual instrument that interfaces with your DAW through the MIDI protocol. Many DAWs load these types of “virtual instruments” on to so called Instrument tracks which often are set up to send MIDI information by default to the plugin instrument on channel 1. Parallels actually receives its MIDI information on all 16 channels (MIDI omni mode).
The Velocity option turns on and off Velocity to amplitude response. This mean that, when Velocity is set to on, soft strokes on your MIDI keyboard will create pretty quiet notes while harder strokes will create louder notes. When Velocity is turned off, any change in velocity will thus not be reflected in quiet and loud notes.
The keyboard range of Parallels covers a little more than five octaves (G0 – C#6). MIDI notes received outside this range will not be registered and thus not heard.
The pitch bend range is always + - 2 semitones.
Modulation wheel (MIDI CC#1) is always routed to vibrato amount, engaged when vibrato is turned on. The present value of modulation wheel is not saved in the patch.
Press CTRL/CMD to have fine-adjust mode activated (as in our other plugins) which also will prevent more than one step being changed at the same time in the sequencer.
Furthermore, for controls that change two parameter at the same time (such as for the shaper controls), it can be “locked” into just X or Y direction by pressing SHIFT when dragging. These two controls can also be combined (where applicable).
Basics – what is this Source Waveforms, Shapers, Envelopes, Mod Pods etc???
Sound is a vibration that typically propagates as an audible wave of pressure, through a transmission medium such as a gas, liquid or solid. In digital audio (as in Parallels), sound is signal that has been recorded as or converted into digital form. This means that the sound wave of the audio signal is encoded as numerical samples in continuous sequence stored in a digital medium (for example a computer hard drive).
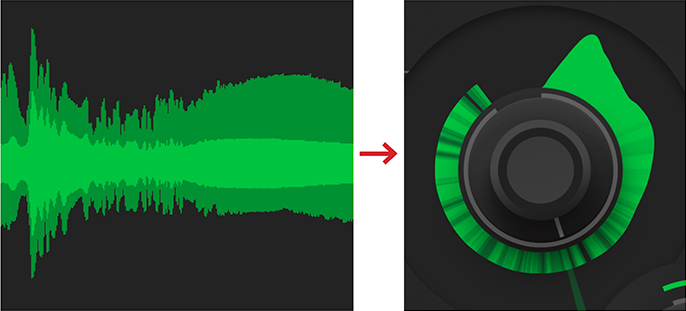
Figure wave to waveshape.
Parallels’s Source section uses pre-recorded digitized audio that has been meticulously recorded in high fidelity and prepared to cover multiple octaves in order to ensure high quality and great musical performance. Each waveform has been selected to be musically inspiring to work with and also each represent a sonic transformation in the sonic spectral properties, but also sometimes in amplitude and pitch. Each waveform can use any startpoint and be swept back and forth freely by the dedicated Color envelope shape or any modulation.
The Source waveforms in Parallels creates a sonically rich spectrum. This spectrum can be further shaped into containing the desired amount of overtones and amplitudes with the so called Shaper section. The Shaper section contains different kinds of filters (and distortion). Each filter affects the spectral outcome of the Source waveforms in different musical ways.
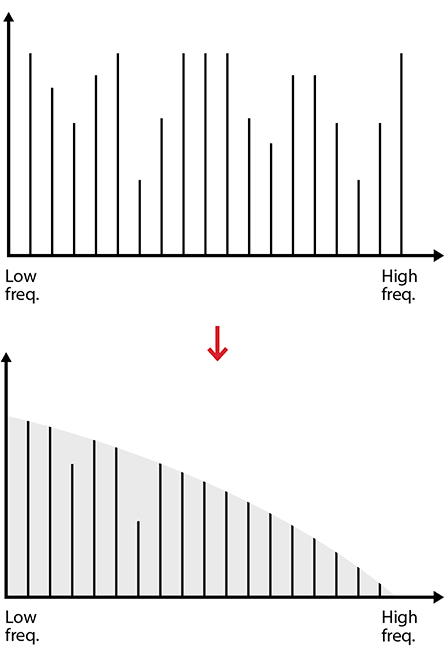
Example of lowpass filtering.
An envelope generator describes a triggered series of timed events, in instruments normally triggered by the note start. The envelope is used to represent the natural sound properties in a formalised model. There are different models and school of thougths when it comes to envelopes in synthesizers. Parallels uses several different ones (AD, ASR and ADSR) for flexibility.
The Attack portion is the rise time of the envelope, i e the time it takes for it to reach its peak. The Decay time is the time it takes for the envelope to fall from the peak down to the next level, often to be the Sustain level. The Sustain level is the level at which the note is statically suspended and sustained until the note is released (key is released). The last envelope phase is the Release phase, describing the time it takes from the note is released until it has all died out.
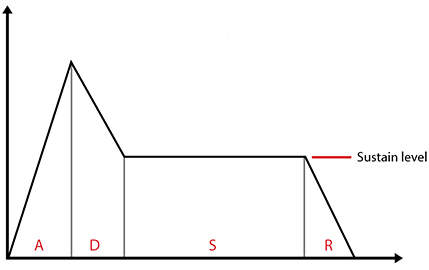
ADSR Envelope.
Getting Started: Let’s get to know Parallels’s Source section!
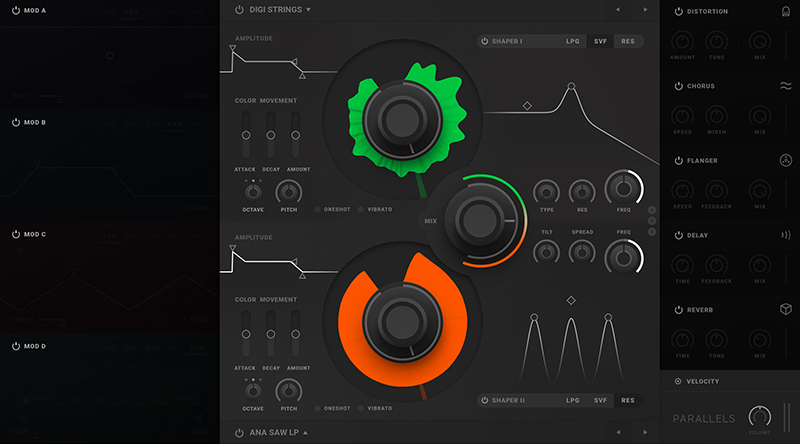
1. We will start off by turning off all modulation and all effects.
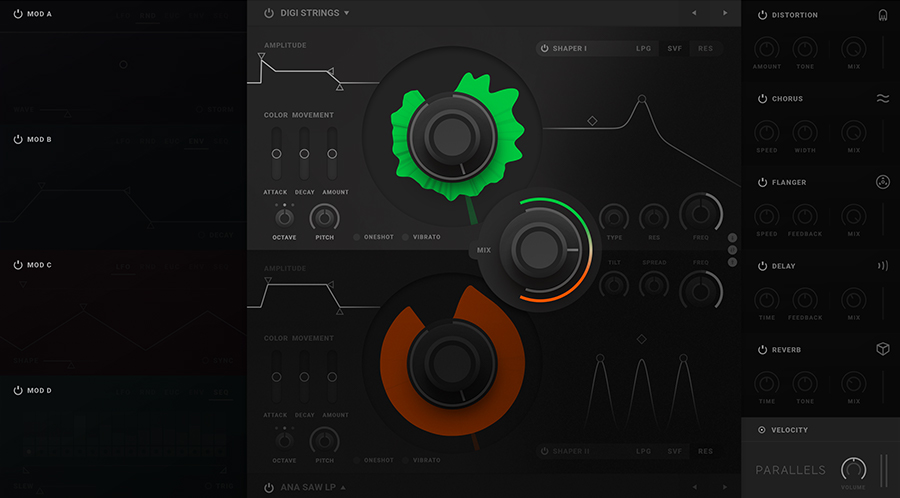
2. Continue on by turning off the lower Source section and the top Shaper. Now when you play Parallels, all you should hear is the raw waveform of the upper Source section.
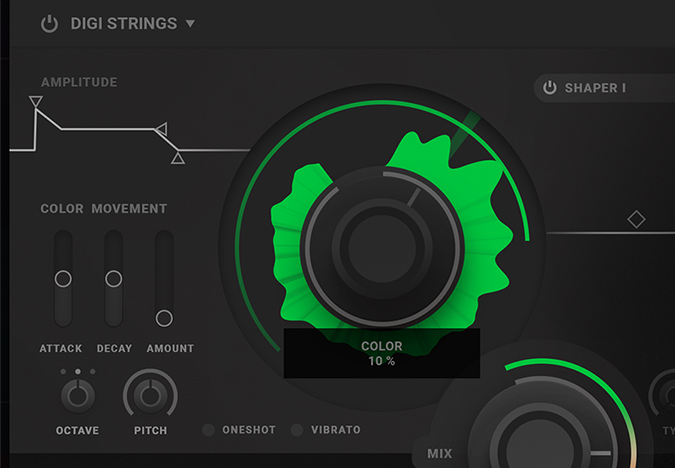
3. Turn down the upper Source Movement Amount slider to zero. Now try to move the big Color knob clockwise and counterclockwise back and forth while playing. You will notice that the sound goes from a duller string sound to brighter one the further clockwise you will go. And at the very end the waveform is silent.
Now turn the Color knob back all the way counterclockwise (Color 0%).
Now image that you could do the clockwise and counterclockwise movement back and forth motion you previously did with your mouse in an automated manner - Yes, this is precisely what the Color Movement Envelope is made for! The Movement Attack time is the timing of the clockwise movement, the Movement Decay time the timing of the counterclockwise movement and Movement Amount the striking distance (i e the multiplier) of the first two.
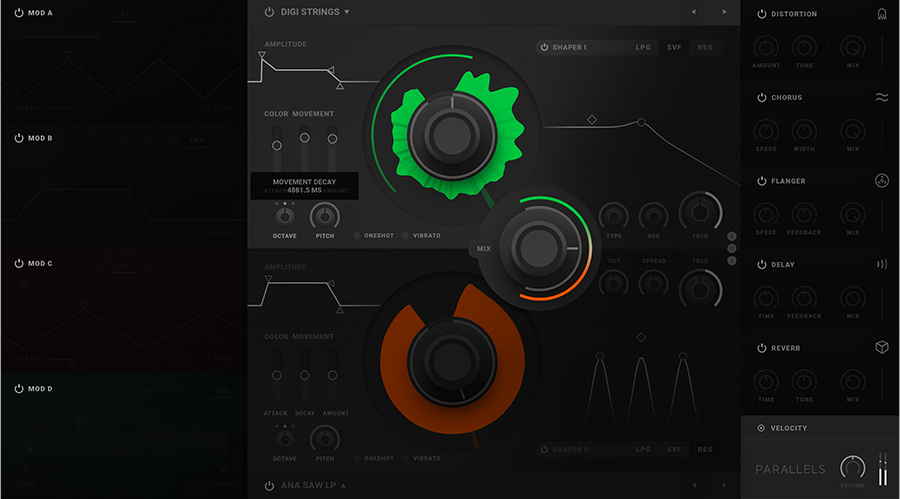
4. Try out the Color Movement Envelope by setting a fairly long Movement Attack (~1300ms) and Decay (~2500ms), with a fairly high Movement Amount (75%). Now play a long sustained note, listen and watch as the playhead of the Source waveforms follows your instructions and now sweeps forward clockwise at first, then turning counterclockwise and returning to the start-point set by the big Color knob.
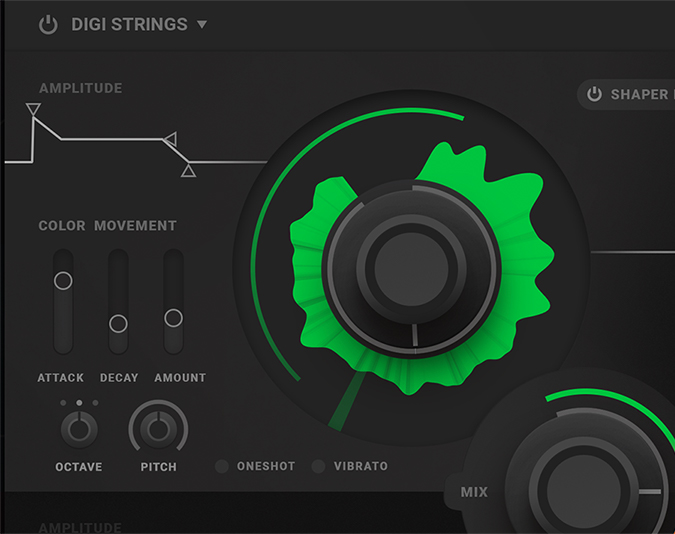
5. Now, try out different settings where you experiment with different Color knob settings for different start-point of the sweep and different Movement Amount for different strike range. Also try different time ratios of the Movement Attack and Decay. You’ll notice that when Movement Amount is too high in combination with a high value on the Color knob (initial startpoint) the Movement envelope can sometimes sweep outside the waveforms boundaries resulting in a silenced or partially note. This can however be used to our advantage (more of this later).
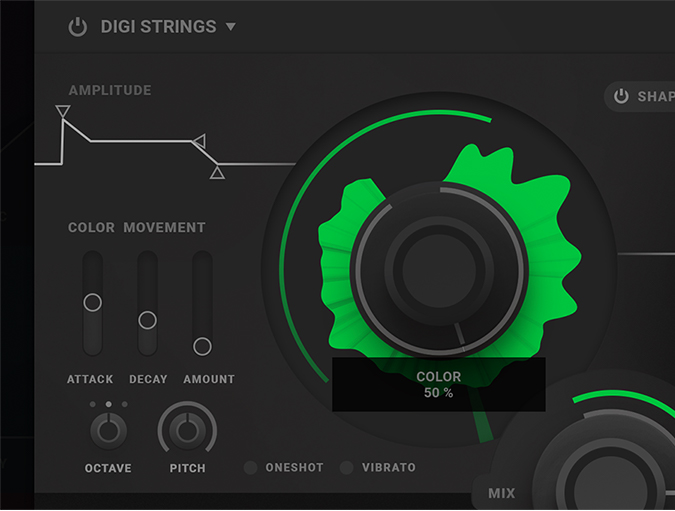
6. OK, let’s try something else. Set the Movement amount to zero again and the Color knob at default position 50% (alt-click on the knob to set it back to initial value).
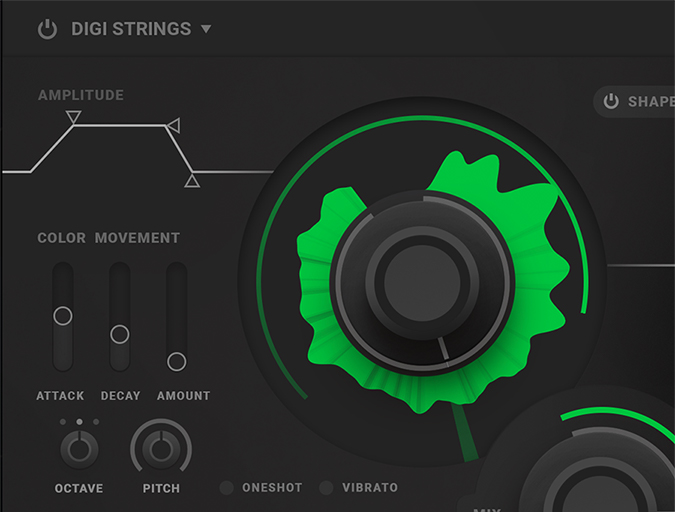
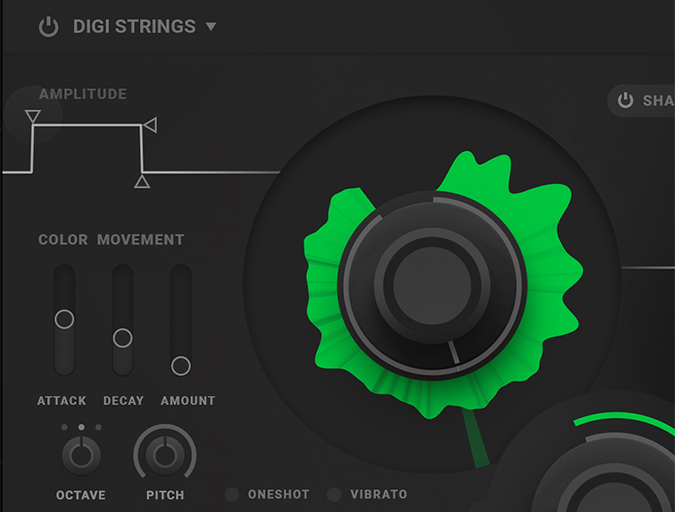
7. Now, adjust the amplitude-envelope at the upper left corner of the Source section, into a smoother curve. This is done by adjusting the attack time and sustain level to match the picture above. Play a note. You will notice that the note now is quieter in the beginning, gradually fading up to sustained level and staying there until the note is released.
8. Now, adjust the amplitude-envelope curve to match the picture above again: Attack time at zero, sustain level at 100% and release time at zero. Play a note again and you will notice the instant full level amplitude response of the waveform now. And when you release the note, the sound is silenced at once.
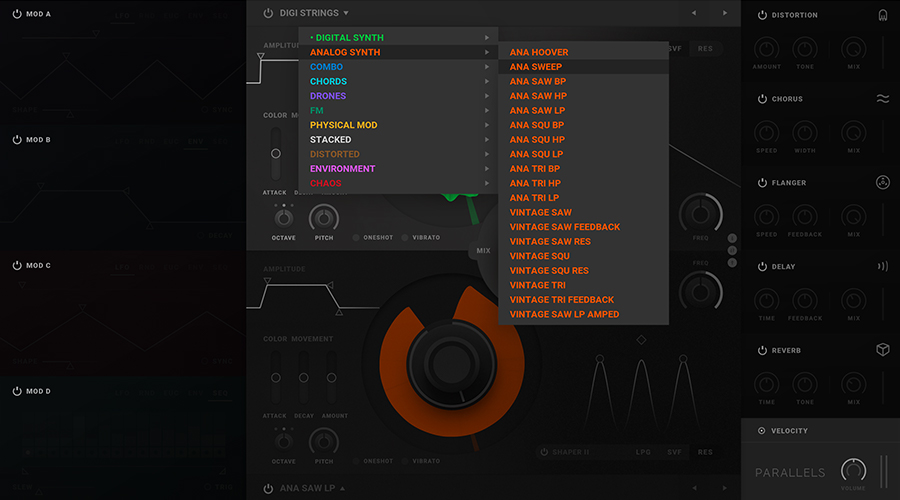
9. Now, using the techniques you learned above, try out and explore the other waveforms by browsing the different waveforms in the waveform menu or using the arrow buttons in the upper right corner of the Source section. You will notice the vast amount variation available already within Parallels’s Source section itself, and we’ve only just begun!
Getting Started: Now let’s turn our attention to Parallels’s Shaper section.
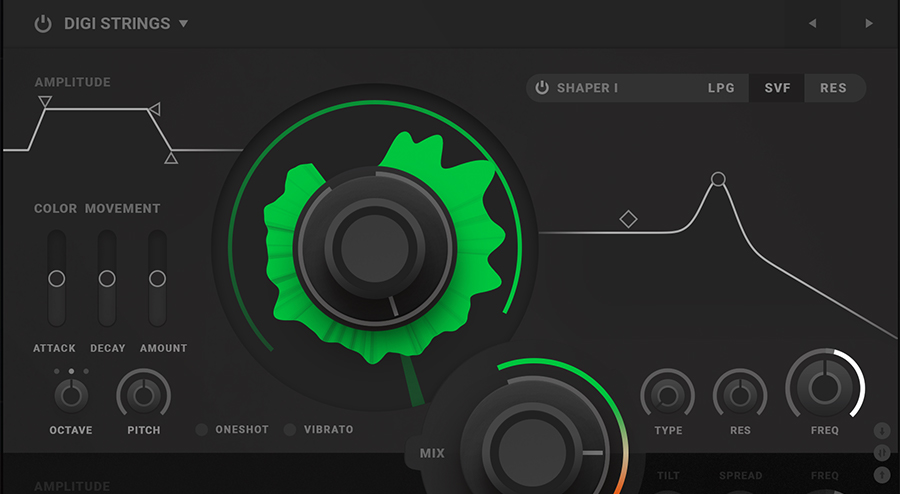
1. Let’s turn on the Shaper section again. SVF mode is the default Shaper mode for the upper Shaper section.
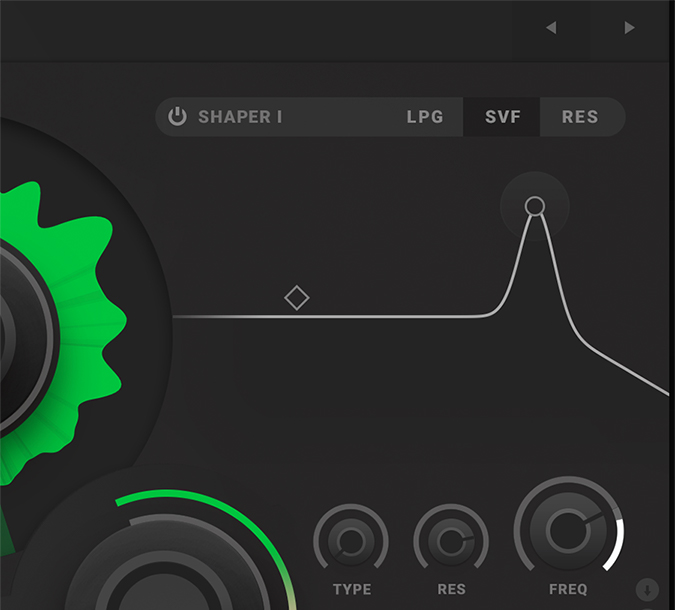
2. Now try clicking on the hotspot in the displayed SVF (state variable filter) curve - it’s on the crest or peak of the curve. Try clicking and moving it around while playing. You’ll notice that by changing this graph in horizontal direction changes the SVF cutoff frequency while changing the graph in vertical direction changes the SVF resonance. Note also that the cutoff frequency and resonance knobs changes with the curve and vise versa.
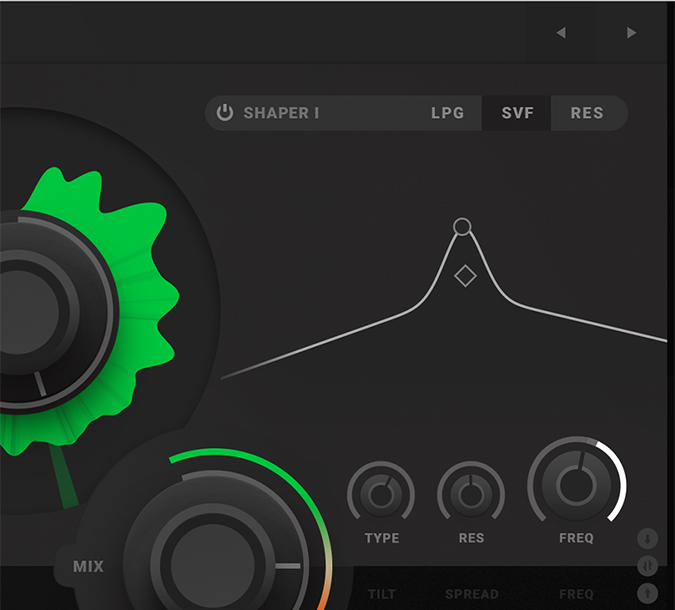
3. Click on the other hotspot in the filter diagram and try to move it. You’ll notice that it is linked to the Type knob and locked to be modified only horizontally. When the Type parameter is changed from a low value to a high value, the SVF topology is seamlessly changed from a lowpass filter, on to a bandpass filter and finally a high pass filter. The displayed graph also reflects this behaviour.
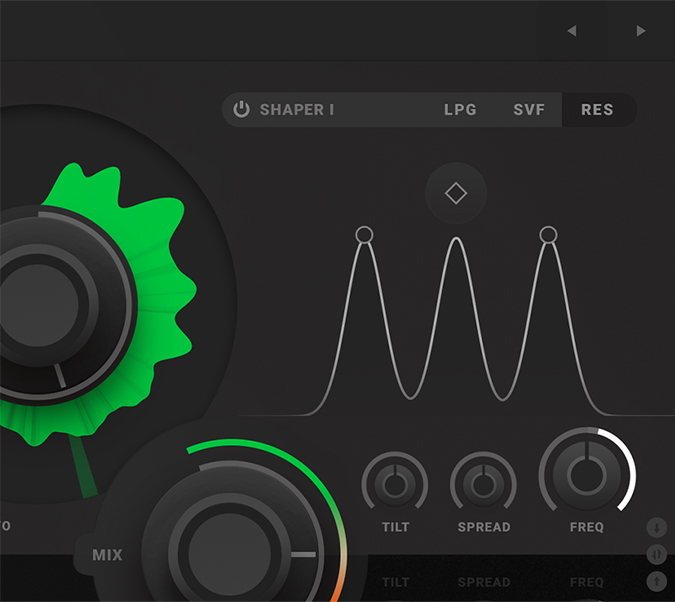
4. OK, Let’s look briefly at the Shaper RES mode, the Resonator. Click on the RES tab on the Shaper mode selector on the top right, an interactive three peak filter curve appears. The Resonator shaper mode is great for creating formants or vocal sounds, but can also be used for crude phasing duties. By clicking on the middle peak hotspot and dragging your mouse or touchpad left and right, the RES Center frequency is changed. This is also reflected on the Freq knob in the lower right part of the Shaper window.
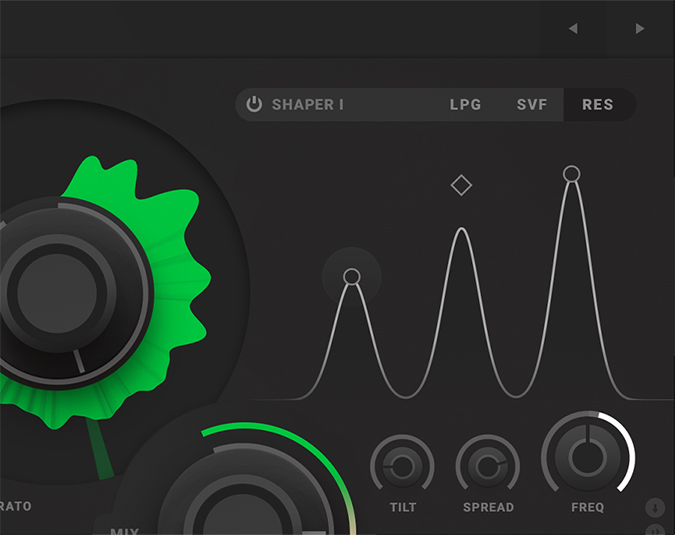
5. Let’s click on the hotspots on one of the side-peaks in the filter curve. Clicking and dragging your mouse or touchpad reveals that moving the side-peaks hotspots vertically changes the RES Tilt (peak emphasis), while moving them horizontally changes the RES spread (the space in frequency between the different peaks). This change is, of course, also reflected on the adjacent knobs on the lower middle and left in the Shaper section.
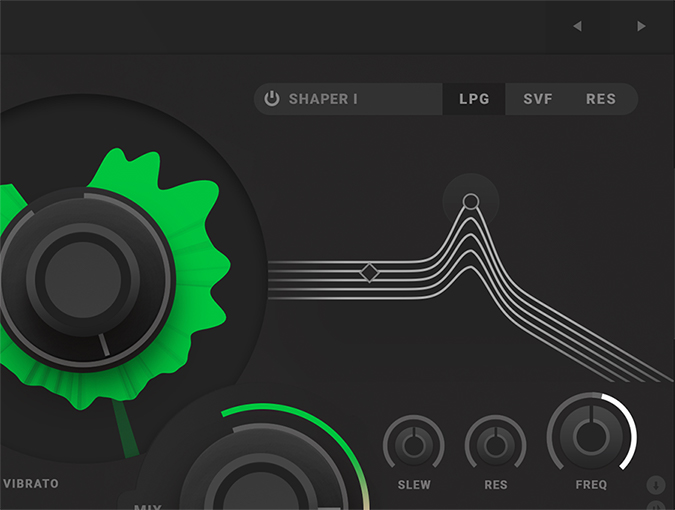
6. At last, let’s look at the Shaper LPG mode. LPG stands for Low Pass Gate which is a special vactrol-controlled filter and VCA combination controlled via a so called vactrol, often used in so called West-Coast modular synthesis. Parallels’s Shaper LPG mode draws some inspiration from the classic LPG to create a filter with a controlled “sloppy” cutoff response. Click on the LPG tab on the Shape mode selector on the top right to bring up the LPG filter curve.
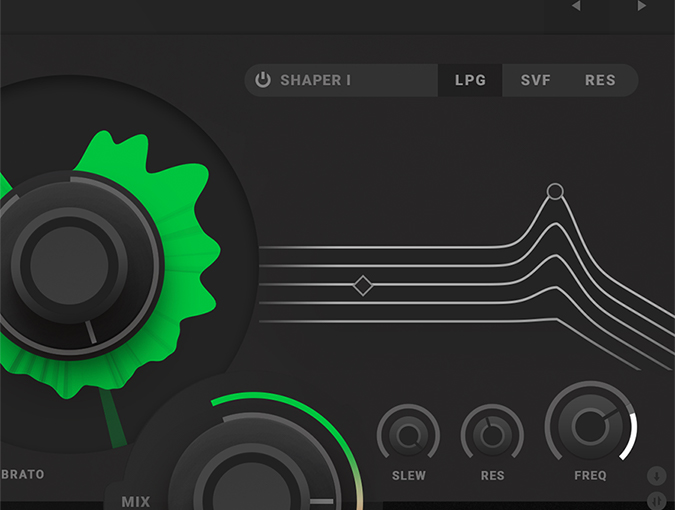
7. Clicking on the different hotspots in the filter curve for the LPG reveals similar behaviour as the other two modes. The peak hotspot moved vertically controls the LPG resonance, while moving it horizontally, it will control the LPG cutoff frequency. The other hotspot on the left is locked to only vertical movement as it reflects the LPG Slew, i e the amount of “sloppyness” behaviour the Shaper LPG will display when its cutoff frequency is modulated (more of this later). Let’s move on to the Effects section!
Getting Started: Getting to know Parallels's Effects section!
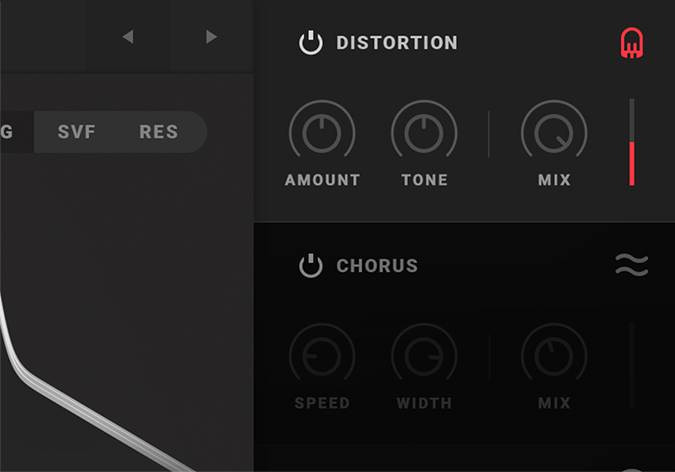
1. OK, let’s start by clicking on the activate-button on the top effect in the Effects section (on the right in Parallels), distortion. When the color graphics light up (in the case of distortion, it is red), the effect is active.
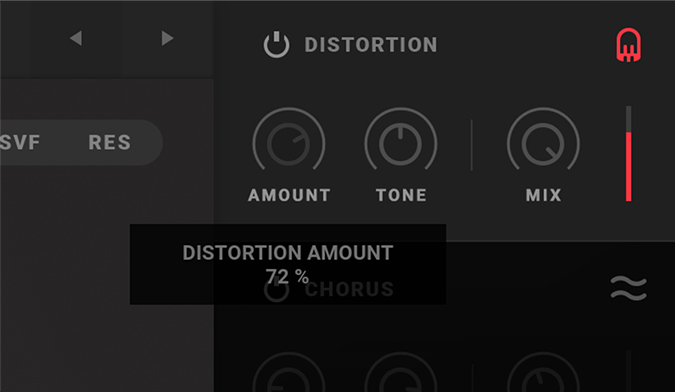
2. Each effect features two specially selected editable parameters and a dry/wet mix (the knob on the right). All the effects in Parallels is chained in series with a signal flow from top to bottom, which is good to know when working with effect.
Getting Started: Looking at Parallels’s Modulation section
On the left panel we will find the Modulation Pod (or Mod Pod for short), containing all the four different modulation slots named A, B, C and D. Most of the parameters in the different sections can be modulated by one of the five modulator types (LFO, RND, EUC, ENV, SEQ) available in each slot of this Mod Pod section.
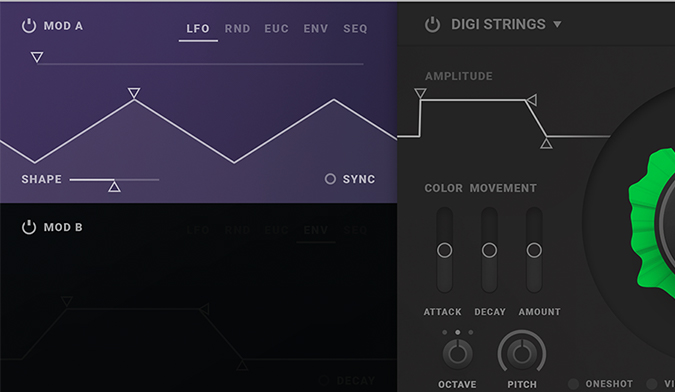
1. Let’s get started by adding an LFO in Mod Pod slot A (the slot on top).
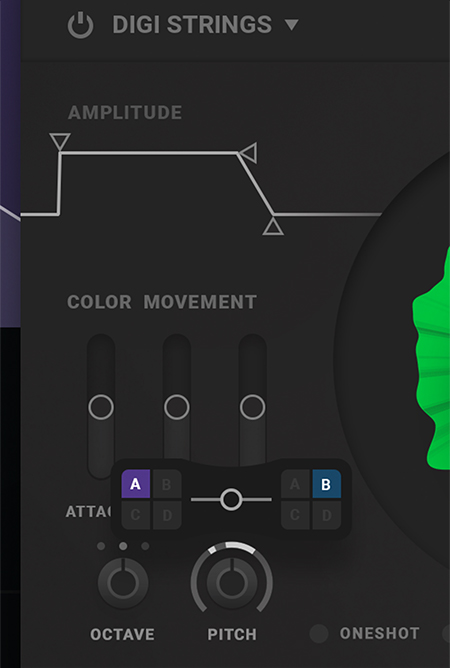
2. Now, let’s add some modulation to the pitch of the upper Source. This is done by clicking on the outer ring of the pitch and dragging upwards. You will see the modulation ring start to fill with white color from the middle and out.
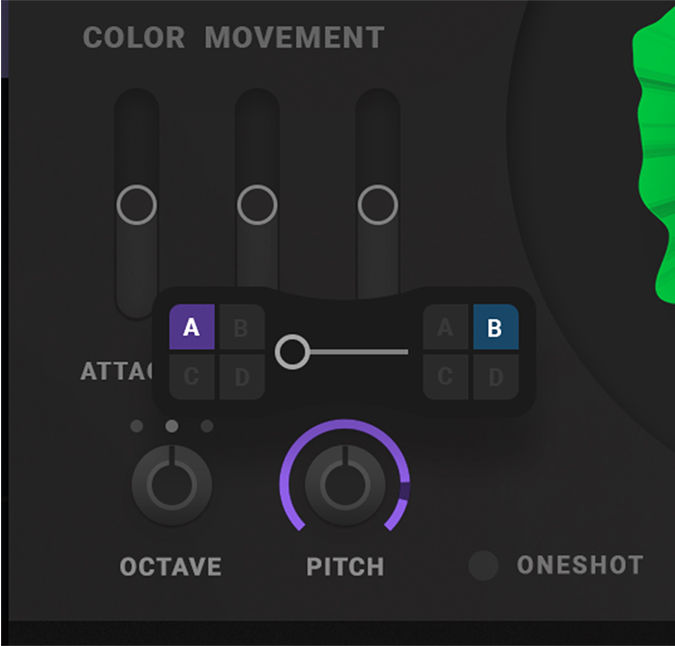
3. By adjusting the Modulation mix slider between the Modulation sources you will see that the color of the modulation will change accordingly. When the Modulation mix is turned all the way towards left where Mod Pod Slot A is selected as modulation source, the modulation color turns violet; the same color as the Mod Pod Slot A has. Play a note and you will hear the LFO affecting the pitch up and down, like a siren. Experiment by changing the speed, shape and rise/fall times in the LFO while playing.
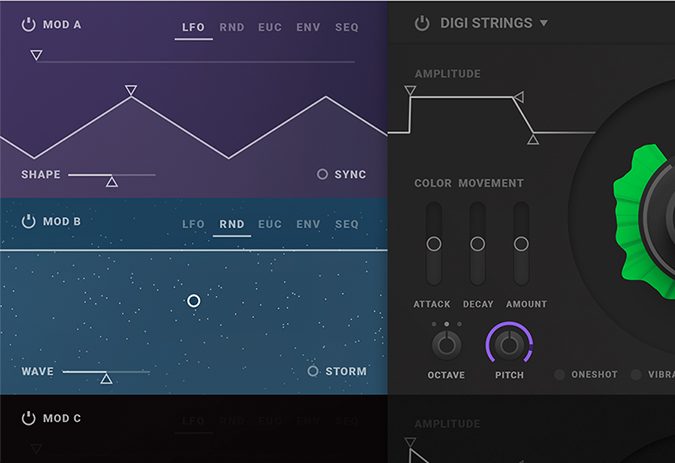
4. Now, let’s add another modulation source. Click on the Mod B Active button to active Mod Pod Slot B and select RND as Mod B Type as pictured.
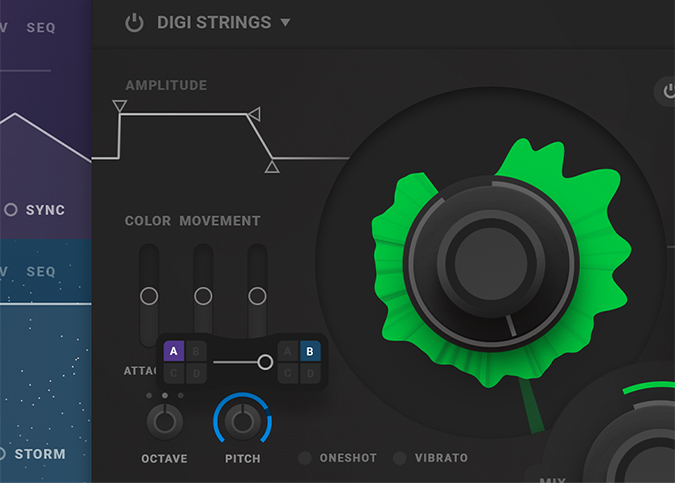
5. Now, click on the Pitch knob outer ring again to bring up the modulation sources and mix controls for this destination. Slide the Modulation mix all the way to the right, towards mod B as modulation source, and you will see the modulation color turn blue; the same color as modulation slot B. Now, when playing a note you will hear a highly buzzing erratic sound due to the noise-source affecting the Source waveform pitch. Experiment by changing the different parameters in the RND source now selected in modulation slot B.
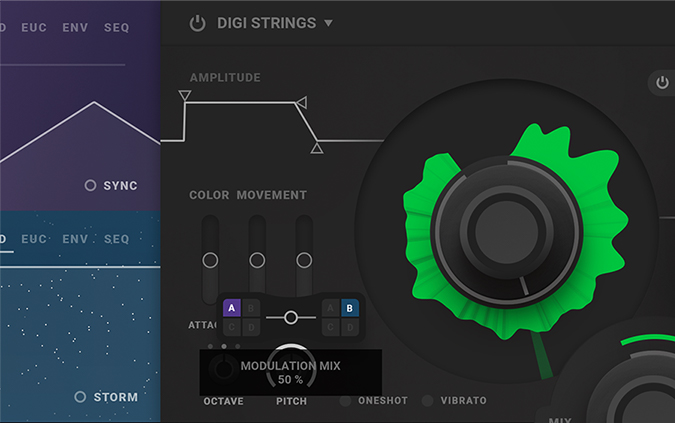
6. As we noticed before, when the modulation mix slider is set somewhere in the middle, in between the modulation source selected on the left and on the right, the modulation color is white; indication that there is a mixture of two modulation sources going on here.
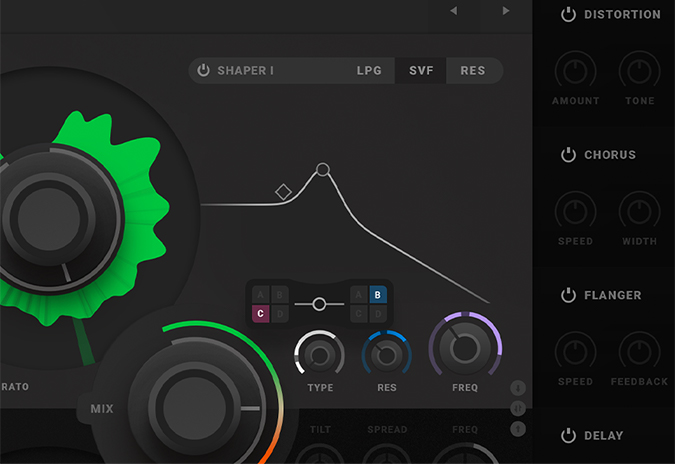
7. As pictured and described, you can route any modulator to any destination by clicking on the other ring of a parameter of choice. Then chose the modulation from two of the four modulation slots and the mix balance between them. Set the amount of modulation at the destination by clicking on the other ring of parameter again, and drag your mouse or mouse-pad upwards (the ring around the parameter will fill up).
Note that some parameters cannot be modulated - all non-knob-type interface will not accept modulation routing from the Mod Pod. This is true with the exception of the Octave knob that’s not available for modulation (despite being a knob).
In these sections that follows, you'll find all detailed information about each and every part of Parallels.
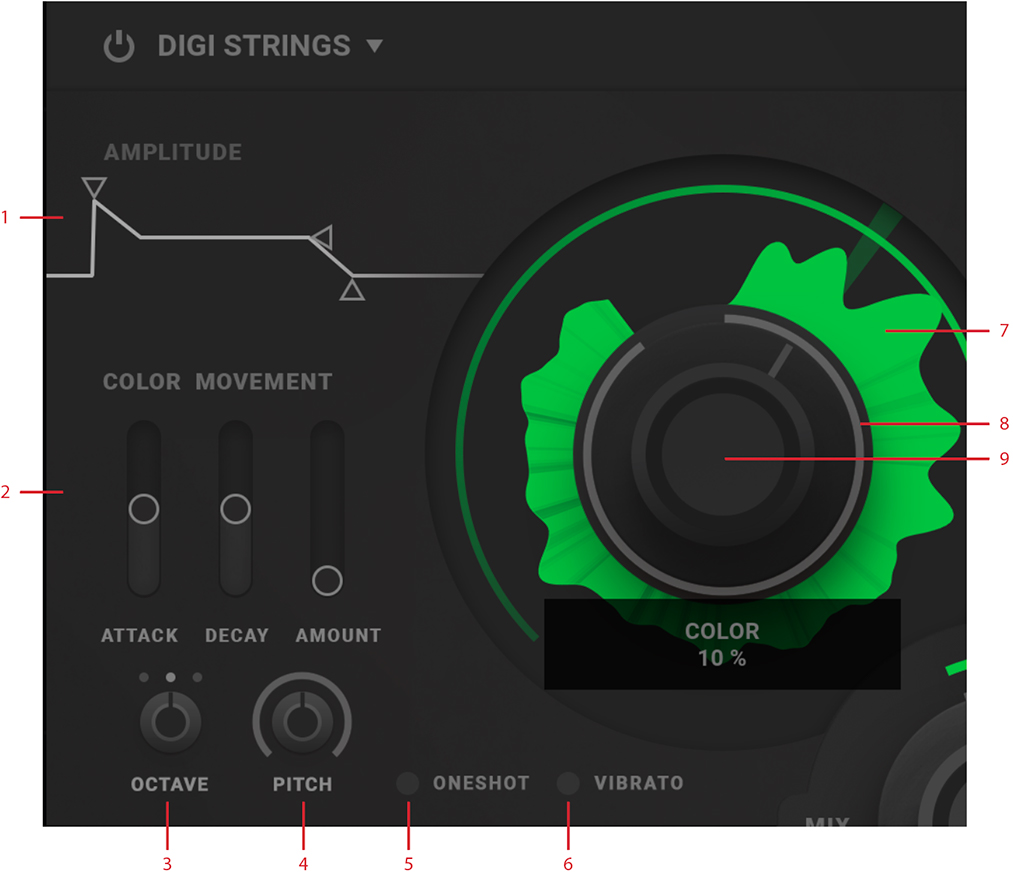
- Amplitude envelope
- Color movement
- envelope
- Octave
- Pitch
- Oneshot
- Vibrato
- Waveform
- Modulation
- Color knob
Active on/off: This parameter activates and deactivates the Source with its adjacent Shaper section. When a section is deactivated, its graphics is dimmed indicating that it is no longer heard.
Wave menu: In this dropdown menu you can select from each of the different wave category.
Wave selection arrows: With the wave selection arrows you can rapidly change between waveforms without using the dropdown menu. Notice that a changed waveform will not be heard until a new note is pressed.
A complete Waveforms list is presented in "Appendix".
The Amplitude envelope
The amplitude envelope controls the overall change of amplitude over time. It is a so called ADSR (Attack, Decay, Sustain, Release) envelope with simplified controls (i e one common control for Decay and Release times).
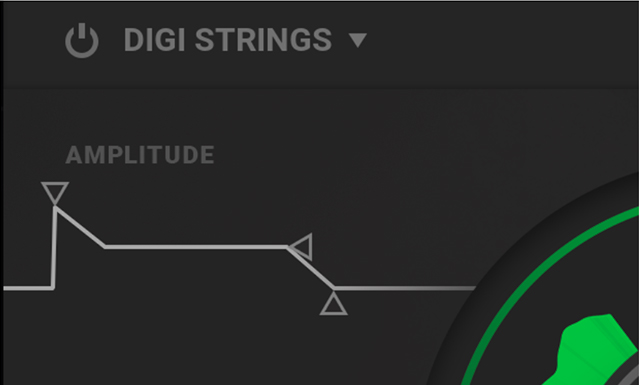
Amplitude envelope attack (1ms - 16sec): This horizontal slider controls the attack portion of the (upper) layer's amplitude envelope. Keep this short (low values) for instantly responsive and snappy sounds, while using higher values for extending the attack time for slower, fading in notes.
Amplitude envelope sustain (0-100%): This vertical slider controls the sustain level of the amplitude envelope for the upper layer. This is the sustained volume level that is held after the initial attack and decay times of the envelope. If the sustain level is at 100% the decay will not be pronounced, effectively turning the envelope into a ASR (Attack Sustain Release) envelope.
Amplitude envelope release (1ms-16sec): This horizontal slider controls the decay and release portion of (upper) layer's amplitude envelope. This dual function parameter controls both the initial decay phase appearing right after the attack phase, but simultaneously also controls the final decay (often also called release) that appears when a note is released. Setting this parameter low creates very fast, abruptly ending sounds, while using higher values creates lush sounds with long hanging notes.
The Color envelope
The Color envelope is a dedicated AD(Attack and Decay)-envelope that will perform a sweeping of the start and loop-position of the Source waveform, first in a clockwise motion during attack phase, and then in a counterclockwise motion during the decay phase.
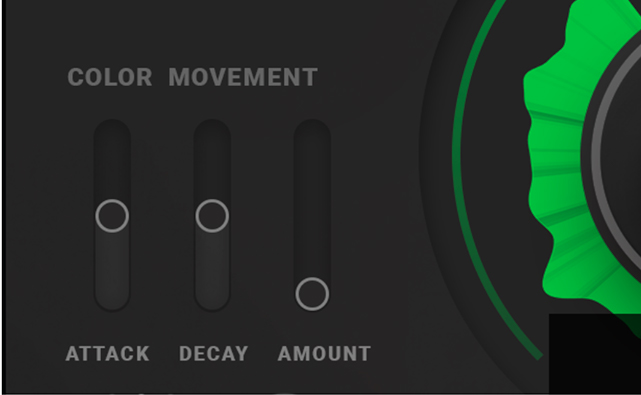
Color (0-100%): This parameter control the waveform playback start- and loop-point. This is the offset point from which the playback of the waveform always will begin.
Color movement envelope attack (1ms-16sec): This parameter controls the attack time of the dedicated Color Movement AD (Attack Decay) envelope. The attack time is the timing of the rising portion (attack) of the envelope.
Color movement envelope decay (1ms-16sec): This parameter controls the decay time of the Color Movement envelope. The decay time is the timing of the falling portion (decay) of the envelope.
Color movement envelope amount (0-100%): This parameter controls the amount of color movement inflicted by the dedicated Color Movement envelope. Color movement is the modulation of the start- and playback-position of the Source waveform. The movement inflicted by the Color Movement envelope is added to the offset position set by the Color knob, as well as the modulation added from the Mod Pod (see further description below).
Octave (-1 / 0 / +1): This parameter let the user transpose the Source waveform up or down once octave. Default value is 0 (no transposition).
Pitch (-12 – 0 - +12 semitones): With this parameter, the user can detune the pitch of the Source waveform up or down from the default offset. Maximum values are + and – one octave. Modulate this parameter with the Mod Pod sequencers for creating pseudo-arpeggios (see further description below).
Oneshot (on/off): This parameter turns on the Oneshot playback mode of the Source waveform. In Oneshot mode, sustained loop-functionality is turned off and the waveform is played from the where the current start-position (Color knob + the modulation determines where). The Color-envelope is also disabled in Oneshot mode.
Vibrato (on/off): This parameter turn on the internal vibrato. Vibrato is a low-frequency pitch modulation that emulated the vibrato of a violinist or cellist. When this parameter is engaged, MIDI modulation amount (MIDI controller #1) will control the maximum amount of vibrato (default is 100%).
The Mix Balance functionality
Src Mix: This is the mix balance in volume between the upper and lower layer in Parallels. When this knob is turned fully counter-clockwise, only the upper layer will sound. And of course, if this knob is turned fully clockwise, only the lower layer will sound. This described behavior is also reflected in the graphics as the waveform's shown color intensity also will reflect the current state. When a waveform is faded to grey, it is not heard.
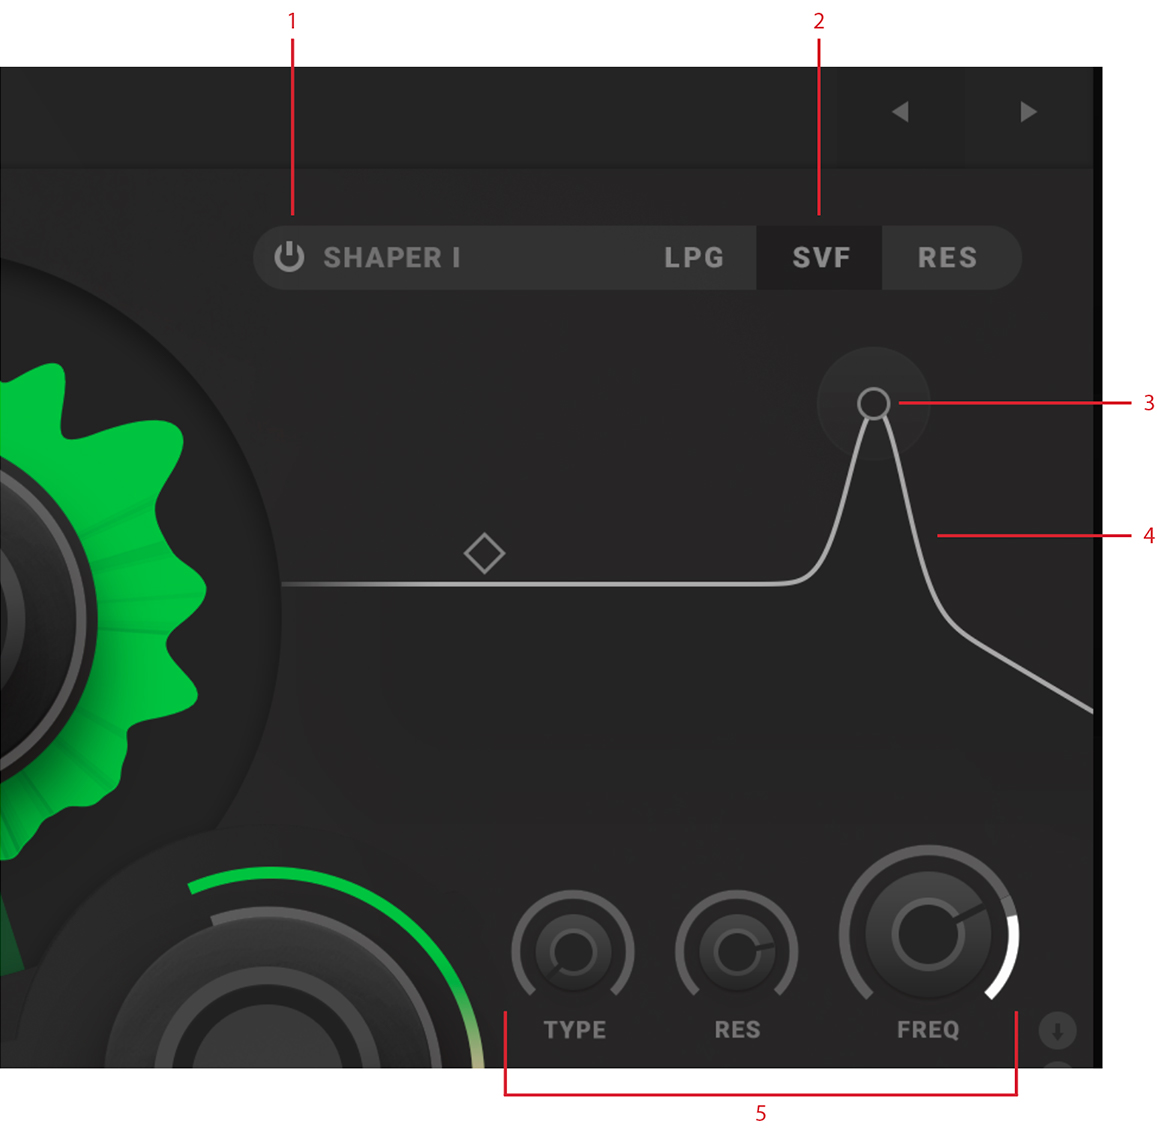
- Shaper active on/off
- Shaper model
- Hotspot
- Interactive filter diagram
- Filter parameters 1-3
Active on/off: This parameter activates and deactivates the Shaper section. When the Shaper is deactivated, its graphics is dimmed indicating that it is no longer heard and the sound from its adjacent Source section is bypassed through to the Effect section.
Type LPG/SVF/RES: This parameter determines which tone shaping model the Shaper section will use. The three types are:
The LPG (Low Pass Gate): Is a lowpass type of filter inspired by West Coast synthesis, with a variable slew, cutoff and resonance control. While the cutoff and resonance controls works pretty much as on any like other lowpass filter with feedback control, the slew parameter controls the response of modulation applied to cutoff frequency, mimicking the “slop” of a vactrol control.
LPG frequency (20Hz - 20kHz): This is the cutoff frequency of the LPG. When modulated, the LPG Slew will determine the “sloppiness” its response (see below).
LPG resonance (0 - 100%): This is the amount of feedback in the LPG Shaper.
LPG slew (0-100%): This is the amount of “sloppiness” in the cutoff response. It ranges from 20 ms to 2000 ms, minimum to maximum response.
The SVF (State Variable Filter): Is an OTA-style filter with variable characteristics (lowpass, bandpass, highpas) and separate control over cutoff and the a wild resonance.
SVF frequency (16Hz - 17.6 kHz): This is the cutoff frequency of the SVF Shaper.
SVF resonance (0 - 100%): This is the amount of feedback in the SVF Shaper.
SVF type (lowpass - bandpass -highpass): This parameter set the SVF type used in the Shaper which ranges from lowpass mode with knob at counterclockwise, bandpass with knob at 12 o’clock, to highpass mode at fully clockwise.
The RES (Resonator): Is a three band variable resonator-bank with control over the center frequency, as well as the tilt and spread of the bands.
RES center freq (159Hz – 2518kHz): This is the center resonator peak cutoff frequency of the RES Shaper mode.
RES tilt (0 – 100%): This parameter set the RES tilt balance used in the Shaper which ranges from high freq boost with knob at counterclockwise to low freq boost at fully clockwise.
RES spread (0 - 100%): This parameter set the spread between the three different bands, from roughly doubling in frequency for each band at fully counterclockwise, to up to eight times the frequency at fully clockwise (x2 - x8).
The Shaper Copy and Swap functionality
The Shaper sections also contains some smartness - you can copy and swap setting between the upper and lower Shaper by clicking on one of the three different “arrow”-buttons (see further description below).
Copy from (arrow on module you want to copy from): Clicking on this arrow on the upper or lower Shaper instantly copies the settings for the Shaper type currently selected, selects the same Shaper type on the other Shaper.
Swap: Clicking on this “double arrow” symbol instantly swaps the settings of the upper and lower Shaper. Clicking the same cymbol again swaps back.
Note: No modulation information is copied or swapped with the functions described above. Because of this, settings copied from the upper Shaper to the lower Shaper or vise versa can sound quite different although the same Shaper type and settings are being used. This can of course be cured by manually selecting the same modulation sources, mix and amount.
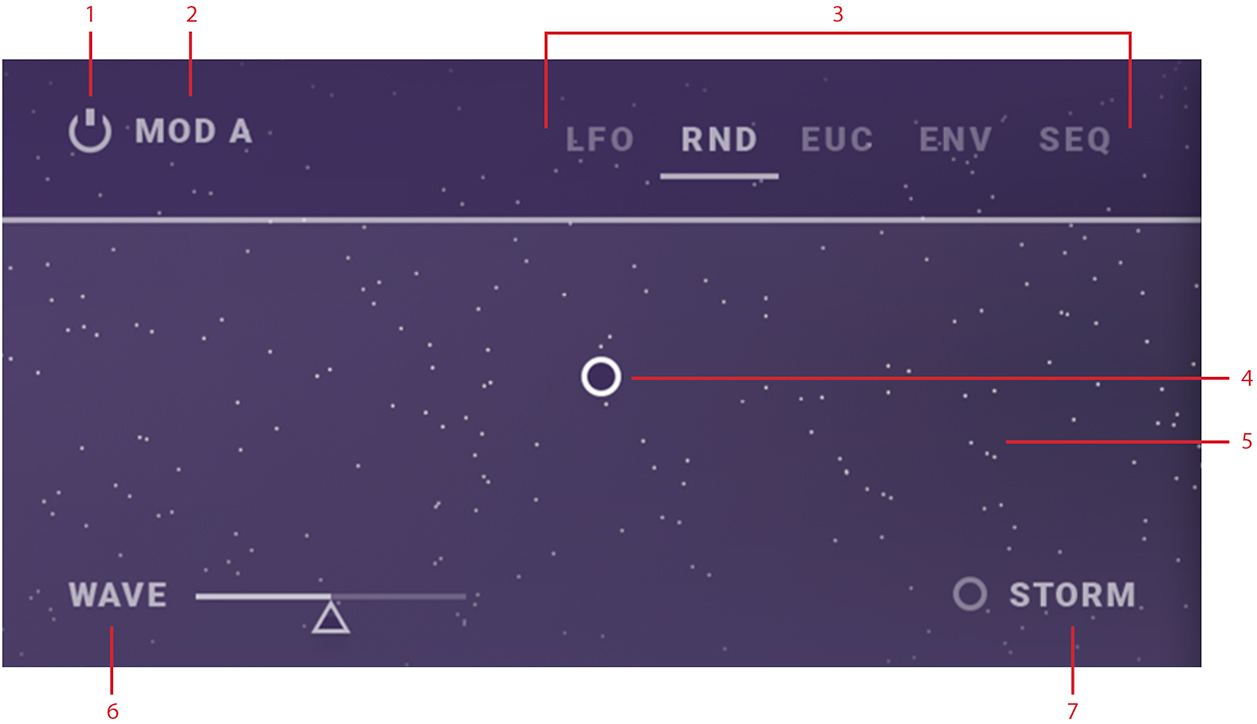
The left section of Parallels contains the modulation slots A to D and is called the Modulation Pod or Mod Pod for short. Each slot in the Mod Pod contains a configurable modulation source. This means that any of the modulation slots can be assigned to do similar modulation tasks and to be assigned just about anywhere. All slots have their own individual modulation color that is reflected in the assigned modulation.
- Modulation active on/off
- Modulation slot A-D
- Modulation type
- Hotspot
- Interactive modulation diagram
- Modulation parameter 1
- Modulation parameter 2
Active on/off: This button turns the Modulation Slot on or off. When turned off, modulation is cut from all destinations using it and thus can radically change the sound.
Modulation type (LFO/RND/EUC/ENV/SEQ): With this type button you can choose which kind of modulation you want the modulation slot to use. Here follows the detailed description of each of these modulation types available in Parallels:
LFO (Low-frequency Oscillator)
An LFO is a low-frequency oscillator - a cyclic rise and fall type of wave oscillation that can be used to modulate your target parameter destination with as slow movement as 0.1Hz (i e 1/10 cycle each second, meaning that cycle time is 10 seconds).
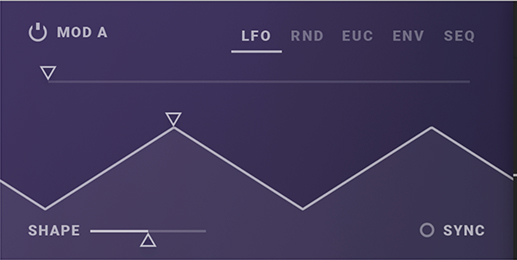
LFO rise (0-100%): This parameter sets the how much of the LFO cycle that will be the rising portion and thus also the remainder that is to be the fall portion.
LFO shape (0-100%): This parameter set the shape on the rise and fall period of the LFO curve. It goes seamlessly from inverted exponential (0%) to linear (50%) to exponential at (100%).
LFO DAW speed (4 bars/1 bar/half note/fourth note/eight note/sixteenth note): When the LFO sync is turned on, each LFO cycle is quantized into division of a beat ranging from one cycle every 4th bar to one cycle each 16th note.
LFO speed (0.1 Hz – 50Hz): The LFO speed parameter sets the cycle time of the LFO, from a very slow 0.1Hz to a moderate 50Hz (just above audio-rate).
LFO sync (off/on): This parameter turn on and off the DAW tempo sync. When turned on, each LFO cycle is quantized into division of a beat (see LFO DAW speed).
RND (Random modulation generator)
The RND is a digital random modulation generator that outputs bursts of random pulses at a regular rate. This means that for each clock-cycle a pulse may of may not appear. The clocked rate in the RND is called “rain” to illustrate the light drops of rain at a low rate, to the heavy rain of a high rate. There's also a low- or highpass filtering of the generated noise as well a internal LFO controlled amplitude-shaping called “wave”. The “Storm” option makes the wave go bananas!
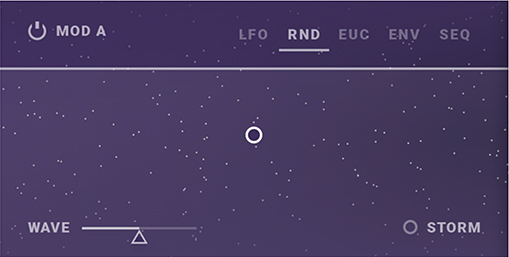
RND rain (0-100%): This parameter which is the movement in the Y-axis on RND panel, controls the internal speed of the clocked random source, from the light drops of rain at a low rate (0%), to the heavy rain of a high rate (100%) - white noise. The Y-axis movement can be locked by holding down shift and moving the mouse vertically for only adjustment of the RND rain (clocked speed).
RND noise (lowpass - flat - highpass): This parameter which is the movement in the X-axis on RND panel, controls the filtering of the generated noise, from the heavy lowpass filtered version at 0%, on to flat (no filtering) at 50% and on to heavy highpass filtered at 100%. The X-axis movement can be locked by holding down shift and moving the mouse horizontally for only adjustment of the RND noise (filtered noise).
RND wave (0 – 100%): This parameter controls the amount of “breathing” scaling to the modulation amount. This is a cyclic slow amplitude modulation of the filtered random pulse output that can be turned completely off by setting the RND wave to 0%.
RND storm (on/off): This option completely turns off the wave modulation and instead amplitude modulates the RND output with another uncorrelated white noise source.
EUC (Euclidian sequence generator)
The Euclidian sequence generator (EUC) in Parallels can be used to create a number of evenly distributed gates (modulation maximum) over the course of one bar. The number of gates are filled from the first beat clockwise by a percentage and the resulting gates can be shifted around the beat for (nearly) endless array of possibilities. The EUC is always synced to DAW tempo and position, therefore its effect will not be heard when the DAW transport is stopped.
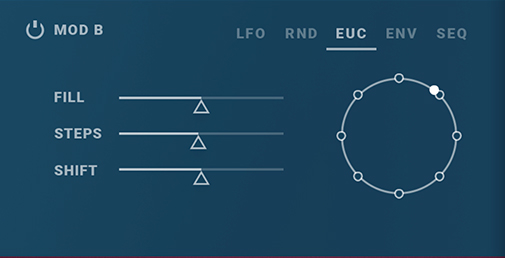
EUC fill (0-100%): This parameter determines how many percentage of the available steps in a bar that will send gates.
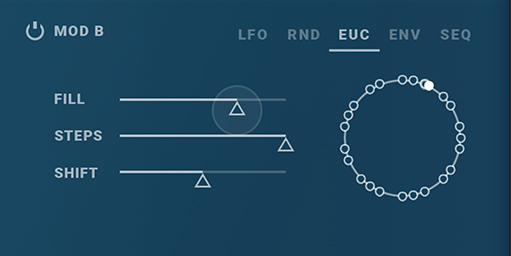
For example, in a 16 step sequence a 25% fill will result in 4 distributed gates.
EUC steps (1-32): This parameter determines the number of evenly distributed gates (modulation maximum) over the course of one bar.
EUC shift (0-100%): The EUC shift parameter is used to shift the steps around the perimeter by percentage.
EUC Retrig (off/on): This parameter determine if the EUC cycle will retrigger on next 16th note.
ENV (modulation Envelope generator)
The modulation Envelope generator of Parallels is a ASR or ADSR generator (configured by the ENV Decay on/off button). It can be used to, for example, modulating the filters in the Shaper section, sweeping the waveforms loop start-points and altering the dry/wet level of the effects.
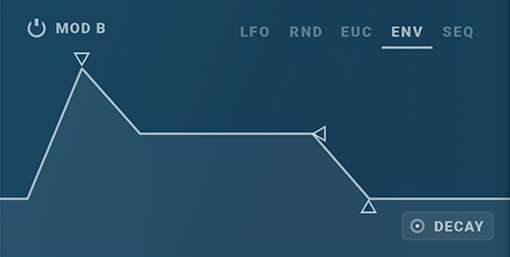
ENV Attack (5ms - 4000ms): This parameter set the attack time of the modulation envelope. It defines the rise time until the envelope has reached its peak. A lower attack value equals a faster rise time.
ENV Sustain (0-100%): The Sustain parameter defines the hold level of the modulation envelope. This is the level that the envelope will rise to from zero through the attack phase that lasts as long as defined by the ENV attack parameter (described above).
ENV Release (50ms - 8000ms): This parameter defines the final fall time of the modulation envelope. It takes from a key is released until the modulation envelope has fallen down to zero again. When the modulation envelope is set to ADSR mode via the ENV Decay option.
ENV Decay (off/on): When this option is turned on, the modulation envelope changes its curve to a ADSR envelope, adding the optional decay stage that will be proportional to, and controlled by the same parameter as the ENV Release (descriped above). In a ADSR envelope, the decay portion describes the fall time from the peak of the envelope, down to its sustain level.
Note: the modulation envelope is the only modulation parameter that is assigned per voice, that is affects each destination polyphonically (true for all destinations except for destinations with the effect section).
SEQ (modulation Sequencer)
The modulation Sequencer in Parallels is designed to provide slewed sequenced modulation or gating information that can be used to modulate different things: pitch, filter cutoff etc. It's speed is a 16th note division set by the DAW sync tempo and its alignment is to transport when DAW is running. The modulation sequencer has two modes: modulation and trig. Where modulation sequencing is stepped level set by each step, the trigged gates of the trig mode is either on or off, and each gate only lasts half of a 16th note (a 32th note). In modulation mode you can easily draw you modulation curves continuously across the 16 steps, and fine-adjustments can be done by pressing and holding CTRL (pc) or CMD (mac) to fine-adjust. This will also prevent more than one step being changed at the same time in the sequencer. Note that the draw functionality can be turned off in the setup menu.
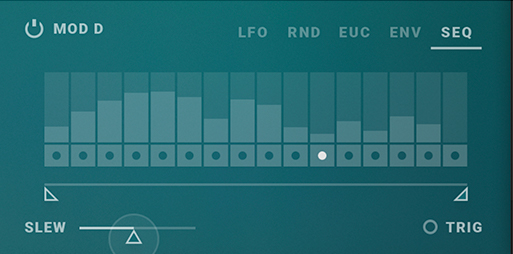
SEQ first step (1-16): This parameter sets the first step of the modulation sequence. If this step occurs after the last step, then the sequence will go backwards. For example, if the first step is 12 and the last step is 8, then the sequence will start at step 12, then play steps 11 through 8 and loop back to step 12 on the next 16th note.
SEQ last step (1-16): This parameter sets the last step if the modulation sequence. If this step is positioned before the first step, the sequence will reverse order as described above.
SEQ slew (0-100%): The slew parameter defines the slew rate of the output modulation from the modulation sequencer. The higher slew value, the slower lag (or glide) is added to the output modulation.
SEQ Trig (off/on): This parameter controls the output mode of the sequencer. Modulation mode (SEQ Trig: off) sequencing is stepped level set by each step, and Trigger mode (SEQ Trig:on) is trigged gates.
SEQ step CV 1 – 16 (0-100%): This is the amount of modulation to be generated by this step.
SEQ step trig 1 – 16 (off/on): In trig-mode, this is the amount (either 0 or 100%) to be generated by the gates of each step. Each gate will last for half a 16th note.
In Parallels, nearly all parameters in Parallels can be modulated from the modulation sources available in the Mod Pod. Click on the outer ring, modulation ring, on a knob to bring up the available modulation sources (A/B/C/D) and the mix balance between them. By clicking on the modulation ring while dragging your mouse/mousepad upwards you will add modulation amount to that destination. The color ring around the destination knob will light up with a color reflecting the modulation amount and mix of the sources chosen to modulate this knob. A 50/50 mix of two sources will result in a white color. There's is also a small indicator on the ring showing the presently applied sum of modulation.
Modulation routed in Parallels is only positive with one exception: Modulation of the to pitch is bipolar, which means that a Source waveform will stay in pitch when modulated with a LFO. This also means that when modulating pitch from the modulation sequencer at full range, nominal pitch will be at 50% on a sequencer step giving the sequencer a modulating pitch range of a total of two octaves.
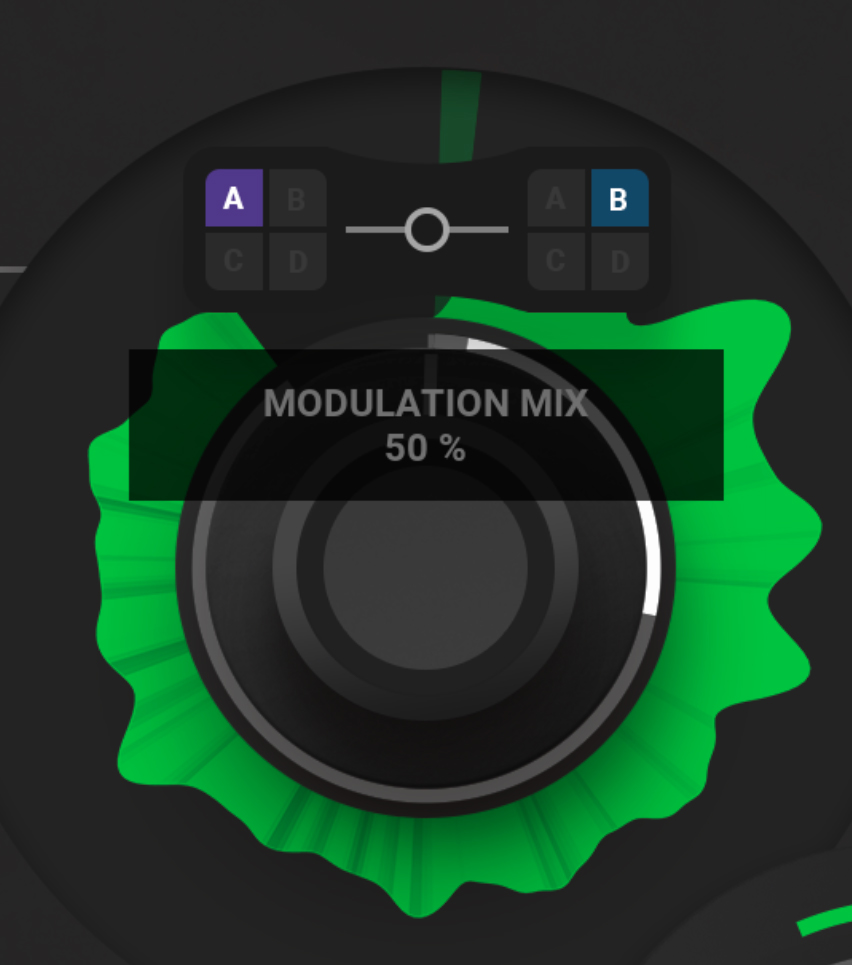
Note: A few of the parameters cannot be modulated and those are primarily sliders: Color Attack, Color Decay, Color Amount and Octave. Also, oneshot and vibrato on/off options cannot be modulated from the Mod Pod. Change of modulation routings is only reflected in the next triggered note.
The effects signal flow in Parallels are setup in series, from top to bottom. Each effect has its own dry/wet mix and bypass switch.

Distortion
This effect saturates the signal with a vacuum tube-like flavor.
Distortion Amount (0-100%): The amount of distortion on the effected signal.
Distortion Tone (0-100%): Dark or Bright distortion, you decide.
Distortion Mix (0-100%): This is the dry/wet mix between the dry signal and the effected (distorted) signal. Blend to your preferred ratio.
Chorus
This effect emulates the behavior of a classic stereo-chorus, often found in polyphonic synthesizers of the late 1970s and early 80s.
Chorus Speed (0-100%): The internal chorus speed.
Chorus Width (0-100%): The stereo width and amount of the chorus.
Chorus Mix (0-100%): This is the dry/wet mix between the dry signal and the effected (chorus) signal. Blend to your preferred ratio.
Flanger
A flanger is a time-dilation effect where parts of the signal is slightly delayed, feedback and mixed with a constant change of he delayed timed. The results is not so different from a phaser but can still be distinguished as it creates an unlimited series of equally spaced notches and peaks, both harsh and sweet sounding at the same time.
Flanger Speed (0-100%): This is the flanger internal sweep speed (approximate range 0.5 – 5Hz).
Flanger Feedback (0-100%): This parameter controls the feedback path of the flanger, but also the stereo width of the sweep; i e the more feedback, the wider flange.
Flanger Mix (0-100%): This is the dry/wet mix between the dry signal and the effected (flanged) signal. Blend to your preferred ratio.
Delay
This delay is an echo effect quite similar to the Filter echo of Softube Heartbeat. It features both a set delay-speed on the first half on the speed knob. But also a variable delay-speed set as division of a beat synced to your DAW, on the second half on the same knob.
Time (1-900ms, 1/16, 1/32, 1/16, 1/16+, 1/8T-, 1/8T, 1/16D, 1/8, 1/8+, 1/4T-, 1/4T, 1/8D, 1/4, 1/2T, 1/4D, 1/2): This parameter determines the delay time of the echo; i e how long time passes between each delay “hit”. On the left half of the Time knob, the range is from 1 to 1000 milliseconds. On the right side, the delay time can be set in divisions of the DAW tempo, ranging from 1/64th to 1/2 of a beat. The latter is useful for setting the delay to act in time with your song.
Feedback (0-100%): Is set the amount of feedback, how many delay repeats there will be. It ranges from one repetition to roughly 10 repetitions at full feedback.
Delay Mix (0-100%): This is the dry/wet mix between the dry signal and the effected (delayed) signal. Blend to your preferred ratio.
Reverb
The Reverb in Parallels is Softube custom reverb algorithm tailored to suit the needs of a synth sound. It creates everything from a short slap-back room to a vast synthesized textured space. Tweak it according to your needs.
Time (0-100%): This parameter changes many things at once about the reverb. Low values makes the pre-delay more apparent, with less feedback and shorter times in the feedback loop. 20-40% creates a small space and with values higher than 50% a very large space is created by the reverb.
Tone (0-100%): This parameter sets the filtering of the feedback networks in the reverb. While 50% is a flat filter topology, lower values below 50% will dampen higher frequencies in the reverb (dark reverb). Values above 50% will dampen lower frequencies in the reverb (brighter reverb).
Reverb Mix (0-100%): This is the dry/wet mix between the dry signal and the effected (reverb) signal. Blend to your preferred ratio.
Setup
By clicking on the Setup window tab in the lower right corner of Parallelss widow, a screen of global options will be displayed. Many of the options requires shutting down and opening Parallels again (good to know). The setup options are as follows:
Warn when deleting presets from preset collection: Turns off or on the dialogue appearing when deleting user presets in the preset collection. Factory presets cannot be deleted, although they can be filtered out (not shown).
Warn when overwriting presets in preset collection: This option turns off or on the dialogue appearing when overwriting user presets in the preset collection.
Use Open GL graphics: Turns off or on Open GL graphics acceleration. This is an option that affects all Softube Plugins and if selected, a DAW restart is required before change of this option is active.
Color Blind Mode: This option enables or disables colors specially adapted for the colorblind. Close and open the Parallels GUI for the change to have effect.
Show Colors in Menu: This option enables or disables colors in the wave menu reflecting the colors of the waveforms already before they are selected. Close and open GUI again for the change to have effect.
Always use smaller GUI: This option forces Parallels’s rescaler to always open the plugin in a smaller window. Close and open the Parallels GUI for the change to have effect.
Show tooltips: Turns on or off the tooltips (screen text overlay for parameters). Close and open the Parallels GUI for the change to have effect.
Show value display: Turns on or off the value display for edited parameters in the lower left corner. Close and open the Parallels GUI for the change to have effect.
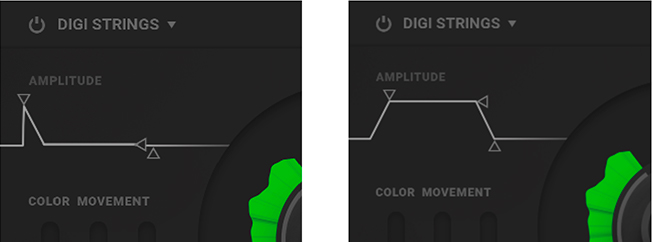
Use the Amp Envelope to change the dynamic character of any sound. Pictured above is the difference on the Amp Envelope between a plucked string sounds and slow, bowed stringed sound.
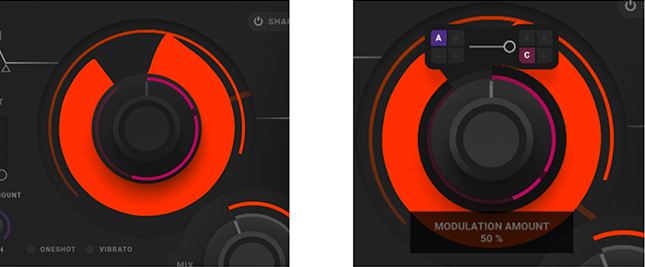
Most of the different Source waveforms have change of harmonic content when sweeping the Color knob clockwise. Make use of these harmonic changes either by using the dedicated Color Movement Envelope or by assigning a modulation slot to create a harmonic change while playing. And of course you can also do both at once. Pictured above is how a LFO in Mod Pod C is assigned to sweep the lowpass filter in the “Ana Saw LP” Source Waveform.
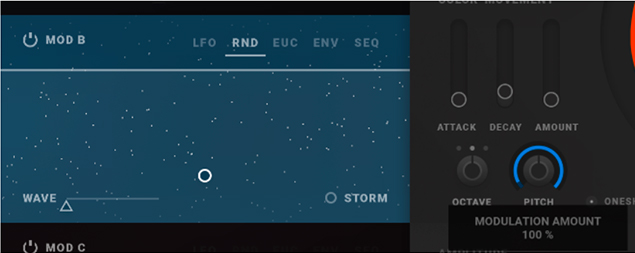
Use the RND to create random octave jumps with the RND Wave parameter set at 0. Use RND modulation on full 100% amount to make the RND pulses to create moderatly slow random octave jump.
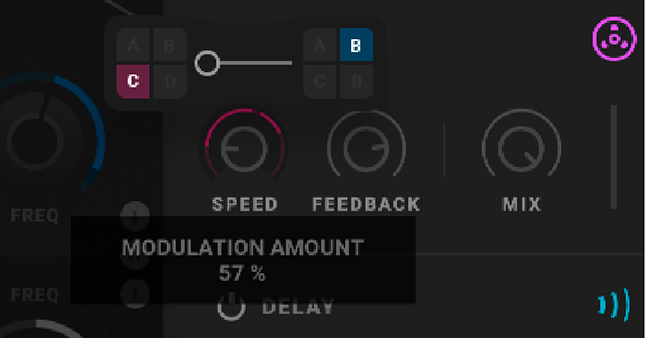
You can modulate the internal LFO speed of the flanger with a modulation LFO by assigning a Mod Pod containing the LFO to the LFO speed knob of the Flanger (as pictured above).
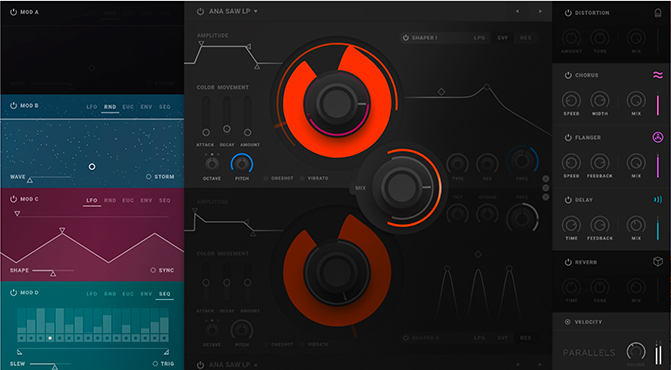
Total polyphony is shared between upper and lower layer. Double your polyphony by turning off one layer if you do not need it.
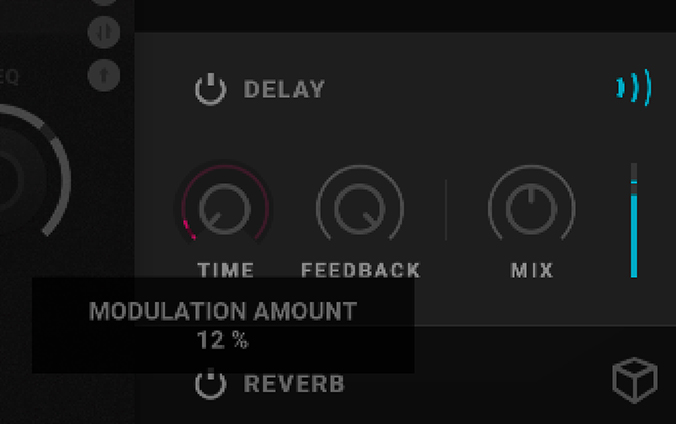
Create your own unusual flange effect by assigning a modulation LFO to speed knob of the Delay effect (as pictured).
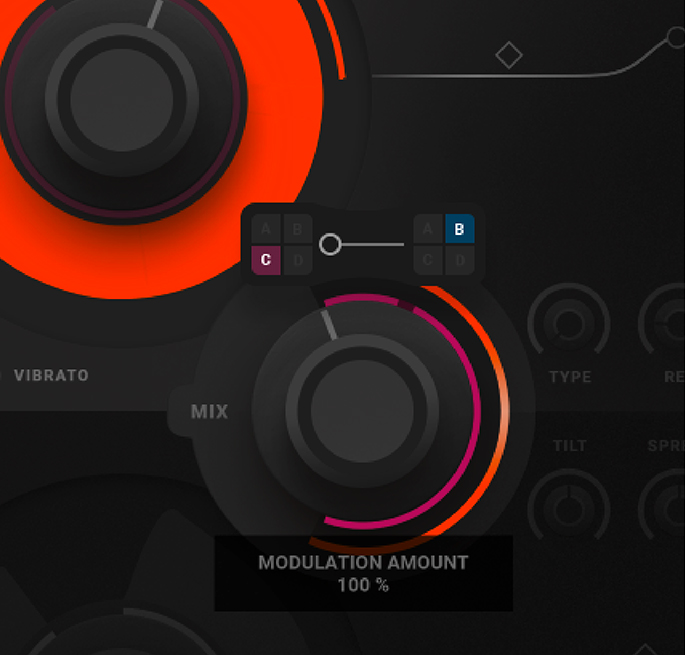
Create a tremolo by using a modulation LFO to modulate mix with one Source turned off.
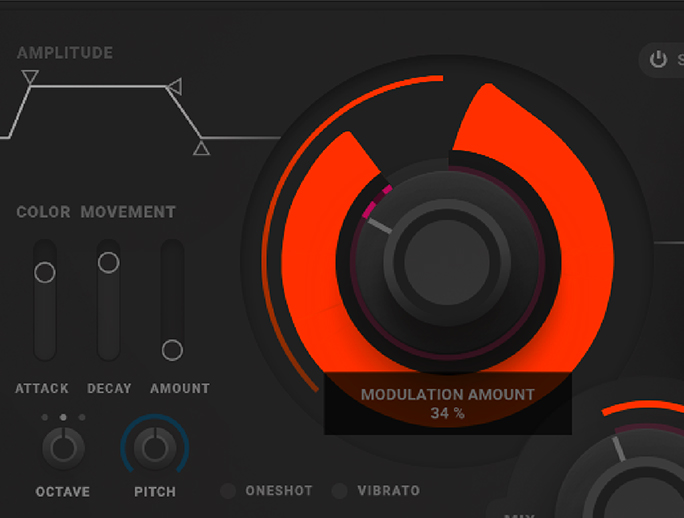
Another way of creating a tremolo effect is by setting a late start in the Source Wave and assigning a modulation LFO to modulate playback.
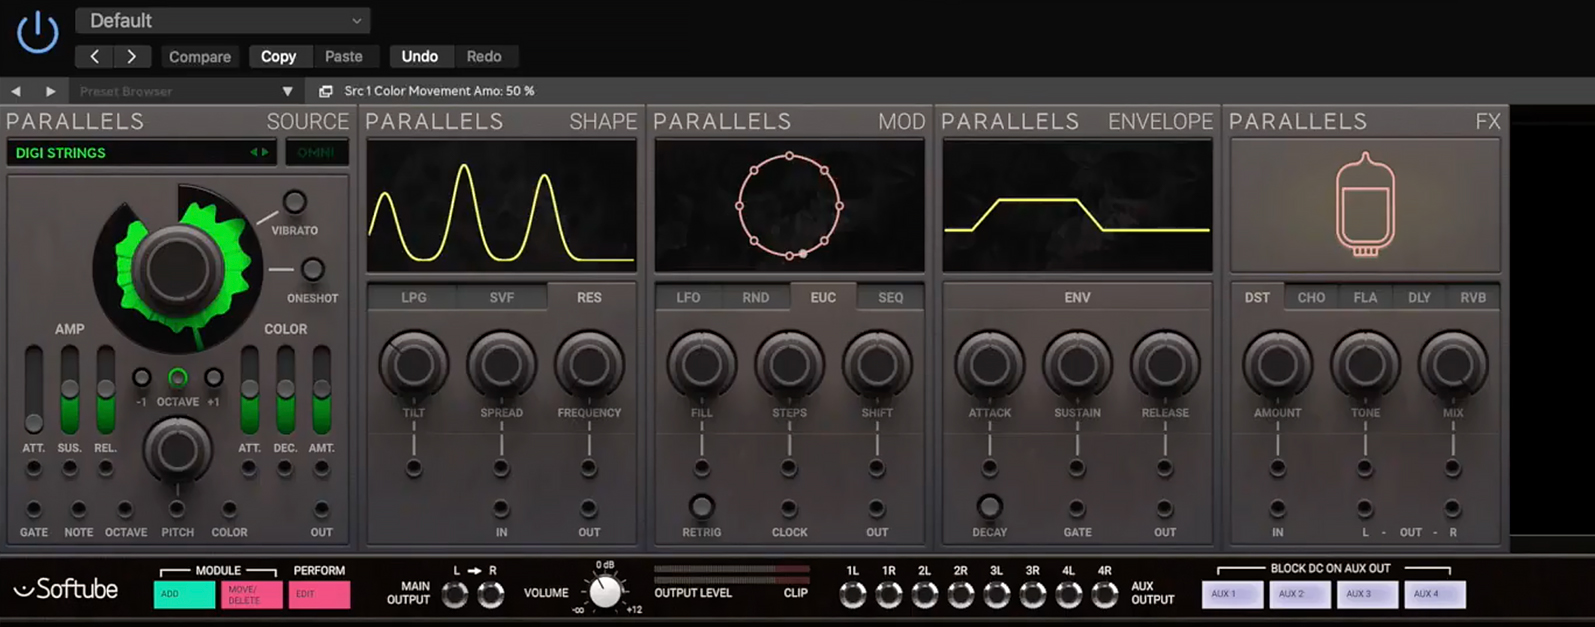
When you purchase Softube Parallels, you're also purchasing the possibility to use it as five separate blocks in our modular platform Softube Modular! The four different modules for you to use in Softube Modular: Parallels Source, Parallels Shape, Parallels Mod, Parallels Env and Parallels FX. Here's a brief description of them:
Parallels Source
This is the Source engine from one half of Parallels, available as stand-alone module. It has a built in amp and color envelopes, vibrato and one shot mode. It can be played polyphonically within modular over midi and/or monophonically at the same time via the gate and note jacks. All envelopes stages, pitch parameters and color parameters features CV control via the external jacks.
Parallels Shape
This is the Shaper section from Parallels, available as stand-alone module. It hasthree built in modes (LPG, SVF and RES). All controls are CV-controllable via external CV control.
Parallels Mod
This is the Modulation section from Parallels. It features four different modulation modes that all can be externally controlled in different ways. The random source can be externally clock, as does also the euclidian and step sequencers. Sequencers have extensive CV control over first, last step and output slew. When not externally clocked the sequencers is automatically locked to the DAW tempo at all times.
Parallels Env
This is the Modulation Env from Parallels, available as stand-alone module. It is externally triggered by a gate over 1.33v and features CV-control over each phase at any time. When Decay is activated it shifts from ASR to ADSR type.
Parallels FX
This is the Effect engine for Parallels, available as stand-alone module. It has five modes that can be run one at a time – Distortion, Chorus, Flanger, Delay and Reverb. Three parameters in each mode has external CV control.
Johan Antoni - Initial concept, multi sample sound-recording and library, testing and presets
Kristofer Ulfves - Project lead, sound design, presets, user manual
Björn Rödseth - Tech lead, programming
Kim Larson - DSP modeling, programming
Erik Sight - Programming
Patrik Holmström - Programming
Jacopo Lovatello - Programming
Filip Thunström - Programming, preset conversion
Tord Jansson - Programming and GUI engine customization
Oscar Öberg - Mentoring, programming
Arvid Rosén - Mentoring, programming
Manuel Colomb - GUI design
Joe Lawton - Testing, presets
Henrik Johansson - Testing, presets
Fredrik Mjelle - Testing, presets
Christoffer Berg - Testing, presets
Maxus Widarsson - Deep testing, qualification
Johan Bremin - Deep testing, qualification
Sven Bornemark - Testing
Fanny Hökars - User Manual layout
Click here to view the full-sized image in a new tab
Click here to view the full-sized image in a new tab
Click here to view the full-sized image in a new tab