User Manual
Statement Lead
Intro
User Interface
Source section
The Source Material for Statement
The Filter and Sequencer section
The Modulation Sequencer
The Tone section
Auto-glide
The Effects section
Options menu
Saving and loading sounds
Statement For Modular
Statement For Amp Room
Credits
Related manuals
Statement Lead is the next product in the series that started with Monoment Bass. The Monoment Bass user will feel right at home with Statement Lead, although some parts are different:
First, this is obviously a lead instrument - it’s polyphonic and covers 5 octaves. It also features quite different source waveforms from Monoment.
Statement also features a slightly different set of Softube effects: Drive, Reverb, Delay, a one-knob Multiband compressor and Spatialization.
Statement, like it’s brother Monoment, is a no-brainer, always-sound-good, easy-to-use polyphonic lead machine that creates complex sounds but feels analog.
Due to its polyphonic nature, we have omitted the glide feature and instead added an auto-glide feature. The idea is that you can trigger a glide/pitch shift at the onset of the note/chord, or at the end of it. You can select how you want to trigger it, for instance if Velocity is above a certain threshold, if Aftertouch reaches a certain level, or maybe every time a note is played or released.
Statement has the same simplified control set of the envelopes as Monoment - Punch/Release instead of a full ADSR, “Env Type” instead of a full ADSR on the filter, simplified controls in the effects section.
Click here to view the full-sized image in a new tab
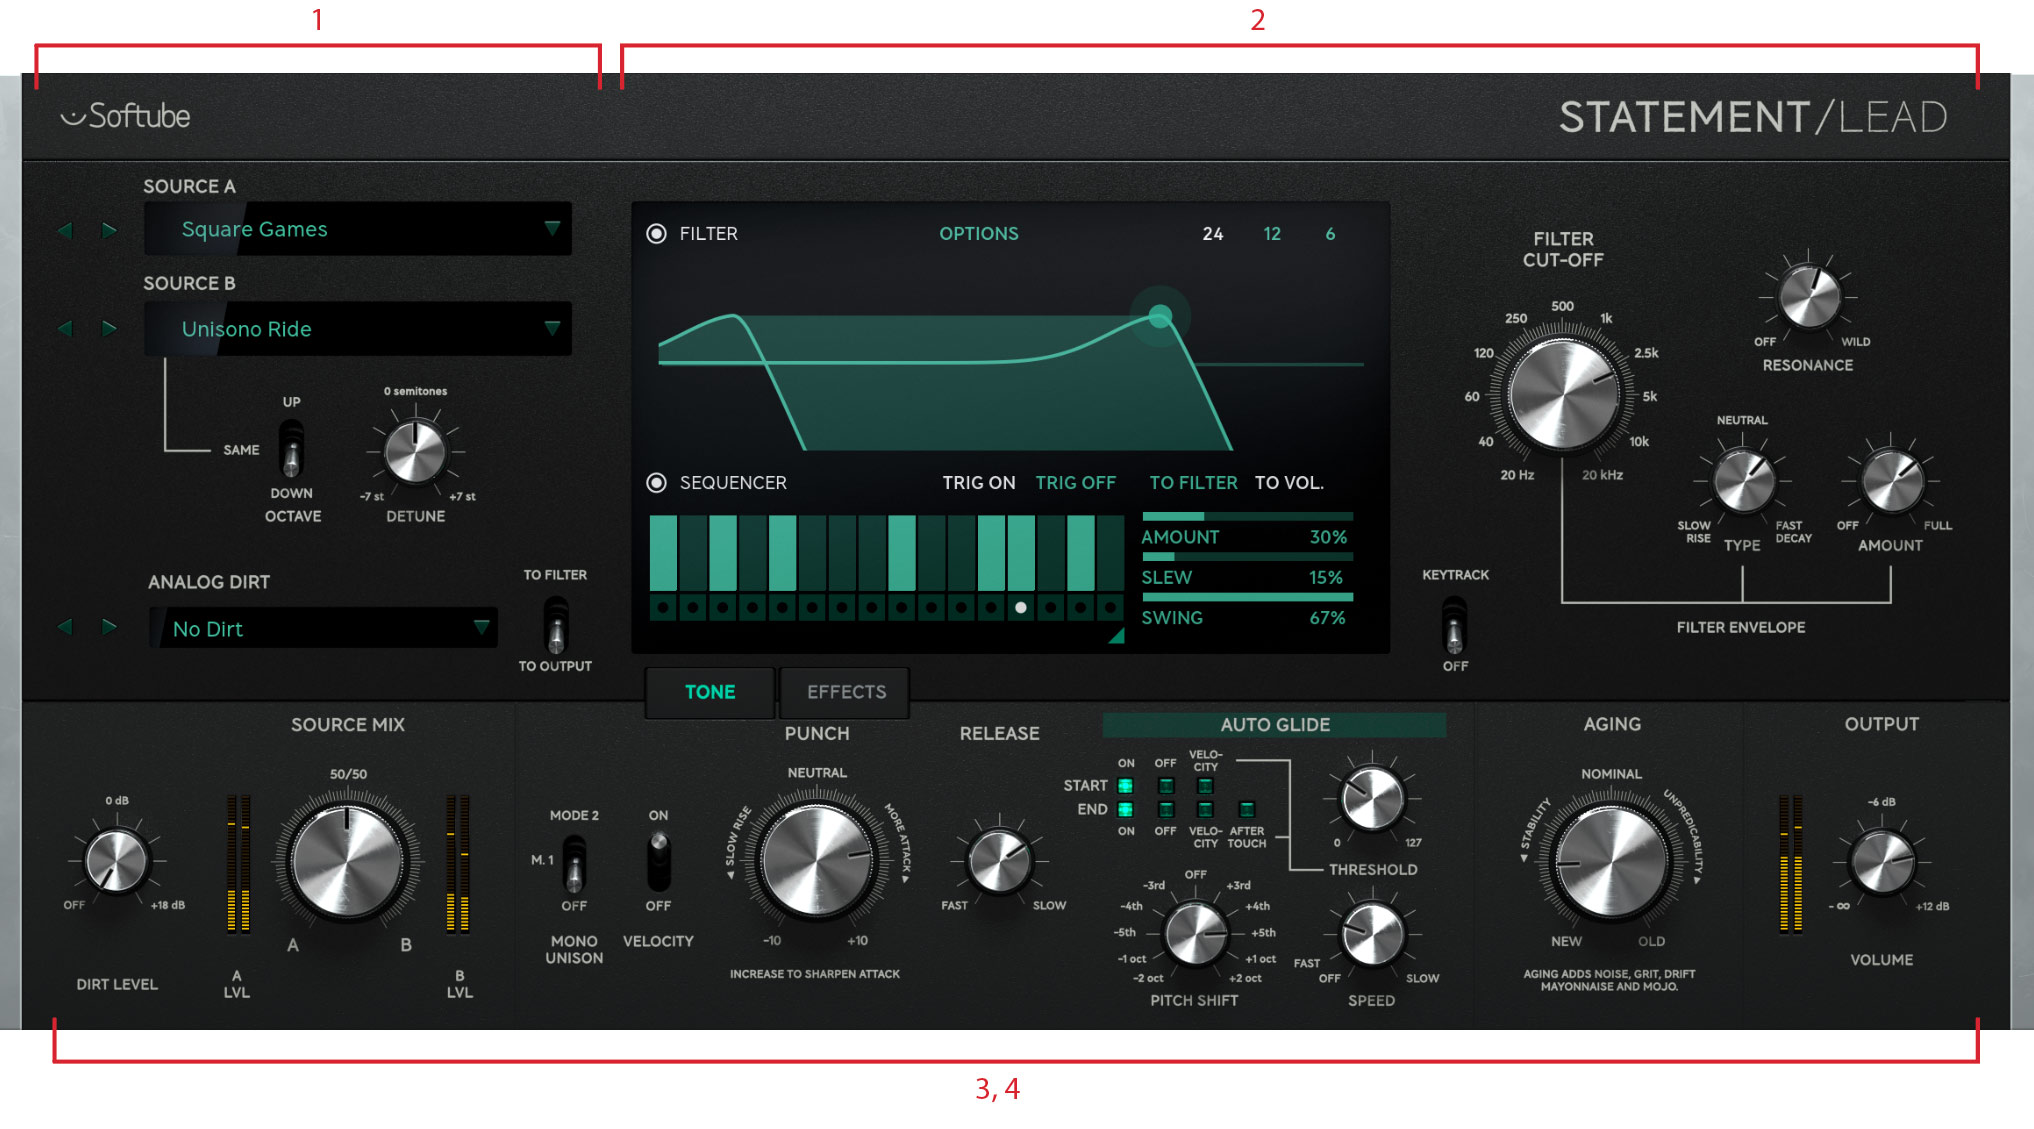
The user interface consists of four parts:
- Source section, where you select different sound sources
- Filter and Sequence section, where you set the cut-off frequency of the filter, or use the dedicated filter sequencer to automatically change filter cut-off or amp.
- Tone, where you balance your sources and set the punchiness of the sound.
- Effects, the place for distortion, reverb, delay, compression and spatialization.
In Statement, we have again created a synth workflow with filters, envelopes and modulation, all easily accessible and adjustable, for you to shape the sources into the tone you need right now. And to compliment the textures of the sources, the effects section with reverb, delay, spatialization, distortion and multi-band compressor is there to help you; all that you need to make your awesome synthesizer sound take its desired position in the mix. Again, it’s about sound quality and workflow. A modern synth-lead sound in no time.
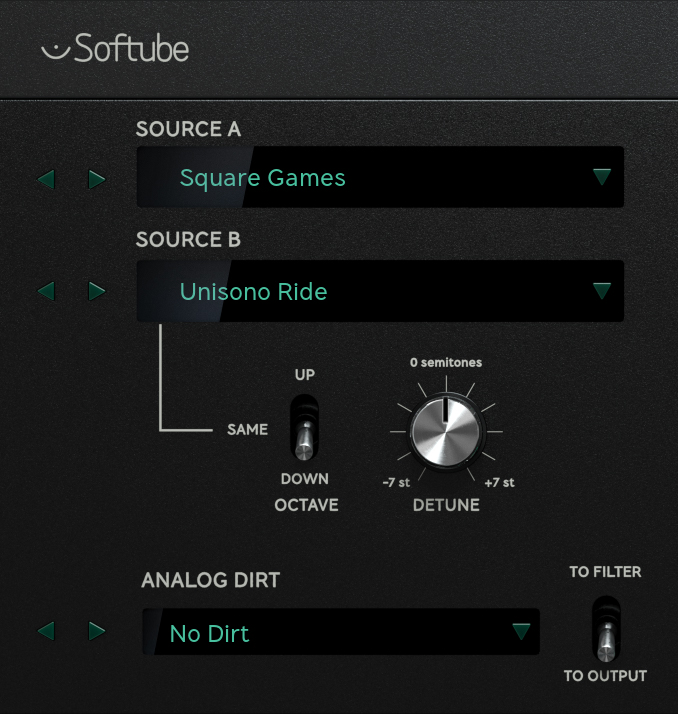
The Source section is the heart of Statement. Each sound is build up by a mix of one or two waveforms. Adding to that is a analog dirt section with looped or transient material to enhance your sound. The two sources are always sent to the filter section while the dirt has the option to be added on the side if needed.
The Source Material for Statement
The extensive Source material for Statement uses meticulously recorded and processed material from rare and expensive synthesizers such as Schmidt Synthesizer, Synclavier, Oberheim Four Voice and Black Corporation Deckard's Dream. The soundmaterial in all consists of 90 waveforms in 11 different categories:
Analog Sync: Oscillator hard- and soft-sync type of waveforms.
Analog Clean: fairly basic analogue sound waveforms.
Analog Dirty: analogue waveforms with a bit more grit and distortion.
Digital Rich: digital rich waveforms with plenty of harmonic content
Digital Noisy: digital waveforms with a bit more grit and lo-fi sound
Analog Rich: analogue rich waveforms with plenty of harmonic content
Digital Dirty: digital waveforms with a bit more grit and distortion.
Digital Percussive: digital waveforms with a defined attack.
Digital Voiced: digital waveforms with different kinds of formant character.
Digital Clean: fairly basic FM and additive waveforms.
Analog Percussive: analogue waveforms with a defined attack.
Parameters
Source A: This is where you select your waveform for Source A out of the 11 different Source categories. Click in the display to activate the drop-down menu for an overview or use the back and forward arrows to go through the different waveforms one by one.
Source B: This works similar to Source A selection but for second source waveform.
Source B Octave: This is the relative transposition of the Source B section. It can be set to be one octave below, at the same octave or one octave above the pitch of Source A.
Source B Detune: The detuning of Source B against the pitch of Source A. It ranges from minus seven semitones to a plus seven semitones.
Analog Dirt: This is where you will select your dirt layer sound out of 20 (15 looping and 5 transient attack) different waveforms. Remember to turn up the dirt level on the tone page in order to properly hear this feature.
Dirt to Filter/to Output: This switch will determine if the Analog Dirt sound is mixed with the rest of the sources (A and B) and sent into the filter, or if it is sent directly dry to the output section.
The Filter and Sequencer section
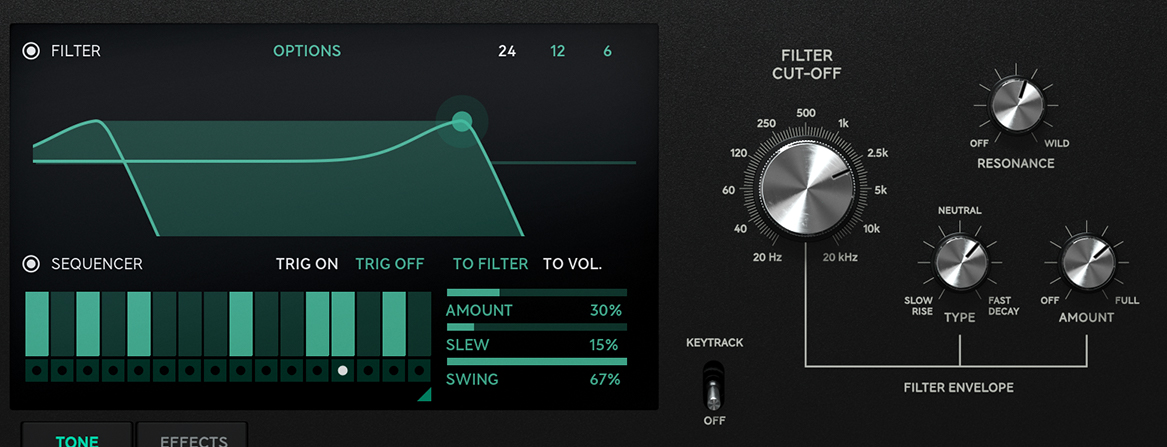
To the right on the Source section, is the Filter-section with its built-in modulation sequencer. At center is the main filter display window that shows filter interactive filter characteristics as well as the modulation sequencer with its controls. To the right of the filter display are the controls that are directly related to the filter and its built-in envelope. The envelope determines how the filter changes when you hit a note. As we wanted to make that as easy as possible for you we boiled it down to four main controls: Filter cutoff, Resonance, Envelope Type and Envelope amount.
Cut Off: This knob set the cutoff frequency of the filter in Statement. The cutoff frequencey determines the roll-off point of the lowpass filter after which high frequencies are diminished. The steepness of this roll-off is dependent on the Filter type (see below).
Resonance: This knob controls the pronounced feedback around the cutoff frequency in the filter. The more resonance, the more “hollow” or “singey” the filter gets.
Env Type: This knob defines the envelope type and timing. From a very slow attack with the knob set at fully counter clock-wise, to a very fast attack at the knob at fully clock-wise. And of course all the interpolating times in between. So if you, for example, would want a medium decaying filter envelope then set the envelope type knob at 2 o'clock.
Env Amount: The envelope amount knob defines how much the envelope will affect your filtgers cutoff frequency. This is value is reflected in the filter graph as a “shadowed area” showing the end-destination level of the cutoff-frequency when applied this amount. While playing, you will also clearly see how it is changing in the filter graph.
Key Track: This switch enables full keyboard tracking to the filter cutoff. This means that the filter tracks and opens the filter cutoff in relation to the notes that is played.
Filter Type: In the top right corner of the filter graph window, you can change between the three different filter-types in Statement: 24 dB/octave, 12 dB/octave and 6 dB/octave – essentially three lowpass filter typer with different roll-off curves with 6 dB/octave being the most “gentle” and 24 dB/octave being the most “aggressive”.
Filter On Off: This is a switch in the upper left corner of the filter graph window to swiftly bypass the filter for instantly listening to the Source waveforms without the coloration of the filter. When turned off, the Filter graph window is blacked out.
The built-in modulation sequencer is another way of automatically change the filter frequency or output volume, either stepped or slewed. The sequencer is always running with its tempo synchronized to the DAW clock so you'll always can get a rhythmic change in time with your music.
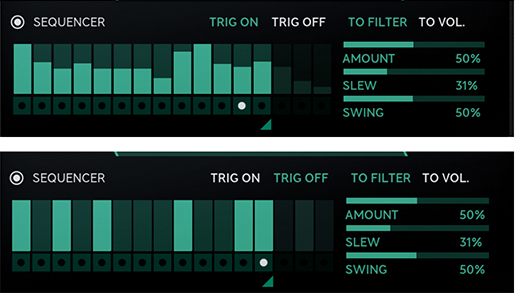
Seq On/Off: This small button at the upper left of the Sequencer window enables or disables the sequencer. When turned off, the sequencer window is blacked out.
Seq levels/trigs: The 16 steps in the modulation sequencer can be set to be either levels or distinctive triggers (on/off). Just click on a level drag with your mouse to adjust it. In trig mode, click repeatedly on a step to toggle it on or off. Only one mode can be used at a time.
Seq Amount: This will determine the effect the modulation sequencer will have on its destination (filter cutoff or output volume, see below). If the filter is turned off (filter graph is black) then the sequencer will not have any effect.
Seq Slew: This parameter will sets the slewing of the output sequencer data applied to the filter or output volume. More slew equal smoother sound. Great when using the sequencer as more of an programmed, synced LFO.
Swing: This parameter will change the timing of the even steps (2,4,6,8,10,12,14 and 16) to make it swing more towards triplets. Range is from 33% to 67% where 50% represents normal, straight timing.
Cut: This knob set the cutoff frequency of the filter in Statement. The cutoff frequencey determines the roll-off point of the lowpass filter after which high frequencies are diminished. The steepness of this roll-off is dependent on the Filter type (see below).
Seq to filter/to Vol: This double click area determines whether the sequencer controls to the cutoff frequency of the filter or the output volume. Experimentation with this one is fun – a sequence that modulates the filter makes a totally different sound when modulating the output volume!
Seq Trig On Off: This switch toggles between normal sequencer level mode (Trig: off) and sequencer trigger mode (Trig: on).
Seq Range: This sets the loop-length of the sequencer. It can be set as low as 1 (no loop) and as high as 16 (all 16 steps).
The Tone section is where you sculpt the tone: here you can mix the sources and choose whether you prefer an overall sharp attack or a slow fade-out for your sound. The main “playability” of the sound is adjusted here with just a few powerful controls. Here's an overview.

Click here to view the full-sized image in a new tab
Next step is to adjust the shape, the envelope, of the tone. That’s easily done by adjusting the Punch control. Increase Punch and you’ll get a snappier, punchier sound. Decrease it and you’ll get a sound with a slow build-up. The Release sets the time it takes for the sound to fade-out.
Parameters
Dirt Level: This parameter will set the dirt volume level from non-existant to pretty subtle - but yet again, the dirt in Statement is meant to be a sonic spice not the source of a sound.
Source Mix: This knob sets the balance between Source A and B before they enter the filter.
Mono Unison: This three stage switch changes Statement between normal polyphonic mode and two different mono unison modes. Unison mode 2 is slighly more pronounced than M1. In unison performance is monophonic, meaning that one note at a time is heard. Last note played is prioritized.
Velocity: This switch toggles Velocity sensitivity on or off. The level of sensitivity can be changed in the options menu (see further description below).
Punch: This parameter sets the overall amplitude envelope of the sound in Statement. Increase Punch and you’ll get a snappier, punchier sound. Decrease it and you’ll get a sound with a slow build-up.
Release: This parameter sets the time it takes for the body of the sound to fade-out. Note that long reverb and delay can prolong the sound further (see section below).
The special auto-glide feature of Statement Lead means that you can start or end each note with an automatic pitch-bend up or down with a programmable time and range. There are also some conditional features such a threshold for setting when the bend should and should not occur. Let's go through them all:
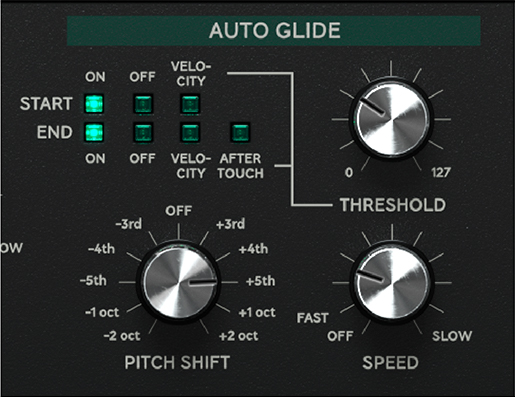
Auto Glide Start: This parameter determines whether the glide will occur in the start of the sound. When set to the velocity option, the threshold-level will determine at which velocity the auto-glide is triggered.
Auto Glide End: This parameter determines whether the glide will occur at the end of the played sound. When set to the velocity option, the threshold-level will determine at which velocity the autobend is triggered. When set to the aftertouch option, any aftertouch above the threshold occuring while note is playing will trigger the auto-glide at the end of the sound (when the key is released).
Auto Glide Pitch Shift: This determines where the glide will start or end. Range goes from minus two octaves to plus two octaves.
Auto Glide Threshold: This threshold determines the trigger-point for the auto-glide when used in conjunction with velocity and/or aftertouch (see description above).
Auto Glide Speed: This is the auto-glide speed rate. It goes from off, fast to fairly slow.
Aging: Sets the amount of unpredictability in Statement. More Aging means less stable pitch, more unpredictable attacks, more dirt and grit and more analog goodness.
Volume: This parameter sets the overall output volume.
The effects section consists of five different effects that you can use to further sculpt your lead sound. These effects have been carefully chosen and designed for polyphonic synthesizer-lead sounds, and the control set has been thoroughly tweaked to give you as much control as possible with as few knobs as possible.

Click here to view the full-sized image in a new tab
Parameters
Drive On Off: This switch enables or disables the Drive effect. This transformer drive is quite subtle but gives your sound the warm edge it needs.
Drive Amount: Sets the amount of drive coloration.
Reverb On Off: This switch enables or disables the Reverb effect simulation. This is an algorithmic reverb with a pre-delay.
Reverb Pre-delay: This is the pre-delay that always is synced to the DAW tempo. The pre-delay is set to be a subdivision of the tempo and ranges from 32th notes at min to half notes (“2”) through 16th, 8th, 8 triplets (“6”), quarter notes and quarter note triplets. When set to “off”, the pre-delay effect is disabled.
Reverb Time: This parameter set the reverb time from very short to very long (near infinite). The decay time of the reverb depends on the reverb tone setting – a neutral setting (50%) will generate the longest reverb times.
Reverb Tone: This parameter is the equalization of the reverb signal. Low settings of this parameter brings out more of the low end while high settings brings out the high end.
Reverb Ducking: This feature enables the user to have create a sound where the decaying reverb from previously played notes is reduced in volume when a new note is played. This parameter will determine how much the reverb will “duck” against the new dry sound.
Reverb Dry Wet: This parameter sets the dry/wet balance of the reverb.
Delay On Off: This switch enables or disables the Delay effect. It creates musically interesting echos that can be defined time-based in milli-seconds or as divisions, synchronized of the DAW tempo.
Delay Taps On Off: The delay effect can be used as a standard one tap delay with feedback (taps off) or as a multi-tap delay (taps on) where up to eight delay taps per channel, left and right, is defined (see below).
Delay Tap L 0 – L7, R0 - R7: These buttons turns the delay taps on and off. The taps farthest to the right (L7 and R7) is the longest and will represent the chosen time, while the ones to left of this are subdivisions down to 1/8 of the time at the very left end (L0 and R0). Delay taps are like playheads in a tape-recorder and will, when enabled, play back a perfect replica of the played sound delayed in time.
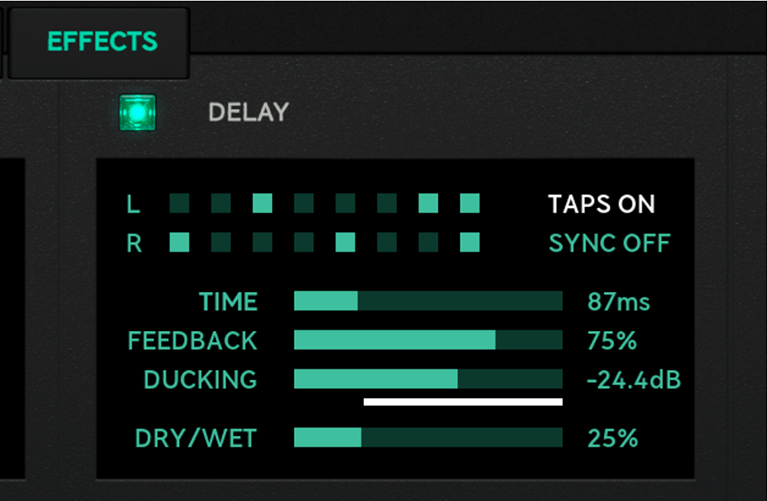
Delay Sync On Off: This turn the DAW synchronization on or off.
Delay Time: This parameter sets the Delay time. It ranges from very short (32ms) to long (2 seconds). How it is presented is dependent whether the Delay is synced to the DAW or not (see above). When sync is set to off, the delay time of the longest taps (L7 and R7) are set in milliseconds. When DAW sync is turned on, the delay time is defined as subdivisions of the DAW tempo.
Note that in “1/2-tempo“ the odd taps will is affected by the swing parameter set in the modulation sequencer, this is deliberate and very musical.
Delay Feedback: This sets the amount of feed-backed signal sent from the slowest delay taps (L7 and R7). The internal feedback is send through a low.
Delay Ducking: This feature enables the user to have create a sound where the decaying delay signal from previously played notes is reduced in volume when a new note is played. This parameter will determine how much the delay will “duck” against the new dry sound.
Delay Dry Wet: This parameter sets the dry/wet mix balance of the delay effect.
Comp On Off: This switch enables or disables the one knob multiband compressor. Multiband makes everything fatter, clearer, better, more defined...use it on everything! With just a bit of compression on your synth-lead you’ll get a warmer and fuller sound.
Comp Amount: The sets the amount of compression. Overdo it and a character on its own gets through.
Spatialization On Off: This turns the Spatialization feature on or off. While all sources and algorithms in Statement are stereo, you sometimes want to enhance the stereoness of them, or maybe reduce it. That’s what the Spatialization effect does.
Sub Mono: This monomaker sets all audio below the set frequency will be in mono. Pull it all the way up to force the overall output of Statement to be completely in mono.
High Freq Widener: This stereo Widener let you enhance stereo differences and suppress mono behavior.
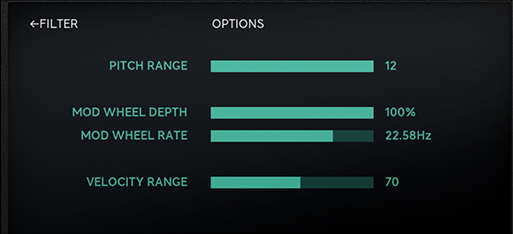
Hidden in plain sight - top middle of the Filter graph window - is the options menu. In here you'll find global parameters not often changed. They are:
Pitch range: This is the customizable pitch-bend range. This will determine how much the pitch of the Sources will bend up and down when a MIDI pitchbend message is received. You can configure the bend-range to be anything from zero to twelve semitones, quantized in semitone steps.
Mod Wheel Depth: This will determine how much the internal modulation will affect pitch when applied through external MIDI modulation message (midi CC#1).
Mod Wheel Rate: This sets the speed of the internal modulation oscillator, from a fairly slow pace at 0.3Hz to fairly quick pace at 30Hz.
Velocity Range: This parameter set sensitivity to incoming MIDI velocity, where the minum value is totally oblivious to velocity information and at maximum setting it has full range (meaning that velocity received with a value of 0 will be totally silent).
Click here for more information about Preset Collection.
Saving and recalling your own or other sounds is very simple in Statement Lead. In the top left corner of the plugin window is the preset display window and just to the left of that are the two buttons for next and previous preset quick browsing.
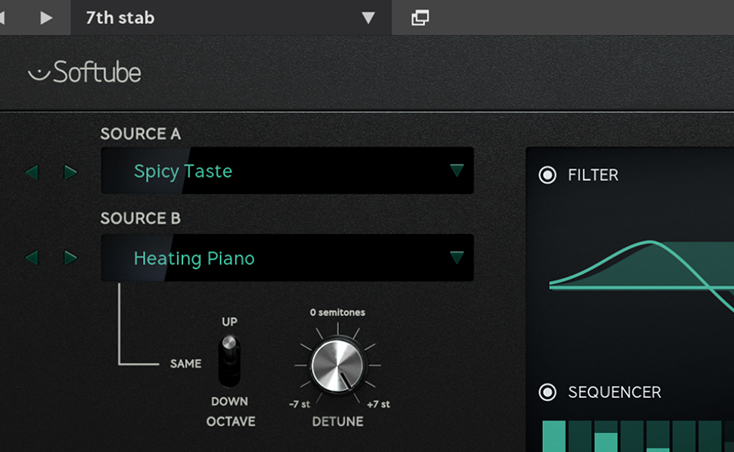
When clicking on these you will scroll back and forth in the list that is selected and filtered in the preset collection browser.
The preset collection browser window is quickly open by clicking on the window symbol to the right of the small preset name display. For details about Preset Collection see the separate chapter.
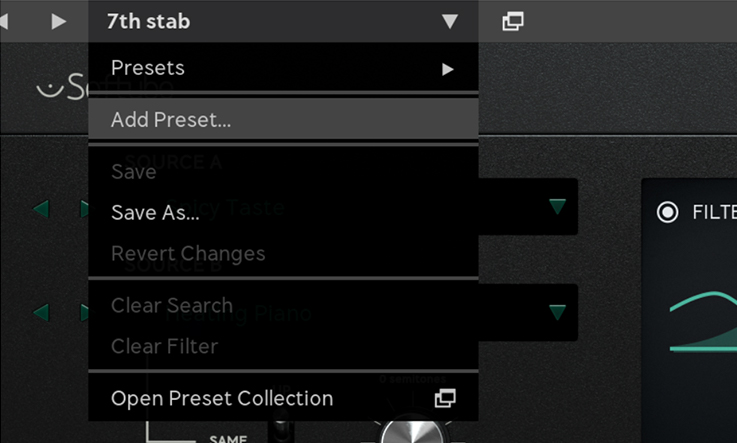
When you have created a really great sound that you want to save, simply click on the drop-down arrow just to the right of the preset display window and choose Add preset or Save as – you'll now be promted to give your preset a name (the same procedure can of course also be performed in the preset collection by itself) and press enter to save it.
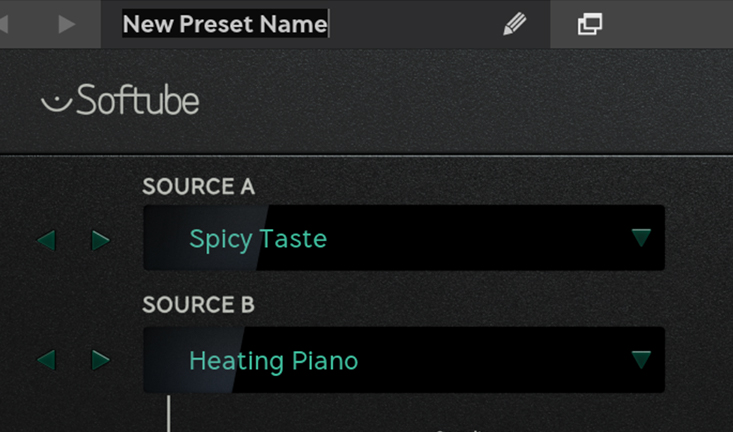
Your preset has now been saved and can found among the user presets in Preset Collection. You can even share it with your friends by exporting it along with other presets as a separate “.softubepreset”-file. Details about this can be found in the Preset Collection chapter.
When just tweaking a sound you'll notice that the name will get an * addition after the name, indicating that this preset has been changed from its saved state. If you want to save those changes simply choose “save” in the preset dropdown menu.
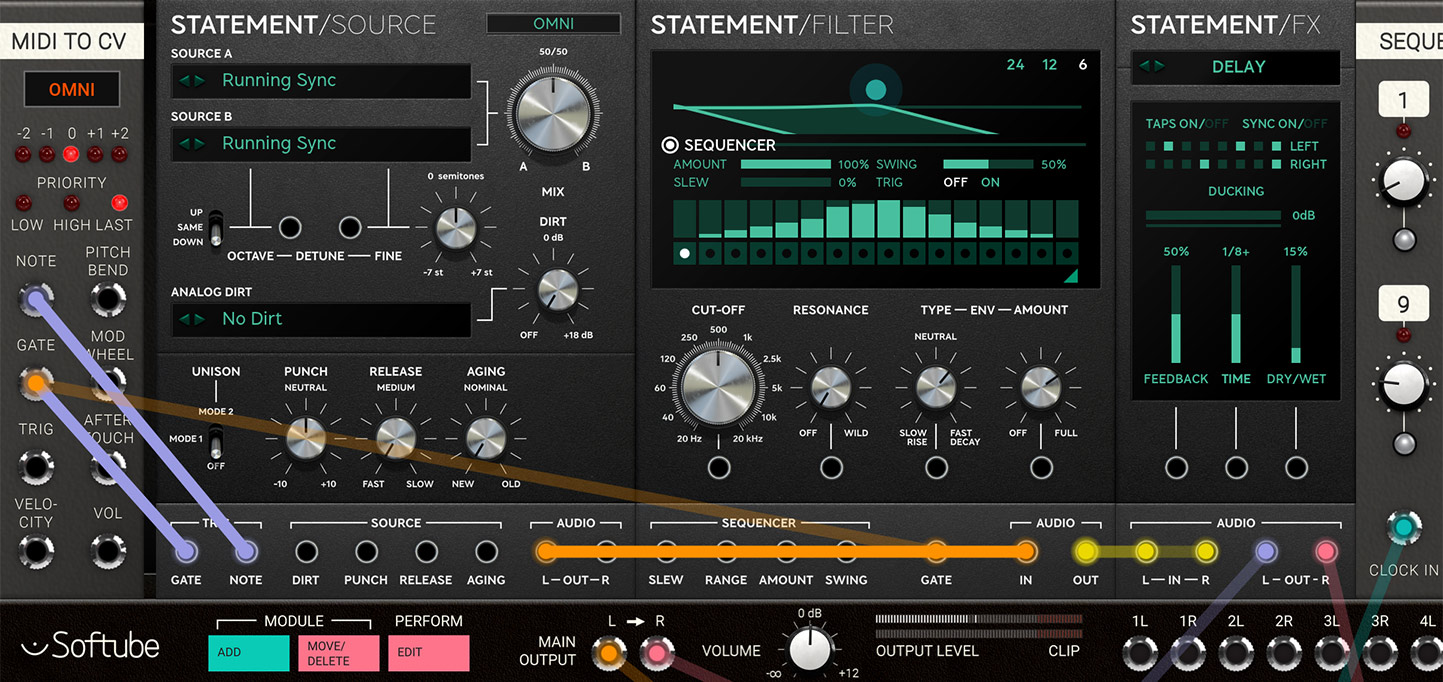
When you purchase Statement Lead, you're also purchasing the possibility to use it as three separate blocks in our modular platform Softube Modular! The three different modules for you to use in Softube Modular: Statement Source, Statement Filter and Statement FX. Here's a brief description of them:
Statement Source
This is the Source engine from Statement Lead, available as stand-alone module. It has a built in amplitude envelope, waveform mixing, dirt level and aging. It can be played polyphonically within modular over midi and/or monophonically at the same time via the gate and note jacks. Dirt Level, Punch, Release and Aging parameters features CV control.
Statement Filter
This is the Filter section from Statement Lead, available as stand-alone module. It has a built in filter envelope and sequencer. The envelope is triggered through the external gate jack. All sequencer functions - Slew, Range, Amount and Swing parameters - features external CV control. The Sequencer is automatically locked to the DAW tempo at all times.
Statement FX
This is the Effect engine for Statement Lead, available as stand-alone module. It has five modes that can be run one at a time – Drive, Reverb, Delay, Multi comp and Spatialization. Up to three parameters in each mode has external CV control.
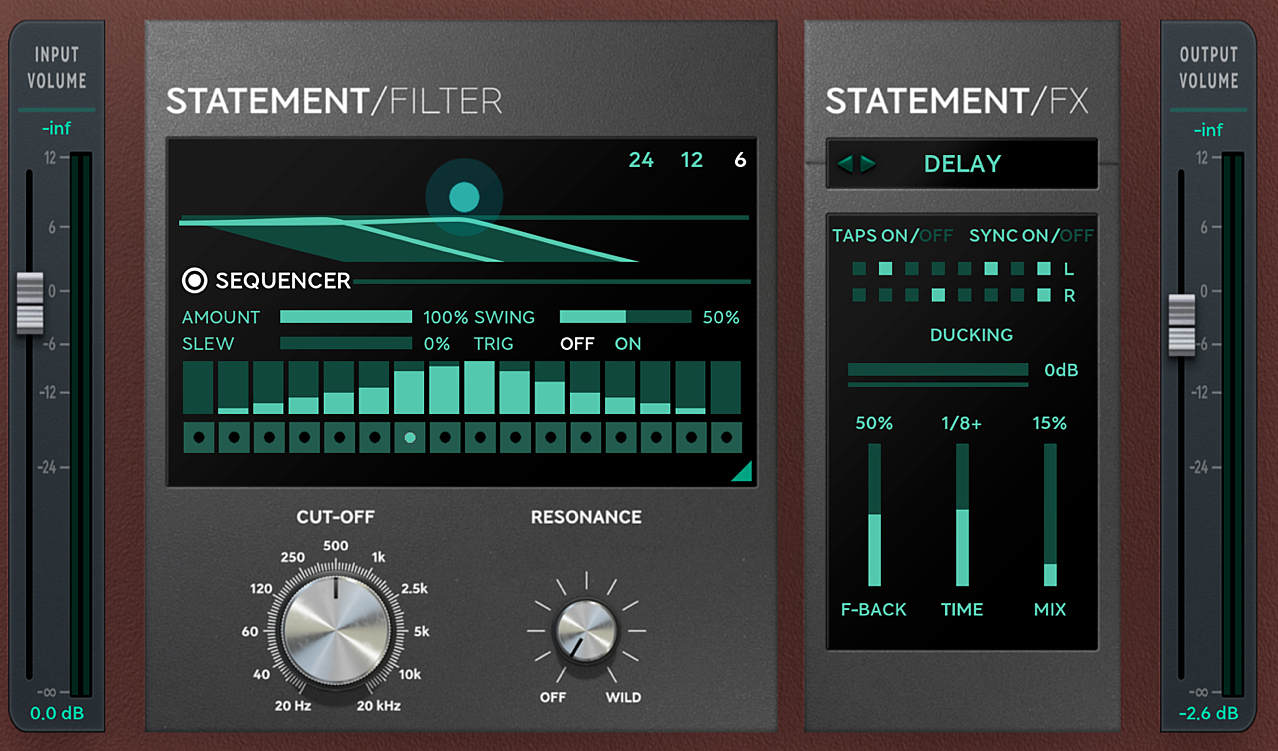
When purchasing this product, you automatically gain access to running two Statement Lead modules, the Statement Filter and the Statement FX, inside the Amp Room platform. The Statement Lead FX features five different FX types to choose from: Delay, Drive, Multiband compressor, Reverb, and Spatialization. These two modules can be matched and arranged together with any other native Amp Room module or other Amp Room-ready modules that you might own.
Tobias Menguser – Initial concept, multi sample sound recording, presets
Niklas Odelholm – Sound, visual and product design
Kristofer Ulfves – Project lead, presets, user manual
Erik Sight – Framework programming
Patrik Holmström – GUI programming
Filip Thunström – GUI programming
Jacopo Lovatello – DSP programming
Alexander Näs – DSP programming
Björn Rödseth – Programming, Mentoring
Arvid Rosén – Filter optimization
Maxus Widarsson – Quality assurance
Ulf Ekelöf – 3D graphics modeling
Klaus Baetz – Programming
Tord Jansson – Programming and GUI engine customization
Henrik Johansson – Testing, presets
Fredrik Mjelle – Testing, presets
Patrick Detampel – Presets
Erik Putrycz – Presets