User Manual
Model 72 Synthesizer System
Intro
Getting Started
Sound architecture
Tone generation & Mixer
Envelopes & Filter
Modulation
The Out section
The Keyboard
The Expanded View
Parameter description
The Expanded View Parameters
Creating sounds
Saving and loading sounds
Model 72 modules in Modular
Model 72 in Amp Room
Extended Features
Credits
Related manuals
Softube Model 72 Synthesizer System is our new fully modeled vintage monophonic synthesizer based a true legend in music instrument history. The hardware was originally launched in 1970 and totally changed the market for how synthesizers were perceived, making them finally accessible to the average musician. It was compact, powerful and easy to use. Our golden model left the factory floor in September of 1972, hence the name. This synthesizer contains plenty of analogue quirks such as excessive distortion in filter and amp when pushed, as well as organic and rich tone generation from its three oscillators.
Model 72 Synthesizer System is really two plugins – a Model 72 Instrument, to be used on instrument channels controlled via MIDI - and a Model 72 FX, which is to be added to audio channels in order to being able to use the filter external input.
Model 72 can be displayed in two different sizes, (one for without keyboard and one with keyboard). Change display mode in Model 72 via the checkbox “show keyboard” in the option menu and then closing and re-opening the plugin GUI.
When using Model 72 as an instrument solely for creating sounds, add the Model 72 Synthesizer System plugin to an instrument or MIDI track in your DAW. Now, either use a connected MIDI keyboard controller or edit notes in your DAW to play your plugin synthesizer. Model 72 will respond to the full range of your keyboard and can also be configured to respond to Velocity.
When using Model 72 as an audio processing unit, add the Model 72 FX version to your audio or mix track. The Model 72 FX version will load with Auto-Gate mode switch turned on, meaning that the incoming audio will trigger the envelopes when it exceeds approximately -18dB gain when the external input audio knob is set at 12 o'clock. The external audio input knob will of course change this when tweaked.
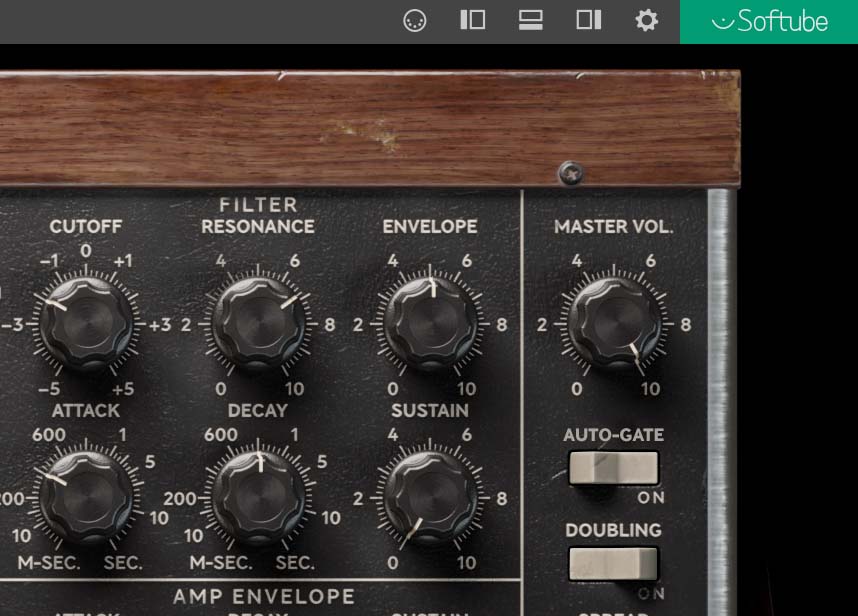
With the Auto-gate set to off you not hear anything until a note is played, just like the original hardware instrument - Model 72 needs to be played in order to open up its filter and amp and let the sound out. So you'll need to route an a MIDI channel to your effect and play a note in order to hear the sound be processed through. How this is done differentiates between different DAWs. Consult your DAW user manual to see how your DAW is setup. Here's two examples of how this is done:
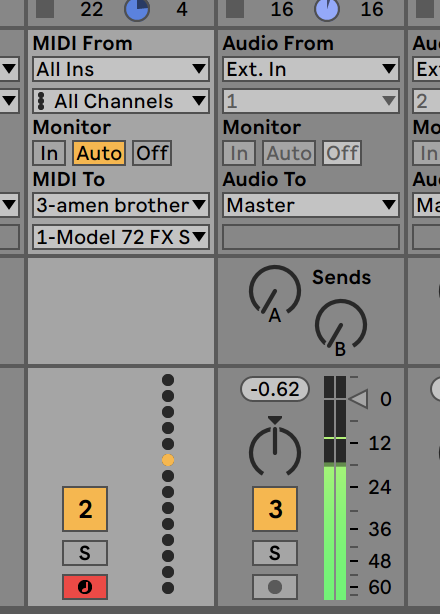
In Ableton live, add Model 72 FX to the channel with the audio-clip that you want to process, then add another, adjacent MIDI-channel to control the envelope. Route the MIDI-channel as pictured above in order to get your MIDI-information for the note-gates to Model 72 FX when you're playing.
In Logic – things are a bit different here. Here's what to do:
1. Create an audio track and import an audio file. Or optionally, route the output of the audio track away from the stereo bus (if you only want to hear the audio passing through Model 72 FX).
2. Create a software instrument track.Populate the software instrument track with Model 72 FX from the menu “AU MIDI controlled Effects”
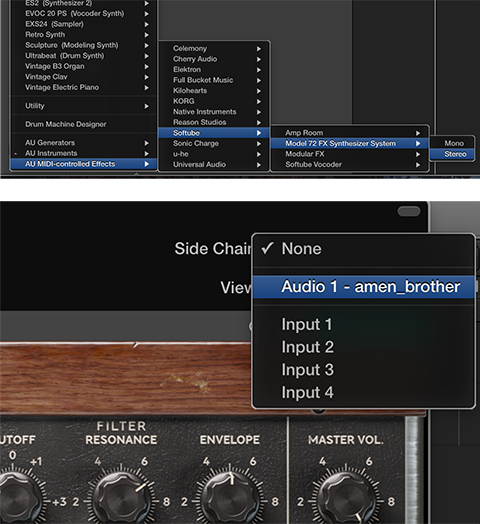
3. In the top-right corner of the instrument GUI, select “Side Chain”, then “Audio”.
4. Now, notes on the software instrument track will control the triggering of the envelopes of Model 72 FX that processes the sound from the audio-track.
You might already have noticed the difference between the Model 72 instrument plugin and the Model 72 FX version – Yes, the Model 72 instrument features a feedback path from the main output directly back into the external input, equivalent to connecting a cable from the hi gain output to the external input of the real hardware unit. This creates a roaring, raw and exciting feedback tone not found elsewhere.
The Model 72 is THE classic subtractive synthesizer. In fact, few might argue that the Model 72 hardware origins set the standard for how subsequently released subtractive synthesizers usually is setup. In a subtractive synthesizer you have at heart sound generation that creates harmonically rich content that then is filtered and amplified to form the final sound. The shaping of the sound is done with either momentous modifiers like Envelope generators or with periodically cycling modifiers like Low Frequency Oscillators (LFOs).

This is the heart of Model 72. The Tone generation section consists of three oscillators, top two of which are identical in terms of output waveforms and features. They are both linked to the incoming note-information and always tracks musically across 9 octaves.The third oscillator is a bit special since it can be unlinked from the incoming note-information and be used as a “freerunning” modulation oscillator with extended tuning range on the tune knob. This third oscillator also features slightly different waveforms (an inverted sawtooth instead of shark-fin).
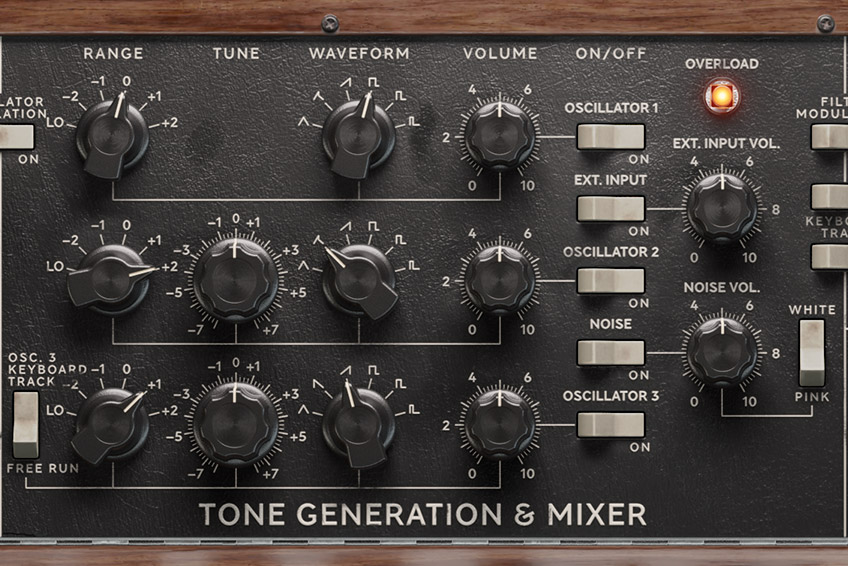
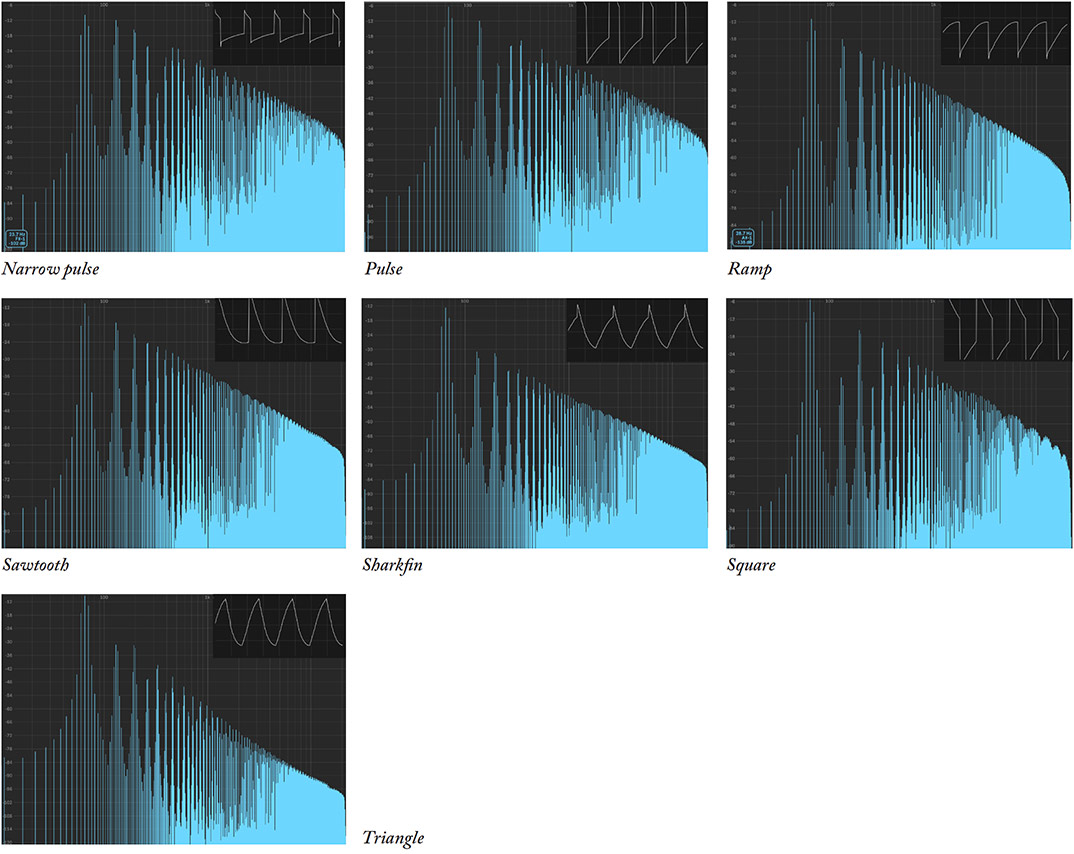
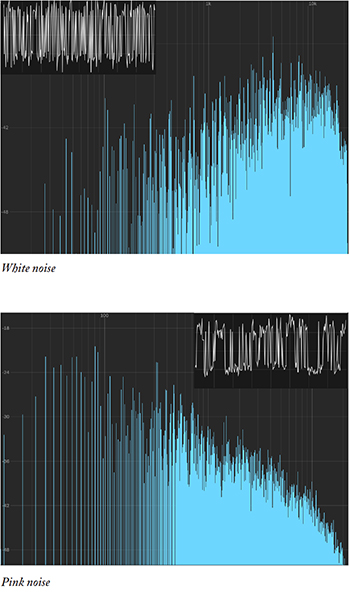
The mixer-section consists of five switches for turning on and off the different sound sources mix into the filter and amp section of the Model 72. Next to these five switches are the volume knobs, setting the mix volume for each sound component. Apart from the three oscillators mentioned above there's also a feedback path (or external audio input in the FX version) and a white/pink noise generator.
The next section to the right of the mixer is the Enve-lopes & Filter. The combined signals from the mixer enters the filter which is a voltage controlled 4 pole lowpass filter with resonance control (feedback). The filter cutoff frequency can be controlled via the cutoff knob but is also dynamically modified in real-time by the Model 72 different modulators. These are the dedicated envelope-generators in this section, but also the separate modulation section described below.
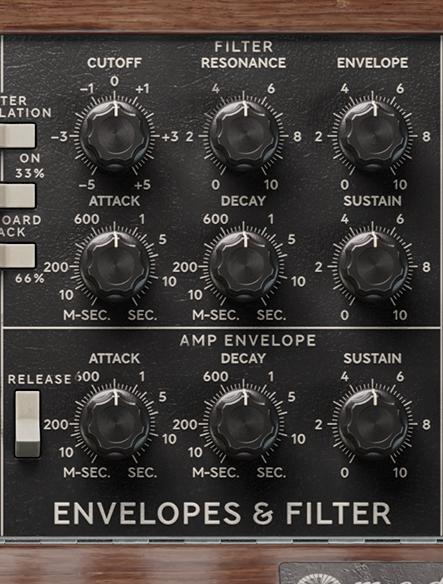
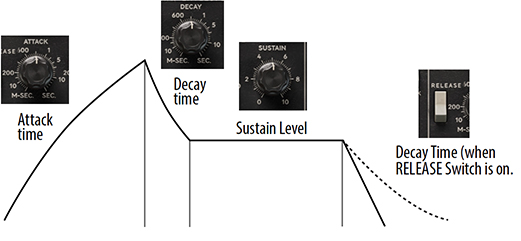
An Envelope generator is used to describe time-based changes in a sound. In the Model 72, the top envelope generator (marked by the attack, decay and sustain knobs) is used to shape the harmonic content of the sound. The bottom one, marked “Amp Envelope”, is used to shape the amplitude of the played sound. Both of these envelope generators are started when you play a note and will go through their individual phases in time set by the knobs.
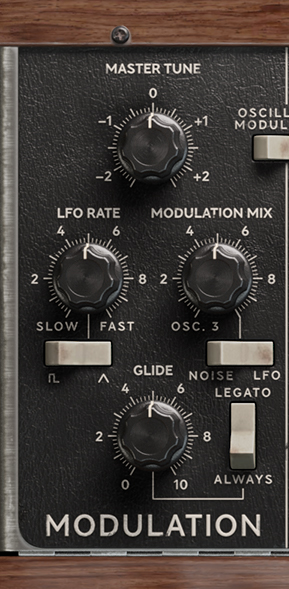
To the far left on the Model 72 panel we will find the modulation section. Here you'll find the master tune knob that sets the overall fine tuning of the Model 72 as well as the note glide rate and modulation mix. Apart from the classic options of using either the oscillator 3 output or the noise, we have also added a dedicated LFO (Low Frequency Oscillator) that can be used as an optional modulation source.
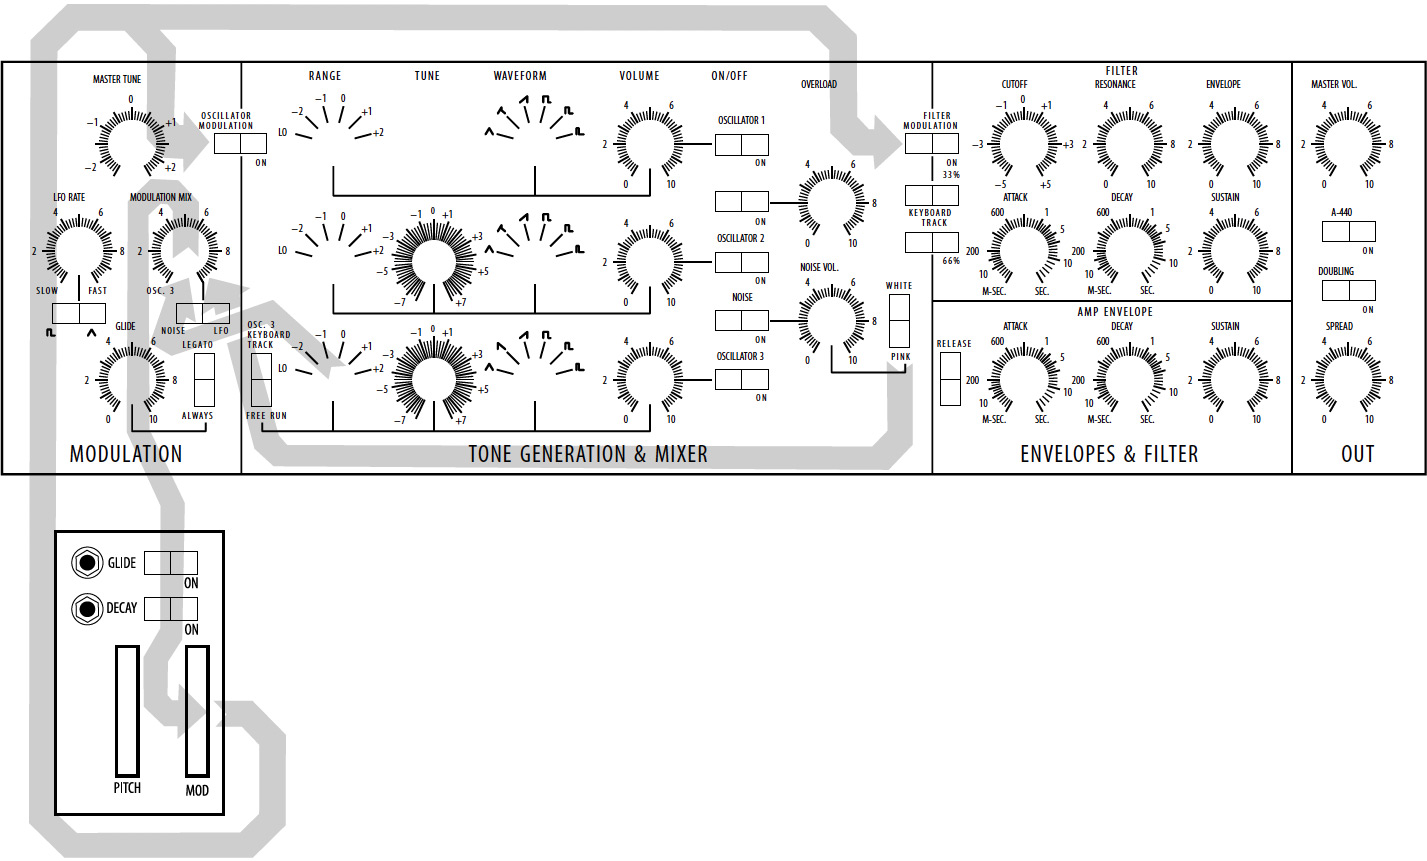
In the Model 72, all modulation is always routed through the modulation wheel which works as an at-tenuator – it will determine the amount of modulation distributed to the destination. Modulation in Model 72 can be routed to either oscillator pitch or filter cutoff frequency, or both at the same time if preferred.

On the far right of the panel is the output section. It contains foremost the Master Volume knob that controls overall output volume. Just below the Master Volume knob is the A440 button which is the tuning guide tone on and off. As implied by its name it turns on a 440hz (A4) sine oscillator that is used for swift tuning purposes. The A440 functionality is not available in the Model 72 FX version of the plugin as its position is repurposed for the Auto-Gate switch functionality (see above).
Below the A440 button is another switch: the Doubling feature and its associated knob, Spread. When enabled, this function will add the effect of having the notes played doubled by another Model 72 while the spread knob will set the how much this doubling will spread out in the stereo field.
Model 72 features an on-screen keyboard with the main purpose of fast and easy testing of sound from mouse-interaction directly on your screen. Without reaching for your midi keyboard you’ll have the possibility to trigger sounds off Model 72 with no effort. The built-in keyboard will play notes equal to a mid velocity(64) level, but cannot be recorded as automation, not does it send midi notes to your DAW.
The on-screen keyboard will also reflect incoming midi notes from your DAW when playing back a recorded or programmed note-sequence.
If you want to remove the keyboard from the Model 72 GUI, you can uncheck the “Show Keyboard” option in the options menu – the next time the plugin GUI is shut down and opened, Model 72 will show the minimal “panel only” GUI.

But wait – there's more! We have added another, “hidden” expansion panel that let you tweak some of the finer details of the oscillator behavior as well as some performance aspects of the Model 72. Click on the wooden board below the control panel (above the keyboard on the big GUI) and the slide-in expansion panel will pop up, revealing another 9 parameters for tweaking. The mouse-cursor will change from an arrow to a small pointing hand to indicate this click-area. Click just above or on the sides of the expansion panel to close it again. The state of this panel (open or closed) is remembered in your projects and saved presets.


Here follows a more detailed description of each knob and switch in Model 72:
Master Tune: This is the master tuning of the Model 72. It affects the pitch of all three oscillators as well as the key-board tracking of the filter (added feature from hardware). Range is up and down two and a half semitones which is great for fine tuning against the included refer-ence oscillator (see A440 switch). If greater adjustments or transpo-sition is needed, the pitch-bend wheel can be used for this purpose (see below).
LFO rate: This knob adjust the speed of Model 72's built in LFO (Low Frequency Oscillator) from a minimum speed of around 1/3Hz (knob fully counter clockwise) to maximum of around 100Hz (knob clockwise).
Modulation mix: Adjust the balance between the Oscillator 3 and Noise (or the optional LFO when selected by the Noise/LFO switch mentioned below) on the modulation bus.
LFO waveform: This switch sets the waveform of the LFO between Square and Triangle. The square waveform is great for automatic trills when modulat-ing pitch, while the triangle wave is better for vibrato.
Noise/LFO: This switch determines what the right modulation source in the modulation mix will be - Noise (as on the original hardware) or the optional LFO.
Glide: This knob will set the glide time between each note in normal (al-ways) or legato mode (see below). Glide is turned off when glide time is set to 0.
Legato: This switch turns glide legato mode on and off (always). In normal mode (always) glide will always occur between two played notes. Key priority mode will whether the overlapping notes will glide or not (see separate description below in the section of the expanded view).
Oscillator Modulation: This switch turns on or off the pitch-modulation to the oscillators. All modulation is routed via the modulation wheel and its effect will be different dependent on the type of modulation source (the mix of oscillator and noise or LFO), its modulation-rate and the amount.
Osc 1 Range: This knob dial will set the octave reference point for oscillator 1. The “0” position is the normal range (sometimes called “8´ range”) where an A3 midi-note will pro-duce a A 440hz note. The “-1” and “-2” position transposes the oscilla-tor one and two octaves below this respectively. Similarly, “+1” and “+2” position transposes the oscillator one and two octaves above the “0” position range. The “LO” position is special and places the oscillator five octaves below the “-2 range”, well into subsonic level.
Osc 1 Waveform: The waveform dial of oscillator 1 will enable you to choose which type of sonic character the oscillator will have. The different waveforms available are triangle, shark-fin (kind of a mixture between a triangle and sawtooth), sawtooth and then three different kinds of pulse waveforms ranging from square-wave (50% cycle) to two more narrow pulse-waves.
Osc 2 Range: This knob has the same functionality for oscillator 2 as the Osc 1 range has for oscillator 1, see detailed description above.
Osc 2 Tune: This knob is the individual tune knob of oscillator 2 and can be used to detune this second oscillator up or down seven semitones in relation to oscillator 1. Note that this knob add detuning in addition to Master tune and pitch-bend, which affects all oscillators.
Osc 2 Waveform: This knob has the same functionality for oscillator 2 as the Osc 1 Waveform knob had for oscillator 1, see detailed description above.
Osc 3 Keyb Tracking: This switch toggles Oscillator 3 between free-running mode (essentially a form of “unvoiced” mode) and keyboard tracking mode. When Oscillator 3 is in free-running mode it will not track the on-screen keyboard or incoming MIDI notes.
What would that be good for then, you might ask? Well, in the original hardware this was a way of using the oscillator 3 as a free-running modulator in “LO range mode” routed to the pitch of the other oscillators or the filter cutoff frequency. But of course you can also do this while in tracking mode as well, even when using in oscillator 3 in audible range! More of this later of course.
Good to know is that the range of the Osc 3 tune knob increases when free-running mode is enabled.
Osc 3 Range: This knob has the same functionality for oscillator 3 as the Osc 1 range has for oscillator 1, see detailed description above.
Osc 3 Tune: This knob has the same functionality for oscillator 3 as the Osc 2 tune knob has for oscillator 2, see above. A notable exception from this behavior is that the range of the Osc 3 tune knob increases when the free-running mode is enabled by the Osc 3 keyboard tracking switch turned off (see above).
Osc 3 Waveform: This knob has the same functionality for oscillator 3 as the Osc 1 Waveform knob had for oscillator 1 and 2, but with one difference: instead of the shark-fin waveform of oscillator 1 and 2, oscillator 3 has a ramp waveform. This is great for usage as a modulation source and also to counter the falling sawtooth in oscillator 1 and 2 – together they create a very nice “soaring” sound when mixed.
Osc 1 Volume: This is the mix volume knob for oscillator 1. It set the relative volume of the oscillator going into the filter.
Osc 1 Switch: This is the oscillator 1 on/off switch. When on, it enables the audio signal from the oscillator to enter the mixer.
Feedback/External Input Volume: This is the volume mix for feedback on Model 72 Instrument, or the external audio signal for Model 72 FX version.
When feedback is enabled (via the Feedback switch turned on) on the Model 72 Instrument version, this knob will control the volume of the feedback signal emulat-ing a cable connected between hi gain output of the hardware and external audio input. Feedback is thus very dependent on mixer level of the oscillators, filter settings and amp envelope. When feedback is turned up past 4 or 5, feedback will start to self-oscillate and create an uncontrollable feedback tone reflecting also the behavior of the hardware.
On the Model 72 FX version this knob will control the volume of the external audio fed into the filter of the Model 72. The preamp overload lamp will indicate when the signal clips although this distortion might also be regarded as desirable.
Feedback/External Switch: The switch adds the Feedback or external signal to the mixer (see further description above).
Osc 2 Volume: Same functionality as the volume knob for oscillator 1 but for the oscillator 2 audio level into the mixer.
Osc 2 Switch: This switch has the same functionality as the oscillator 1 on/off switch but for the oscillator 2. It enables or disables the audio from oscillator 2 reaching the mixer.
Noise Volume: This knob will set the level of the noise going into the mixer.
Noise Colour: This switch sets the which type of noise is being used (also for modulation), White or Pink. White noise in the Model 72 is more focused on high end frequencies, while Pink noise have more focus in the low frequency areas.
Noise Switch: Enables or disables the audio from the noise generator to reach the mixer.
Osc 3 Volume: Same functionality as the volume knob for oscillator 1 but for the oscillator 3 audio level into the mixer.
Osc 3 Switch: This switch has the same functionality as the oscillator 1 on/off switch but for the oscillator 3. It enables or disables the audio from oscillator 3 reaching the mixer.
Filter Modulation: This switch enables the modulation bus, the mixed and damped modulation signal, to reach and control the cutoff frequency of the filter. All modulation is routed via the modulation wheel and its effect on the filter will be different dependent on the type of modulation source (the mix of oscillator and noise or LFO), its modulation-rate and the amount. For example a medium rated LFO can be used to create a auto-wah effect being routed to the filter, while a audio-rate oscillator routed to the filter can create a distortion type of effect.
Cutoff Frequency: This knob is the most important knob in the filter section. It controls the filter cutoff frequency which is the roll-off point of the lowpass filter in Model 72. The cutoff frequency also represents the reference point to which all other kinds of modulation (keyboard tracking, the envelope generator and the modulation from modulation bus), are added to.
Resonance: This controls the internal feedback of the filter itself. Higher feedback creates a resonant peak around the cutoff frequency of the filter which at a certain point (resonance set to about 8 or 9) starts to self-oscillate. The self-oscillation itself creates a nice sine-oscillator that can be tuned and played via the keyboard tracking of the filter (see below).
Envelope Amount: This knob will set the amount influence the filter envelope genera-tor will have on the cutoff-frequency. The more envelope amount, the more the filter will open up with the attack, sustain and decay phases of the envelope. When adding midi velocity to envelope amount (via the expanded view), this knob will also mark the maximum value the envelope will influence the filter cutoff.
33% Switch: This switch turns on 1/3 of the tracking of the keyboard to the filter cutoff. Keyboard-tracking means that higher notes will open up the lowpass filter to let the upper harmonics out. When combined with the 66% switch this will have the keyboard-tracking at 100%, meaning that the filter cutoff fully tracks the notes played (you can even play on the self-oscillating filter itself ).
66% Switch: This switch turns on the remaining 2/3 of the tracking of the keyboard to the filter cutoff. Effect on this switch by itself is twice as much tracking as the 33% switch but still not 100%. Combine this with the 33% switch to have the keyboard-tracking at 100%.
Filter Attack: The filter attack knob controls the time of initial “rising” phase of the filter envelope generator. It opens up the filter and ranges from very fast to around 10 seconds.
Filter Decay: This knob controls the time of the “falling” decay phase of the filter envelope generator. It can be heard as a gradually dulling effect as the filter closes and ranges from very fast to around 50 seconds at maximum. It will also dictate the release time of the filter envelope when the release switch is enabled (see below).
Filter Sustain: The filter sustain level is the “hold level” phase in the envelope generators of the Model 72. It defines the level at which the cutoff frequency is held until the note has ended (key is released). A little known fun fact is that the sustain level change rate is determined by the decay setting – this can be heard when changing the sustain level of the filter while holding down a note.
Release Switch: This switch affects both the Filter Envelope generator and the Amp Envelope generator. It turns on the release phase of both Envelope generators which are controlled by each decay knob (Filter Decay and Amp Decay). When this knob is turned off, the release time for both envelopes will be set to zero (instant decay).
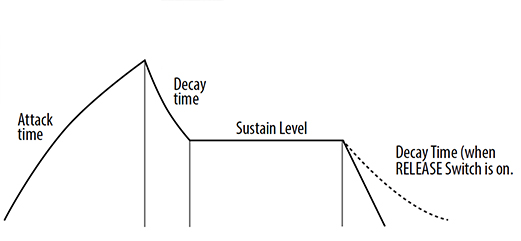
Amp Attack: This knob controls the time of initial “rising” phase, the attack of the Amp envelope generator. It ranges from very fast, instantly hear sound set to minimum, to a smoother around 10 seconds long crescendo at maximum.
Amp Decay: This knob controls the time of the “falling” decay phase of the amp envelope generator. Amp decay can be heard as a change in volume as the sound gradually diminish in amplitude down to the level set by the sustain knob. The amp decay times of Model 72 ranges from very fast (instant), to around 50 seconds at maximum. It will also dictate the release time of the amp envelope when the release switch is enabled (see above).
Amp Sustain: The amp sustain level determines the “hold level” phase of the amp envelope and that means that it defines the volume level at which the sound will be held at after the initial attack and decay phases. The amp envelope generator will hold the amplitude at the same level until the note / key is released. The same rules for the rate of change while tweaking the amp sustain level applies as described in the section about the filter sustain knob (see above).
Master Volume: The master volume knob determines the overall output level.
A440 Switch: This is the reference tuning oscillator for Model 72. It plays an A at 440hz – great for tuning those complex FM modulated sounds! This switch turns it on and off. The A440 functionality is not available in the Model 72 FX version of the plugin as its position is repurposed for the Auto-Gate switch functionality (see above).
Doubling Switch: This switch turns on the doubling feature of Model 72. This emulates a doubling of the played baseline or lead-synth or whatever you’re playing.
Doubling Spread: This is knob determines the width of the doubling when enabled It goes from full mono at minimum, to fairly wide stereo spread at max. This knob will have no effect when the doubling switch is set to off.
Pitch bend: The pitch bend wheel is unspringed just like the hardware original and can be used to transpose the whole keyboard. This in collaboration with the built-in tune oscillator (A440hz) comes in handy.
Mod Amount: Modulation is an integral part of the Model 72 sound, so always remember that it is routed through the modulation wheel which sets the modulation amount. Both pitch and mod-wheels are parameters and thus saved as part of your project or preset.
By clicking on the wooden board below the panel (or below the keyboard in the big GUI), the bottom expander panel with additional “pro-tweaking options” becomes accessible. They are:
Slop: This parameter emulates the slow temperature drift of the individual oscillators on a vintage instrument over time. A low value is near ideal (no drift) and then go some 0.5 semi out of tune when reaching max, excessive drift.
Octave Trim: This parameter is to emulate the accuracy of the global octave trim for the octave switches of the original hardware. This is a global multiplier for CV that is applied to the octave offset so that at zero, octaves track 100% correct, but at max octaves for all three oscillators stretch slightly more that 1 v/oct.
Stretch Trim: This parameter is designed to emulate the CV/octave fine trim stretch for each oscillator. This is a per oscillator multiplier for CV applied to the CV tracking much a like how the octave trim works. Difference is that this stretch is a bit different per oscillator. A low value goes from ideal trim and then go some 0.1 - 0.2% out of tune when reaching maximum setting.
Velocity to Filter: This parameter determines how MIDI note velocity will map to the filter cutoff frequency. A low value (minimum) on this parameter will have no effect and then scale up linear to at max, full velocity to cutoff scaling is obtained.
Velocity to Amp: This parameter will determine how MIDI note velocity till map to the amplitude of the Model 72. Low value (minimum) will have no effect and then scale to a linear to maximum where full velocity will affect amp scaling so that MIDI velocity 0 will be totally silent.
Velocity to Filter Envelope: This parameter determines how MIDI note velocity will map to filter envelope amount. A low value here will have no effect and then scale up linear to max where full velocity will affect filter envelope amount at 100% (which means what the Filter Envelope amount knob is currently set to).
Key Priority: This parameter can be set to high, low or last and determine when which note have priority over another when multiple notes are played. It will also how legato portamento is applied.
Envelope Retrig: This parameter determines when the envelope generators is re-triggered Normally - on the original hardware, the envelopes does not re-trig on when playing multiple notes at once (legato). Retrig is the option to have each note to restart the envelopes, regardless if one or more keys are playing at once.
Pitch bend Range: This parameter will set pitch bend range up and down from minimum of a +-2 semitones to maximum of +-12 semitones.
When creating sounds with Model 72 it is crucial to un-derstand the fundamentally separate signalflows of the audio and modulating signals in the sound architecture. By understanding it is easier to new angles to a seemingly simple synthesizer. I want to share a few tips and tricks for your enjoyment:
pseudo PWM
Although Model 72 has different set pulse-waves of three different width, you might sometimes miss a feature more common in other subtractive synthesis: Pulse Width Modulation (PWM). This is a feature where the width of the pulse is changed by a external modulator at variable speed. Model 72 does not have PWM, but you can create a sound very similar to this by mixing the sawtooth waveform of oscillator 1 or 2 with the ramp waveform of oscillator 3 tuned very close in pitch. With very close pitch ratio you'll get a slow PWM like phasing, while detuned slighly more apart will get you a faster pulse modulating rate. One disadvantage of this method vs proper PWM is of course that the modulation rate is pitch-dependent and that modulation amount is hard to properly govern.
FM
By using Oscillator 3 as modulation source while in audio-rate, modulation applied to the pitch or the filter cutoff will create interesting harmonic or dis-harmonic overtones by the means of linear frequency modula-tion. To synthesize harmonic sounds, the modulating oscillator must have a harmonic relationship to the original carrier signal, in this case oscillator 2 and 3. As the amount of frequency modulation is increased (by the modulation wheel), the sound grows progressively complex. By modulating oscillator 1 and 2 with oscillator 3 set to frequencies that are non-integer multiples of the those frequencies, inharmonic bell-like and percussive spectra can be created. The disadvantage of using linear frequency modulation in the Model 72 is that the pitch the modulated oscillator is easily detuned out of range. This is when it is great to have the a440 reference oscillator close at hand to tune the sound back into normal usability with master tune and/or the pitch-bend wheel.
Filter FM distortion
Using oscillator 3 again as an audio-rate modulator, introducing modulation to the filter creates a kind of nice distorted sound.
Using the Filter as oscillator
The filter itself can act as an oscillator while in self-oscillation. Turn up the resonance beyond 8 and the filter itself can be used as a nice sounding sine-oscillator that, when keyboard-tracked (using the 1/3 and 2/3 switches) can be used for everything from haunting theremin-like lead sounds to subwoofer base sounds.
Chords
The fact that Model 72 has three oscillators lends it well to create monophonically controlled chord sounds. Set up a minor chord easily by clicking on the +7 label beside the oscillator 3 detune knob and +3 label beside the oscillator 2 detune knob.
Click here for more information about Preset Collection.
Saving and recalling your own or other sounds is very simple in Model 72. In the top left corner of the plugin window is the preset display window and just to the left of that are the two buttons for next and previous preset quick browsing.
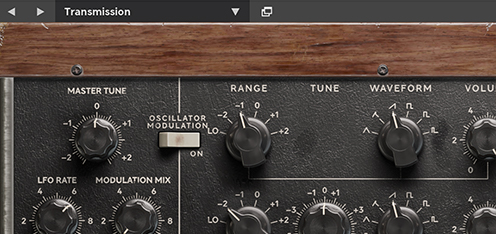
When clicking on these you will scroll back and forth in the list that is selected and filtered in the preset collection browser.
The preset collection browser window is quickly open by clicking on the window symbol to the right of the small preset name display. For details about Preset Collection see the separate chapter. When browsing the presets for Model 72, please note that there are separate presets for the Model 72 Instrument and the Model 72 FX version. While the presets for Model 72 Instrument are playoriented the presets for Model 72 FX are audio-processing oriented and won't probably sound at all before adding audio that is processed through it while playing it.
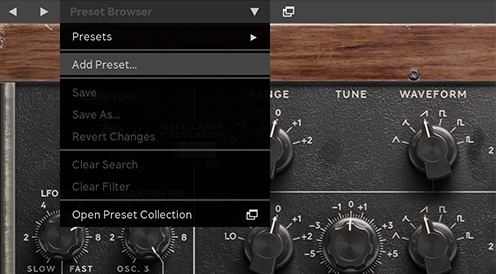
When you have created a really great sound that you want to save, simply click on the drop-down arrow just to the right of the preset display window and choose Add preset or Save as – you'll now be promted to give your preset a name (the same procedure can of course also be performed in the preset collection by itself ) and press enter to save it.
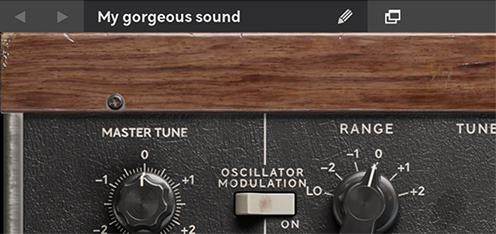
Your preset has now been saved and can found among the user presets in Preset Collection. You can even share it with your friends by exporting it along with other presets as a separate “.softubepreset”-file. Details about this can be found in the Preset Collection chapter.
When just tweaking a sound you'll notice that the name will get an * addition after the name, indicating that this preset has been changed from its saved state. If you want to save those changes simply choose “save” in the preset dropdown menu.
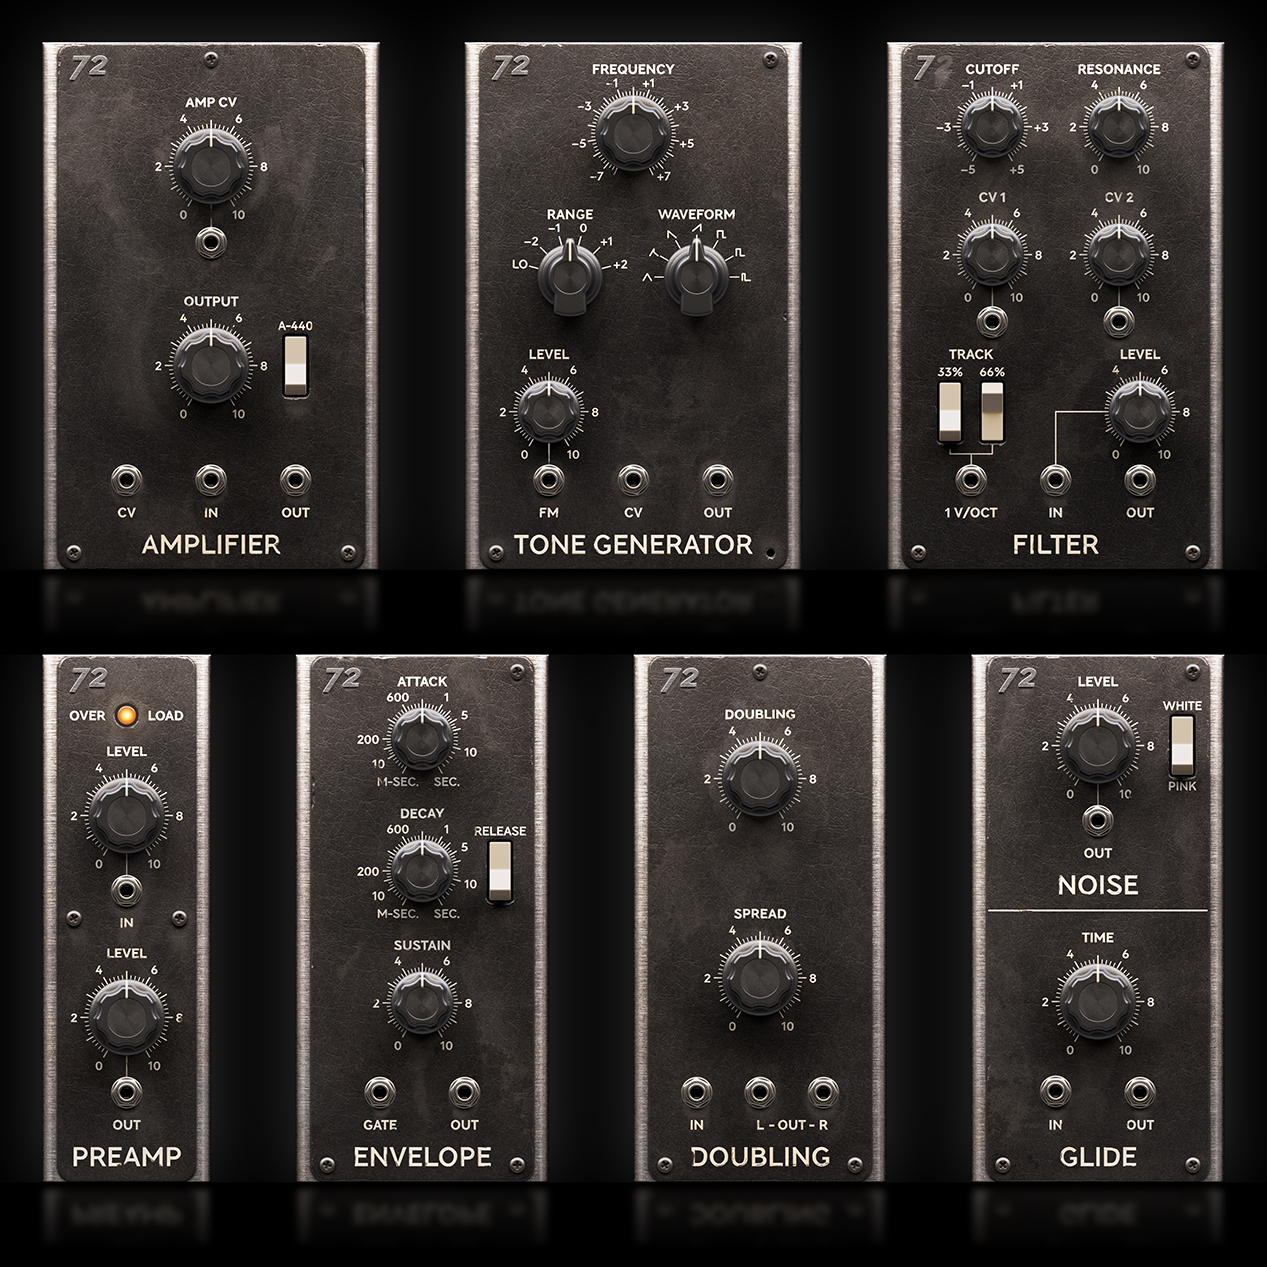
When you purchase Model 72 Synthesizer System, you're also purchasing the possibility to use all the dif-ferent components of Model 72 in our modular platform Softube Modular! There are seven different modules for you to use in Softube Modular: Tone Generator, Amp, Filter, Envelope, Noise/Glide, Doubling and Preamp. Here's a brief description of them:
Model 72 Tone Generator
These oscillators a lot hotter than the Doepfer VCOs included in Softube Modular. In order to get correct gain-staging, use a mixer or gain module to get the to perform well with the other modules in Modular. The depiction of the waveforms on the panel reflects the same error (flipped waveforms) as on the original hardware and includes all seven waveforms used in Model 72. The FM jacks are AC coupled and thus are not suited for static CV like sequencer data.
Model 72 Amp
This amp does not only amplify - it distorts audio as well. The top CV jack is prepatched to 7.5v when no cable is inserted, this voltage is scaled through the Amp CV attentuator potentiometer. Additional CV (from for example an envelope) need to be inserted at CV in order for the Amp to amplify/pass audio.
Model 72 Filter
This classic fat lowpass filter selfoscillates when it goes past 8 and can track 1 v/octave fairly well when 33% and 66% switches are both engaged – they actually represent 1/3 and 2/3, but hey - the panel was not big enough for all decimals. Observe that the level knob is actually dampening for the input.
Model 72 Envelope
A gate above 0.66V in the gate jack activates the envelope. The decay knob also sets the release time when release switch is set to on (same functionality as in the Model 72 plugin). Release time is set to zero when the Release switch is turned off.
Model 72 Noise/Glide
This module consists of two parts – a white and pink noise generator, and a glide buffer. The white noise outputs far from ideal white noise but based upon performance of the original circuitry. Same goes for the Pink noise of course. The glide buffer is mainly designed for slewing control voltages but can of course be used to slew anything.
Model 72 Doubling
This essentially the same effect from the standalone Model 72 plugin but here this effect can be set gradually with the Doubling knob and the spread knob will expand the effect in stereo.
Model 72 Preamp
This is the preamp for external audio from Model 72, it gives a very nice distortion when pushed.
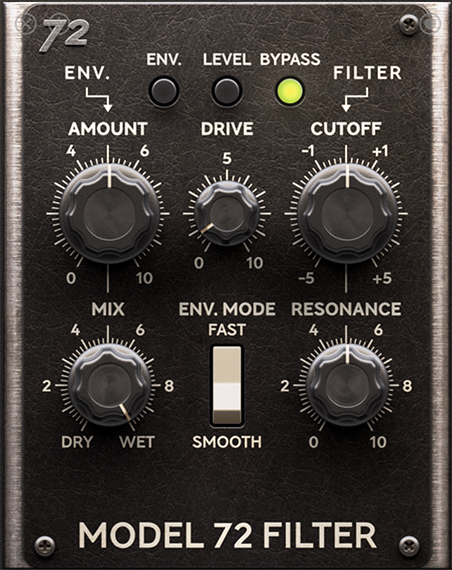
Ever wanted some lush, warm and focused distortion or perhaps modulated sounds that you just can’t seem to achieve anywhere? Then look no further! From the Model 72 Synthesizer System comes a great addition to the Amp Room platform:
The Model 72 Envelope Filter module. The Model 72 pedal is pretty straight-forward in its design, but here are the basics; the Amount knob con-trols how much of the envelope signal is used to open and close the filter and the Drive knob controls the input gain. The Cutoff knob opens and closes the filter, regulating the number of overtones that are let through. The Resonance knob changes the shape of the frequency response (the module starts to self-oscillate above 8) and the Smooth/Fast switch determines whether the enve-lope signal is smoothed out or not. For something like drums the Fast setting would be recommended, but for a guitar or bass Smooth would be the go-to setting.
Then again, experimenting is what this pedal is all about!
A whole range of added control can be accessed with Extended Features. Please see the separate "Extended Features" manual for more information.
Kristofer Ulfves – Project lead, sound design, presets, user manual
Jacopo Lovatello – Tech lead, DSP models
Anton Eriksson - DSP models
Erik Sight – UI programming
Patrik Holmström - UI programming
Nis Wegmann – GUI design
Tord Jansson – programming and GUI engine customization
Maxus Widarsson – Deep testing, Qualification
Henrik Johansson – Testing, presets
Fredrik Mjelle – Testing, presets
Pontus Hagberg – Testing, presets