User Manual
Overstayer M-A-S and Overstayer M-A-S Extended
Overstayer M-A-S
Overstayer M-A-S Extended
Overstayer M-A-S for Modular and Amp Room
Block Diagram
Modeling notes
Extended Features
Credits
The products from Californian high-end gear designer Overstayer Recording Equipment are often referred to as the “hidden gems” that every high-end studio uses, but no-one on the outside knows about. And it is indeed harder to spot a single rack unit M-A-S in studio photos than other more extravagantly looking units. But now that you know what to look for, we’ll sure you will see it everywhere.
The M-A-S is about subtle saturation. The hardware manual states it “rounds and bends peaks resulting in increased apparent volume, without the timing artifacts associated with compression”. It was designed to be used across the board for cumulative benefits, to add consistency and balance by rounding off peaks and harsh transients, thus making it easier to glue the mix together.
”Use it on the individual tracks for cumulative benefits. The M-A-S can add consistency as peaks and harsh transients get smoothed and absorbed into the performance, making balancing tracks in the mix easier, and lessening the need for bus limiting down the line. Used on a full mix, the added harmonic content can energize, and add cohesiveness and detail. The Mix control allows the character to be balanced to taste.” (From original hardware manual.)
M-A-S and M-A-S Extended
Included in the purchase are two variants of the M-A-S: the easy-to-use M-A-S, and the tone sculpting monster M-A-S Extended. Both units were modeled from the original hardware M-A-S but have added features. For DAW flexibility we’ve added auto-compensated levels on the Input (“Auto Gain” and “To Dry”), more precise saturation meters, plus the five new emphasis modes in addition to the original “Classic M-A-S” mode.
On the M-A-S Extended we added a fully flexible emphasis equalizer, along with sweet 12 dB/octave Low and High Pass Filters.
In a mix, it’s easier to pull up the small M-A-S on every track, select a suitable Emphasis Type and just go with it. For tracks that require more precision or creative control, such as an 808 kick or lead vocals, use the M-A-S Extended to fine tune the sound of the saturation.

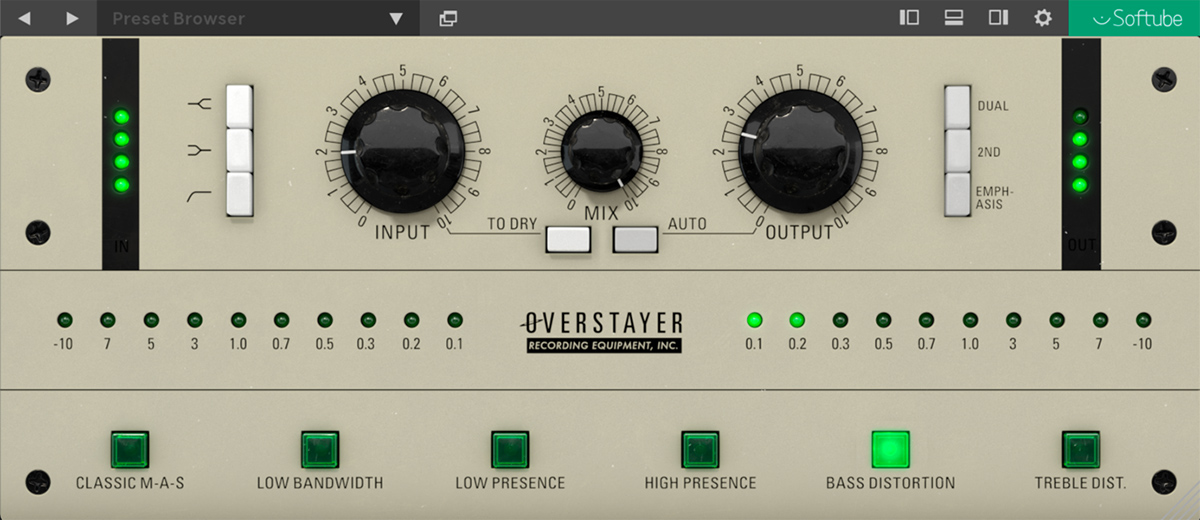
Figure 1. Overstayer M-A-S. At the top you have the original unit, and at the bottom the additional emphasis types.
The M-A-S amp stages have a very wide range (sweet spot) from where they start to work to where they clip hard. The horizontal LED meters indicate this range, the first LED indicates bending starting to happen, low order harmonic color is present even on signal levels below this point.
It is important to note that depending on the Emphasis Type setting and input audio material, the operating range can change. You will probably have to adjust the Input when changing Emphasis Type in order to achieve the same amount of saturation.
The circuitry can be very forgiving, and fast transients can be rounded with little perceived distortion. We find it useful to experiment with transient and steady signals to get a feel for how far it can be pushed in either scenario.
To get to know the unit, you can start by adjusting the Input control to get a feel for how the circuit reacts. Auto Gain is enabled by default, so you don’t have to compensate the gain with the Output knob. This will give a feel of how far it can be pushed without becoming overtly distorted, and give a feel for the increased average volume.
The EQ and filter boosts (the white buttons to the left) are before the M-A-S’s saturation stages and the affect the harmonics, so experiment with engaging them at different levels of Input drive. The high pass filter cuts out subs but adds a resonant peak at 50Hz.
Depending on the source material, the Dual and 2nd modes can be subtle or more apparent. Experimenting with individual instruments here can reveal the character these provide.
The different Emphasis Types will radically change how the M-A-S reacts to the incoming audio, and is also dependent on the incoming audio level. The Classic M-A-S setting will for example sound more bass heavy the more you push it.
Since you can load M-A-S into Amp Room, you can get a sense of what the M-A-S does by playing an instrument through it. Feel how it pushes back a bit and can be very amp-like.
High Shelf: 2 dB high shelf boost at 2 kHz.
Low Shelf: 2 dB low shelf boost at 100 Hz
Low Cut: 12 dB/octave high pass filter with a resonant peak at 50 Hz.
Input: Sets the input gain and the amount of saturation.
To Dry: Applies the same gain to the “dry” signal as the “wet”. Very useful when you use wet and dry a lot.
Auto Gain: Compensates for the input gain on the output, so that the apparent audio level remains the same.
Mix: Sets the balance between the processed audio (wet) and the clean audio (dry). You can for example blend the dry audio with a heavily saturated wet signal in order to restore some of the transients that were lost in the saturation.
Output: Sets the output gain.
Dual: Adds a second discrete stage in series to the signal path spreading the load amongst both stages, creating a more complex harmonic character.
2nd: Shifts the response of the circuitry to have stronger second harmonic content.
Emphasis On/Off: Engages the emphasis circuits, and the six different emphasis types listed below.
The Dual and 2nd buttons will both add more second harmonics, and will brighten up the distorted sound a bit. If your vocals get too dull after distorting it, engage the Dual mode to get more life back.
Emphasis Types
Classic M-A-S: Sets the curve of the harmonic content, shifting the focus to the middle and upper ranges, and allowing fundamental frequencies to remain un-clipped.
Low Bandwidth: High and low frequencies will distort first, leaving the mids unaffected. This is useful for getting a sound to sit in a mix. On a full drum kit, this will distort the kick drum and start to sound almost like a broken boom box.
Low Presence: Emphasis on the vocal frequencies in the upper mid range to give some clarity.
High Presence: Emphasis on the vocal frequencies in the lower high range to add some air and shimmer to the sound.
Bass Distortion: Thin out the bass while keeping the highs unaffected. Can sound transformer-like on bass heavy audio material.
Treble Distortion: Almost a tape like sound, where the rough edges on the harsh transients will be smoothly rounded down. It’s also similar to how the human ear perceives the frequency spectrum, so with this setting it sounds like all frequencies are affected equally, while in fact the high frequencies are affected more.

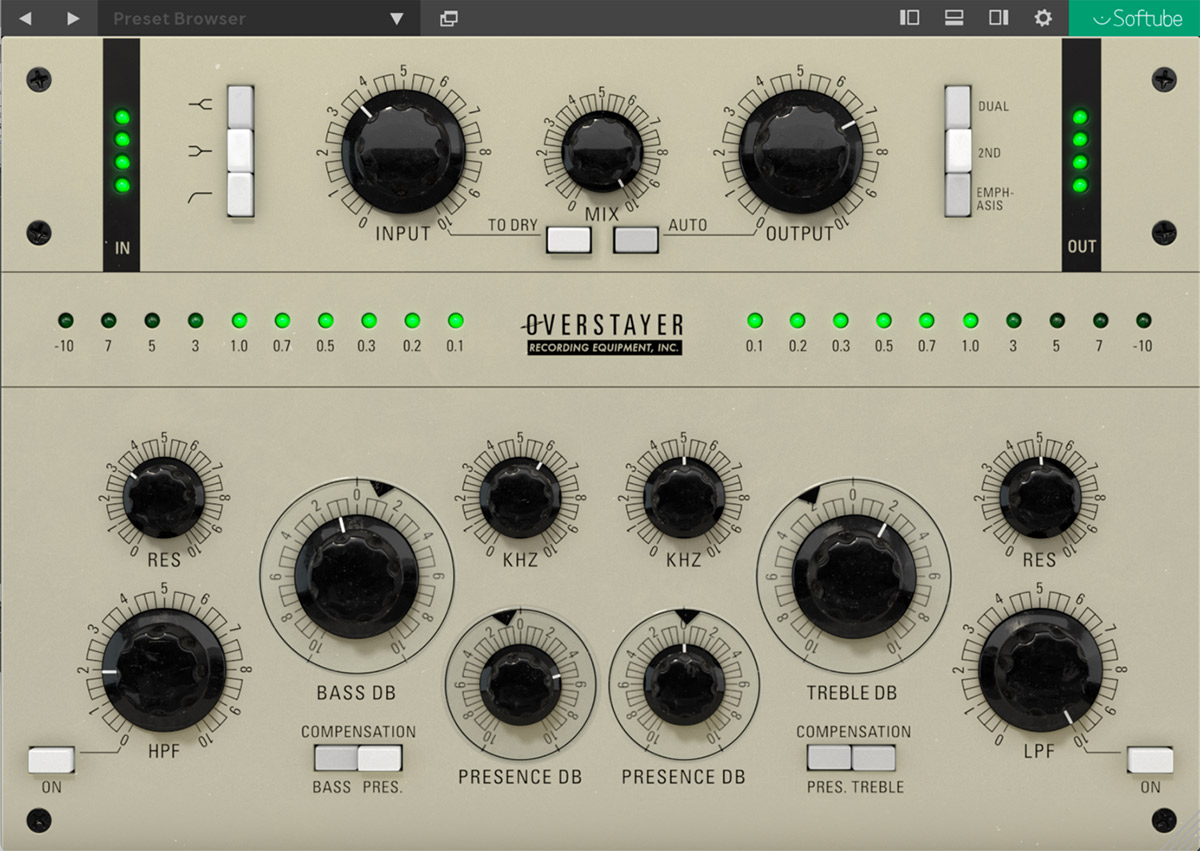
The extended version of M-A-S has the same sound, and consists of the same algorithm as its smaller brother, but instead of having six predefined emphasis types, you are able to sculpt the emphasis freely.
The lower part of the M-A-S Extended can be engaged by clicking on the Emphasis button.
Filters
The filters are 12 dB/octave resonant filters before the M-A-S saturation. These filters are not compensated for and are “just” normal filters. However, to use them you need to engage the lower section with the Emphasis On/Off button.
HPF On/Off: Engages the high pass filter
HPF Frequency: Sets the cut-off frequency of the high pass filter (20 Hz to 2 kHz)
HPF Res: Sets the resonance of the high pass filter.
LFP On/Off: Engages the low pass filter
LPF Frequency: Sets the cut-off frequency of the low pass filter (200 Hz to 20 kHz)
LPF Res: Sets the resonance of the low pass filter

Figure 1. The resonances of the HPF and LPF filters go from smooth (at 0), to a slight 1 dB bump at 12 o'clock, all the way up to an emphasized 3 dB bump when it is at its max position.
Emphasis Equalizer
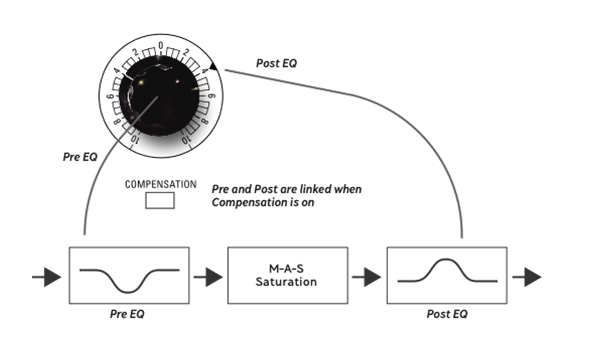
The emphasis equalizer consists of four bands before the saturation, and four complementary bands after the saturation. Boosting a frequency using the black bakelite knobs will automatically cut the same frequency after the saturation, so that the total equalization equals out. With a high amount of saturation, you will start to hear a tonal coloration from the EQ, coming mostly from the complementary EQ after the saturation.
The idea of emphasis equalization is to alter the frequencies that the saturator sees (or hears?), much like doing sidechain filtering on a compressor. The sound of the emphasis filters are thus more about how the saturation sounds, rather than how the filters in themselves sound.
The black bakelite knobs are the main EQ controls, and the outer ring is an indicator for what the complementary post equalization is set at. If you want to control the pre and post bands independently, turn off the Compensation button below the band. The outer ring (post EQ) can now be adjusted like a normal control.
Boosting a band can have a counter-intuitive effect! By boosting a band you will make that band distort more, which can lower the output volume of that band. To “emphasize” a frequency, you often have to do the opposite: for example lowering the gain of the bass band in order to emphasize the bass frequencies.

Figure 2. Each EQ band consists of two controls, the black "pre-EQ" and the outer disc ("post EQ"). With Compensation=ON, the outer disc will always be set to the inverted value of the pre-EQ. Turn Compensation OFF to adjust both controls independently. The sum of the two curves will be a flat, uncolored, EQ curve.
Bass dB Pre (black knob): Sets the gain of a fixed low shelving filter pre-saturation. If Bass Compensation is ON, it will also set the outer disc to the inverted (complementary) value. The center frequency is placed at 150 Hz.
Bass dB Post (outer disc): Sets the gain of a fixed low shelving filter post saturation. Is automatically controlled when Bass Compensation is ON.
Bass Compensation: Turn on to automatically set the complementary band (the “Post EQ” band).
Presence 1 (kHz), Presence 2 (kHz): Set the frequency of the peaking filter. Both presence bands are equal, and they range between 50 Hz and 20 kHz in 21 fixed positions.
Presence 1 (dB) Pre, Presence 2 (dB) Pre (black knobs): Sets the gain of the peaking band pre-saturation. If compensation is on, it will automatically set the post EQ band (outer disc) to the complementary (inverted) value.
Presence 1 (dB) Post, Presence 2 (dB) Post (outer discs): Sets the gain of the peaking band post-saturation. Is automatically controlled when the compensation buttons are engaged.
Presence 1 Compensation, Presence 2 Compensation: Turn on to automatically set the complementary band (the “Post EQ” band).
Treble dB Pre (black knob): Sets the gain of a fixed high shelving filter pre-saturation. If Treble Compensation is ON, it will also set the outer disc to the inverted (complementary) value. The center frequency is set at 7.5 kHz.
Treble dB Post (outer disc): Sets the gain of a fixed high shelving filter post saturation. Is automatically controlled when Treble Compensation is ON.
Treble Compensation: Turn on to automatically set the complementary band (the “Post EQ” band).
If you just need a bit of air on the track, turn off compensation on the treble band and increase the gain of the Treble dB Post to use it as a regular EQ after the M-A-S processing.
Overstayer M-A-S for Modular and Amp Room
The Overstayer M-A-S is also available as a module in both Modular and Amp Room, providing the same functionality as the plug-in counterpart. Using M-A-S in Modular as the “final stage” before input will thicken up your synth parts. In Amp Room, it’s lots of fun to play around with M-A-S both as a boost pedal before a guitar amp, but also as a finalizer to get your guitar track to sit in the mix.
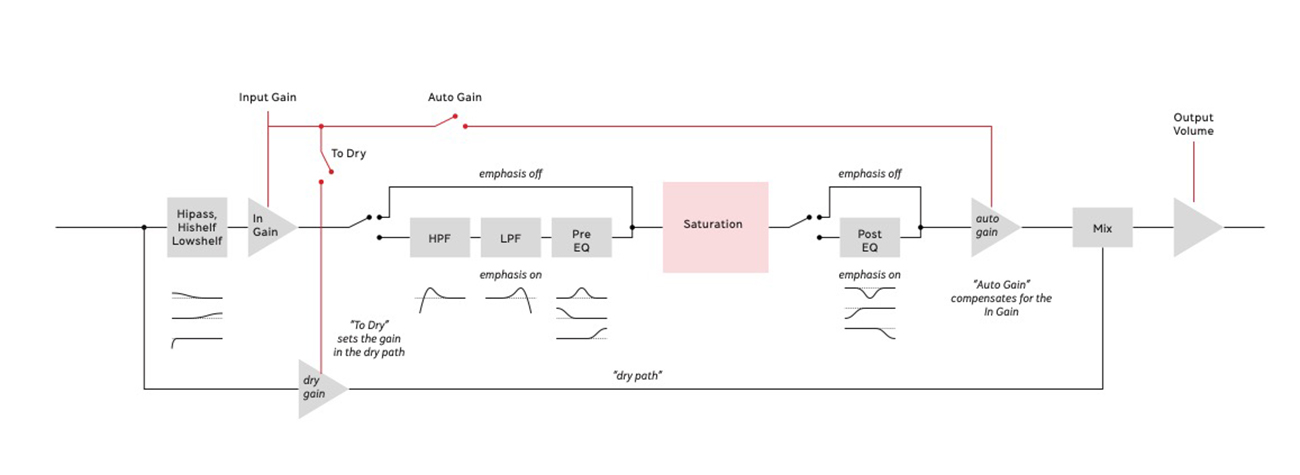
A functional block diagram of the Overstayer M-A-S and M-A-S Extended. The pre- and post EQs are preset by the Emphasis Type settings in M-A-S, and fully flexible in M-A-S Extended.

Figure 2. Functional block diagram for the M-A-S and M-A-S Extended.
The original hardware contains an OP-amp circuit for safety clipping of extremely loud input signals. That circuit has been omitted in the plugin after careful consideration together with Overstayer.
A whole range of added control can be accessed with Extended Features. Please see the separate "Extended Features" manual for more information.
Anton Eriksson – modeling
Niklas Odelholm – software product design, sound design, user manual
Björn Rödseth – framework programming
Filip Thunström – framework programming
Nis Wegmann – algorithms
Erik Sight – UI programming for Modular
Pelle Serander – UI programming for Amp Room
Johan Bremin – quality assurance, presets
Ulf Ekelöf – 3D design
Jeff Turzo – hardware product design